Tuesday, March 15, 2011

Happy Birthday "Color Me Creative Classroom"!


Color Me Creative Classroom
is celebrating a “BIRTHDAY’! Starting on March 15th, 2011 we will be celebrating with daily fun activities and wait until you see the grand prize!!! Anyone can participate – you just sign in and you are ready to join in the fun.

March 15th---Kick Off Party
3 Random Prizes will be given to members of the Birthday Group just for leaving a comment there on March 15th. To join the group, click on GROUPS tab at top of site and join Birthday Group! Anyone can do it!

This is the Sketch Challenge. You will have until March 24th to create a project using any image AND must be colored with COPICS of course!


Check out Color Me Creative Classroom site for more information and details about how to win those fabulous prizes!

Saturday, March 12, 2011

The Versatile Blogger Award

Good morning! I want to extend a big Thank You to Pat at
Rubber Stamping is My Game for preshttp://www.blogger.com/img/blank.gifenting me with the Versatile Blogger Award!


Thank you! I am pleased to share the award with Pat!
I need to list 7 things about myself and send the wonderful award on to 15 bloggers that have inspired me.

7 Things About Myself:

1. I love love, love to travel. I love going anywhere and seeing new things!

2. I love reading mystery books. I plan to go to Santa Fe to attend "Left Coast Crime" - a mystery conference.

3 I will be attending Bouchercon in St Louis in the fall.... yes, another mystery conference!

4. I LOVE Asian, Indian and Thai food!

5. I love all types of craft activities and try to learn at least one new thing every day.

6. My secret dream is to get an email from Gina K someday inviting me to be on her Design Team! Her Site can be found HERE

7. I am so proud to have been selected to serve a 3 month term as a member of Suzanne Dean's first Color Me Creative Challenge Design Team. I am over the moon! Her Web site can be found at Color Me Creative Classroom Anyone can participate in activities. You just need to sign in to access all the fun activities!

And now I get to select 15 wonderful bloggers that deserve the Versatile Blogger Award!

Theresa @ Crafting the Web
Lee @ Luv Lee Stamper
Rosie @ In Rosie's Book
Sharon @ Paperfections
Linda @ Linda Marie Designs
Wini @ Looney Bug Designs
Lisa @ You Make Me Ink
Jennie @ Stamp Away the Day
Barbara @ A Time to Create
Bonnie @ The Pink Dawg House
Aletha @ AJS Designs
Julie @ Paper Pleasing
Sonya @ Appel Quilling Garden
Robin @ Robin's Rubber Room
Ignacio @ Nicecrane Designs

Thank you for this award and for the opportunity to say Thank you to all the extraordinary crafters that I have included in my link. I know it takes time to link websites but I believe it is important to recognize all the people that I spend time with - looking at their wonderful creations on a daily basis!

Friday, March 11, 2011

Let's Experiment

Copic Instructor, Suzanne Dean, creator of Color Me Creative Classroom encourages her students to EXPERIMENT. Well I decided to take today and just experiment with Copics and have fun! No pressure - if it doesn't turn out... you will understand. We must take risks and try new things in order to grow. I have a lot to learn and I am willing to share my successes and my "not so good" experimental journey with you! Alright, Suzanne is probably saying... "Don't show them ALL, Marie"!! LOL. She has a copy of my very first image I colored with Copics ! I cannot believe that I first held a Copic marker in my hand about one year ago!


Measurements:
Card Base 5.5 in. X 8.5 in.
Score and fold at 4.25 in. (This makes card for a 2A envelope)
Base Layer 5 in. X 3.75 in.
Focal Image Layer 4.75 in X 3.5

Supplies:
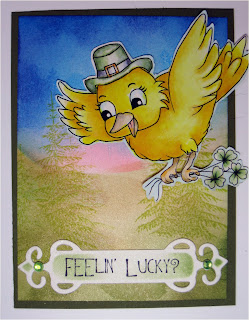
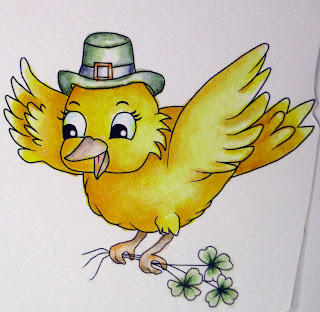
Focal Image: Digital Image by Digi Doodle Shop “St Paddy Birdie”, Backgrund image from Stampscapes, Inc called "Naure sheet #1". Sentiment GKD clled "Spring Hilidays"

Copic Markers : Y0000, Y00, Y02 Y04, Y06, YG63, G20, W3, Colorless Blender
(For background wth airbrush system: R03, B00, B03, E33, E93)

Prisma Pencil: PC1003

Card stock : GKD Pure Luxury White, Cryogen Paper for focal image.

Ink : Memento Summer Sky, Paris Dusk and and New Sprout

Embellishments: Green Rhinestones

Tools: Scor-Pal or Scor-Buddy, Paper Cutter (I use Fiskars), Scissors (Tim Holtz helps reduce pain for those with arthritis!), Quickie Glue Pen, Adhesive,large sponge daubers,
Spellbinders Nestabilities “Fancy Labels”

Tip of the Day: Did you know you can Color you background wth a Copic Airbrush System and still sponge with your Mimento Ink Markers in order to give more depth?


I know red is to be the most difficult color but I struggle with yellow. So I decided to color this image by Digi Doodle Shop called "St. Paddy Birdie". It has a lot of yellow space for my practice.


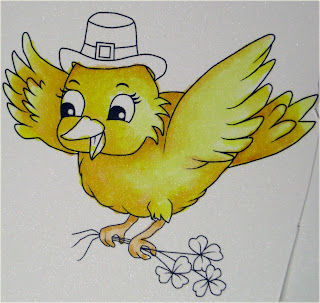
Coppics: Y0000, Y00, Y02, Y04 and Y06. I think I needed to add a little more shadow, I added YR 20. I decided to practice adding a Prisma Color Pencil to give a little more texture.


I listened to a wonderful tutorial by Suzanne Dean in her Class 3 series. She discussed using Copic markers to give the effect you are coloring with "Distress Ink". I just had to try it. YG63, G20, W3 and Colorless Blender. I used this technique on the hat and clover. I used C7, C5, C3 and C0 along with my Colorless Blender for the band around the hat.


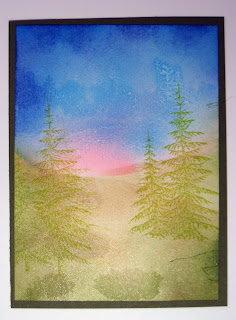
I airbrushed my background with B00, B03,E93,R03, E33 and E93 Copic markers and then added more depth by sponging the outer edges with Paris Dusk and Pear Tart Memento Ink. I watched a tutorial on using a Copic Colorless Blender on a stamp to achieve an interesting background effect. This was a tutorial from Splitcoast Stampers. I tried the technique and realized I needed to use a more solid image. It is a great technique and I will try it again... but it got lost on this background. I lightly stamped the image again with New Sprout Memento Ink.

I mounted the image on Gina K Pure Luzure "Pure White" 120# Cardstock. I cut out my focal image and adhered it to the facal backbround. I added gree rhinestones for a little "pizazz".

I hope your enjoyed this tutorial. Please stop back soon.

Hugs and Smiles,
Marie

Monday, March 7, 2011

Color Me Creative Classroom Color Challenge

Happy Wednesday morning! I am off work today and wanted to post this wonderful challenge that is in going on at Color Me Creative Classroom This cute little nursery image is the inspiration for this creative project. Isn't it just sweet?


This is my take on the challenge. Hummmm, I have a friend that is going to have a baby soon.... maybe it will be a girl!


Measurements:
Card Base 5.5 in. X 8.5 in.
Score and fold at 4.25 in. (This makes card for a 2A envelope)
Base Layer 4 in. X 525 in.
Focal Layer Label Eleven Nestabilities
Focal Image Layer Label Eleven Nestabilities

Supplies:
Focal Image: Digital Image “Bambino” by Sweet Nellie

Copic Markers E000, E01, E11, R20, R22, R000, E43, E41, E40, G99, G82, G40

Card stock : GKD Pure Luxury White, Crème de Menthe and Bubblegum Pink.

Ink : Memento Angel Pink

Embelishments: Rose, Ribbon sprayed with Copic Airbrush System, Pearls

Tools: Scor-Pal or Scor-Buddy, Paper Cutter (I use Fiskars), Scissors (Tim Holtz helps reduce pain for those with arthritis!), Quickie Glue Pen, Adhesive,large sponge daubers,
Cuttlebug or die cutter, D’Vine Swirls embossing folder and Spellbinders Nestabilities Labels Eleven, Cricut and New Arrival Cartridge for sentiment.

Tip Did you know you can color your ribbon with your copic markers in order to obtain a perfect match to your image? How cool is that!


I used E000, E01, E11 and R20 for the skintones. I used R000, R20, R22 for the cap. I added just a little R24 for the shadows in the cap. The little tassels were colored creme with E43, E41 and E40. I used G99, G82 and G40 for the Green blanket the baby is resting on.


I used my Nestabilities Label Eleven for my focal image and sponged Memento Angel Pink around the border while the focal image was stil in the frame. Tip: Secure the bottom of the image to the Nestabilities frame to prevent the image from moving while sponging your edges.


This is how the focal image looks after you remove the Nestabilities frame.


Click image to enlarge.
The focal image is mounted on Pure Luxury Bubblegum Pink paper. I sprayed an ivory colored ribbon with a pink shade of Copic marker with my airbrush (first attempt!) and attached a rose. Embellish with pearls I cut the sentiment with Pure Luzury White and Bubblegum Pink using my Cricut machine and the cartridge "New Arrival".

I hope you like this card. Please do not hesitate to contact me if you have any questions. Thank you so much for stopping by. For a real treat, check out the Color Me Creative Classroom site and see all the fun activities that are going on. We have a great bunch of Copic Lovers and we always have fun exchanging ideas, tips and just laughing and supporting each other! Also, check out the other Design Team members' sites...( listed on my sidebar)... There are a lot of beautiful cards that are sure to inspire!

Friday, March 4, 2011

Ah, How Exciting

I feel very humbled and pleased that Lisa at You Made Me Ink gifted my site with the coveted "Stylish Blogger Award". Thank you so much Lisa!


This gift comes with the rules that I must follow in order to accept this award.
Rules:

1. Thank the person who gave this award to me and link it back to their blog
2. Share 8 things about myself
3. Pass this award to 8 other individuals that I have recently discovered and am inspired by
4. Leave a comment on their blogs so that they can pass along the recognition!
5. I need to go on each of my inspiring stampers sites and tell them that I think they are all winners in our stamping world and then have them pass along an award of recognition to some other lucky stylish bloggers out there!!!

Well to start with, I would like to thank Lisa for gifting me with such a wonderful award. I love her site and would invite you to check it out Here I visit her site on a daily basis!

And now for 8 things you may not know about me: (This is hard!)

1. I have been a Registered Nurse for more years than I care to say... I am employed by Kaiser Permanente and work as a Patient Care Coordinator in an Emergency Department. I work 12 hour shifts and absolutely love helping people!

2. I spent 22 years as a Franciscan Sister in my earlier years and worked in our Franciscan Hospitals throughout the United States. Our hospitals were primarily on the East Coast and the West Coast. Our motherhouse was in Chester PA, near Philadelphia.

3. I was attending a conference in San Diego and decided to go with friends across the border to Mexico. Great fun! Right? NO. Someone bumped into me and a piece of pottery fell.... I spent the entire morning, afternoon and evening in a Mexican jail (when I wasn't in the back seat of the police car as we raced through the city on a high speed chases! LOL Finally got back across the border around midnight!

4. I adopted an adorable adult dog named Astro. He was a professional model until he lost his vision. I adopted him from the rescue society for Labs. He still poses when he hears my camera shutter go off when I am taking photos of my art!

5. I have three birds. One is called Mo Mo and she talks all day. She calls herself Baby Mo Mo when she needs love and Mo Babe when she is feeling like hot stuff!

6. I had an opportunity to go to South Africa as an International Delegate on Gerontology. After the conference I had an opportunity to go of a Safari. No one could find the elephants in the area.... I discovered they were in the back of the tree house I was staying in.

7. On the same trip to Africa, my guide and tracker took us on an early morning trip. We came across a Black Rhino that was ill. He had a wound on his face and was in a very foul mood. He stood rocking our land-rover for hours. We had to keep quiet because he could tip the Land-rover over very easily. We finally had another guide try to distract the Rhino while we took off.... hitting 50 mph in a very short amount of time.

8. I am thrilled with all my new friends i have met through surfing the web. These are 8 of the sites that that inspire me

http://rubberstampingismygame.blogspot.com (Pat)
http://anaryatelie.blogspot.com (Anary)
http://www.mypaddedcraftroom.blogspot.com (Brook)
http://fabulouscolorfulcraftsbymel.blogspot.com (Melanie)
http://scrappygmasplace.blogspot.com (Charlene)
http://ruby2shoesdesign.blogspot.com/ (Ruby)
http://tracysstampingcorner.blogspot.com (Tracy)
http://scrapbitz.blogspot.com (Suzanne - Our fearless leader)

This has been very special to receive this award..... I say with a BIG smile on my face. Thank you! I am off now to tell each person on my list just how much they inspire me!

Hugs and Smiles!
Marie

Over the Moon!

I wonder how I can say "I am so excited" in a million different languages?
Do you notice anything different on my sidebar?
Yes, Yes, Yes! I made it! I have wanted to be on Suzanne Dean's Design Team ever since she posted a Design Team Call. I was so excited when an email arrived from Suzanne with the invitation. However, she then swore me to secrecy. Do you know how hard it was to keep that secret? I wanted to shout if from the rooftop! It is NOW official! Check out Suzanne's Color Me Creative Classroom I promise you will be in for a real treat! Check out the sites from the other Design Team Members as well and see what wonderful creations they are posting for you!

You may wonder how this all started. I was surfing the web and came across a card by Suzanne Dean. I checked out her site, Scrap Bitz and discovered that she not only makes awesome cards - she has online classes on Copic markers. It all began at Suzanne's Classroom for me I started out not knowing what a Copic marker was. I started her classes... and I am now addicted. The classes are reasonable and they are soooo worth it. If you surf the web. you will frequently hear Suzannes' name referenced in the "Land of Copics".. What can I say? She is the Guru of Copics! Each class she offers has many videos and resources. I am currently taking class 3. She keeps adding more classes.. See, the possibilities are endless! You can check out her site HERE Check it out!


Tip for The Day:
I want to post a picture of how I organize my reference manual for my rubber stamps and my digital images. It is easy to have so many that you do not know what you have. This is a method I decided to use for quick reference. I have a 3 ring binder and I organize my digital images like this:


Click to enlarge image
I have since edited this page on the computer to read "Animal Digital Images" and have created a different page for Animal Stamps to use with rubber and/or clear stamps.

For my rubber or clear stamps, I take a picture of my cards and then treat the picture like a digital image. I copy it to Microsoft Word, I size it to approximately 1.5 to 2 inches and copy and label them like the digital images. I discovered the hard way that it is always easier when you are posting and want to credit the artist and company when you document the information under the image on your reference book. for my original digital images, I keep a folder in my computer under pictures and have a folder for each artist.

I hope this tip was helpful! Thank you for stopping by. Please come back soon!


Hugs and Smiles
Marie

Friday, February 25, 2011

Thinking of You

Copic Creations' has a new challenge! We are to use WARM colors. Now, that is a challenge when it feels so darn cold! We are expecting snow tonight in California!
If you would like to join in the challenge, it can be found HERE

This is the image I selected for the challenge. I also used a sketch challenge from Stamp TV for my starting point.


Measurements:

Card Base 5.5 in. X 8.5 in. Score and fold at 4.25 in. (This makes card for a 2A envelope)
Base Layer 4 in. X 525 in.
Focal Layer 3.5 in. X 4.75 in
Focal Image Layer 3 in X 4.5 Cut the 3 inch segement into 3 1 in. strips


Supplies:

Focal Image: Digital Image by Just Inked “Cocker Spanial Pup


Sentiment: GKD/Theresa Momber "Life is Good"

Background Image: Gina K Designs/Theresa Momber “Farm Life”

Copic Markers: Y00, Y21, YR21, YR23, YR16, YR18, E000, E19, G40, YG63, G28, V02, BV17

Card Stock : Cryogen White, GKD Pure Luxury in White, Pumpkin Spice and Chocolate Kiss

Ink
: Memento Black, Cocoa, Rhubarb Stalk, Yellow Dandelion, Cantaloupe,

Tools: Scor-Pal or Scor-Buddy, Paper Cutter (I use Fiskars), Scissors (Tim Holtz helps reduce pain for those with arthritis!), Quickie Glue Pen, Adhesive,large sponge daubers, brayer, Cuttlebug or die cutter, Forest Branches embossing folder and Spellbinders Nestabilities Fancy Labels.

Embelishment: Ribbon

Tip: When you score your card base make certain you place another piece of paper over the top of the card prior to scoring to achieve a crisp fold without getting unwanted lines on your finished card.

Tip 2: You will save a lot of blood, sweat and tears if you select your cardstock and designer paper prior to coloring your focal image. You may find you want to alter the Copic Marker shades or ink media based on your available paper. This is a taken from someone who did not always follow this rule! LOL!


I used Memento Ink and a brayer to set my background. I stamped the background with GKD image from "Farm Life"


This adorable image is a digital from Just Inked called "Cocker Spaniel Pup" Doesn't he just look like he is so sad and missing your soooo much?! I colored the image with Copic markers and paper pieced the image over my background.


I applied ribbon and embelishmentst I used Fancy Labels for my sentiment.

Thank you for coming by and please stop by again soon. Leave a comment and let me know you were here ad have a great weekend!

HUGS AND Smiles,
Marie

Thursday, February 24, 2011

Tranquillity

This is another beautiful image by NICECRANE DESIGNS. I think the image is so beautiful and just makes me feel so tranquil. In these times, we can use as many tranquil moments as we can get! I used to live in Colorado on a lake that had frequent visits from two gorgeous swans. I couldn't help but remember Phoebe and Cecil (the names I gave them) and remember how many beautiful moments they gave me. I remember how worried I was when they needed to fly south for the winter. I said many prayers that they would make it safe and sound.


Measurements:
Card Base 5.5 in. X 8.5 in.
Score and fold at 4.25 in. (This makes card for a 2A envelope)
Base Layer 4 in. X 525 in.
Focal Layer 3.75 in. X 5 in
Focal Image Layer

Supplies:
Focal Image: Digital Image by Nicecrane Designs/Illustrator Ignacio Molina

Copic Markers: R000, R00, R11,B0000, B000, B32,YR000, YG91, YG95, YG99,
C0, C1

Card stock : GKD Pure Luxury White, Purple-Blue and very light skin toned paper by Bazzil

Ink : Memento Summer Sky, Bahama Blue and Paris Dusk.

Embellishments: Pearls

Tools: Scor-Pal or Scor-Buddy, Paper Cutter (I use Fiskars), Scissors (Tim Holtz helps reduce pain for those with arthritis!), Quickie Glue Pen, Adhesive,large sponge daubers, Tim Holtz paper sander to smooth paper edges after cutting. Cuttlebug or die cutter), small corner paper punch (1 inch circle punch will work if you do not have a corner punch), D’Vine Swirls embossing folder and Spellbinders Nestabilities Large Labels die.

Tip: When you score your card base make certain you place another piece of paper over the top of the card prior to scoring to achieve a crisp fold without getting unwanted lines on your finished card.

Tip 2: You will save a lot of blood, sweat and tears if you select your cardstock and designer paper prior to coloring your focal image. You may find you want to alter the Copic Marker shades or ink media based on your available paper. This is a taken from someone who did not always follow this rule! LOL!


Copic Markers: R000, R00, R11,B0000, B000, B32,YR000, YG91, YG95, YG99,
C0, C1


I cut the image out with Spellbinders Nestabilaties Large Labels. I mounted the image on a purple-blue card stock and realized I needed to darken the sky. I added Memento Paris Dusk.


Hugs and Smiles
Marie

Wednesday, February 23, 2011

Mark Twain Remembered!

The famous Mark Twain lived in Calaveras County and wrote his famous book that placed our Calaveras frogs in the spotlight. Graphic Designer, Ignacio Molina from Spain illustrated some beautiful Mark Twain digital images. Since I live in Calaveras County and have a fondness for Mark Twain, I created two cards with these wonderful images from Nicecrane Designs. You can find his wonderful creations HERE


Isn't this image wonderful? It look like he is having such a crazy, lazy summer day?


This is the inside of the card. I stamped "Tree Silhouettes" from Gina K Designs. I sponged the background with Memento Desert Sand, Potters Clay, Summer Sky, Angel Pink and Tangelo.


I really think this image is beautiful. It looks just like some of the beautiful areas around here. Living in the country does have some benefits..... miss all the craft stores ! LOL

Thank you so much for stopping by. I rally appreciate that you took the time to stop by! Please feel free to leave a comment and come back really soon.
Hugs and Smiles
Marie

Friday, February 18, 2011

Design Team Call!

Suzanne Dean, my Copic Marker instructor is having a Design Team call for "Color Me Creative Classroom". I just had to color a few cards in order to participate. How could anyone miss an opportunity like that! We needed to submit two cards or projects using Copic Markers. My first card was a gorgeous flower by Flourishes called "Thank You set 33". Now if you have picked yourself up off the floor from laughing, we will continue. I know.... it is a really strange name for a stamp but the flower is worth it! I have loved this flower stamp for a long time.


Measurements:
Card base: 8 1/2 " X 5 1/2", Scored at 4 1/4" and fold in half
Card Base Layer: 5 1/4 " X 4”
Coordinated Designer Paper: 5 " X 3 7/8"
Focal Base Layer: 3 ½ “ X 4 3/4 “.
Focal Image Layer: 3 1/4” X 4 1/4”

Supplies:
Stamp Set- Flourishes "Thank You" sett 33
Card stock- Gina K. Designs Pure Luxury "Pure Luxury White", "All Spruced Up"
Coordinated Designer Paper
Brads colored with copic markers to coordinate with paper/design
Waxed paper
Iron
Scissors, Quickie Glue Pen, Adhesive,
Copic Markers
Cuttlebug, D'Vine Swirls embossing folder
Ribbon
Memento Ink Cottage Ivy, Pear Tart, New Sprout, Tuxedo Black, Summer Sky


Copics: R000, R81, R83, R85, R89, C0, G99, YG63 and YG11
I embossed waxed paper with D'Vine Swirls and transferred it to my focal image layer with a hot iron. (Be sure your have paper in between your iron and the ironing board! Sponge Memento Ink onto the focal layer and your will see how the waxed image magically pops up! I then cut out my focal image and tied a bow that I made using bow easy.


I just love the waxed paper technique. Gina K did a tutorial on this technique and I have just loved it. It reminds me of a stained glass window behind the focal image.

My Second card was a wonderful digital image from Sugar Nellie called "Verity Standing".


Measurements:
Card base 8 1/2 " X 5 1/2", Scored at 4 1/4" and folded in half
Base Layer 5 1/4 " X 4”
Coordinated Designer Paper 5 " X 3 7/8"
Focal Base Layer Spellbinder Petite Small Ovals
Focal Image Layer Spellbinder Petite Large Ovals

Supplies:
Digital Image: Sugar Nellie "Verity Standing"
Card stock- Gina K. Designs "Pure Luxury White, Chocolate Kill"
Designer Paper
Memento Ink: Tuxedo Black, Summer Sky
Copic Markers
Ribbon
Pearls
Adhesive and Quickie Glue Pen


Isn't she just adorable? I just love her little face!


I submitted my cards today. I can hardly wait to see all the wonderful entries from my fellow Copic lovers!

I hope you enjoyed my cards. Come back soon!

Hugs and Smiles!
Marie

Friday, February 11, 2011

"We're Cool"!

Copic Creations' new challenge #43 is called "We're Cool"!. There are so many wonderful entries by so many creative people! I always learn so much from this website. There is always something new to learn for those of us that love Copic Markers! In case you would like to play along, the link is here .... Copic Creations


Measurements:
Base card 8 ½ in X 5 1/2 in Scored at 4 1/4 in and fold in half
Base Layer 4 in X 5 1/4 in
Designer Layer 3 7/8 in X 5 in
Focal Image Layer Labels Eleven Nestabilities

Supplies:
Digital Image: Sweet Nellie “Joy Sitting”
Card stock- Gina K Pure Luxury White 120#
Designer Paper
Coordinating Card stock
Copic Markers E000, E00, E01, E11, R20, C3, C5, C7, C9, BG000, BG01, BG05, BG07, BG09
Memento Ink: Tangelo
Scissors, Quickie Glue Pen, Adhesive
Rhinestone embellishments


This sweet image is a digital by Sugar Nellie and the name is "Joy Sitting". I cut the image around the legs and feet so that when I used my Nestabilities to cut the image, it would look as if she is sitting on something other than thin air! LOL! Yes, I know she looks like an angel but I didn't want to try having her sit on a cloud yet!


This is Joy Sitting with shades of violet.


Thank you for stopping by. I always LOVE visitors!

Hugs and Smiles,
Marie

Owl Always Love You

Happy Friday! This is a cute little card I made the other day. I think the little owl from Wink Wink Ink Digital is soooo cute!


Measurements:
Card Base 4 1/2" X 11", Scored at 5 1/2" and folded in half
Base Layer 3 3/4" X 4 3/4”
Focal Image and Base: Spellbinders Large and Small Petite Oval Nestabilities
Fancy Labels Spellbinder Nestabilities

Supplies:
Focal Image- Wink Wink Ink Digital - "Owlfie"
Card stock- Gina K. Designs Pure Luxury Base Weight Creme de Menthe and All Spruced Up
Scissors, Quickie Glue Pen, Adhesive,
Copic Markers E 30, E33, E35, E37, E39 Y13, Y15, Y18
Memento Ink: Tuxedo Black, Summer Sky, Tangelo, Cottage Ivy, New Srout,


I embossed the base layer with D'Vine Swirls folder. I wrapped the layer with twine and applied my focal image.


Have a wonderful weekend. Thank you for stopping by and come back soon!

Hugs and Smiles
Maire

Thursday, February 10, 2011

Furry Little Friend

As you know, I am taking classes on Copic markers from Suzanne Dean. She is now offering classes for Distress Ink. Now, doesn't that sound fun? Yes, of course I had to sign up for the class! LOL.

As with anything new.... one must practice. This is my first attempt at using distress ink. I tried to make the little bear look furry. I was a little worried about my paper. We are to use smooth watercolor paper. My watercolor paper has quite a grain to it. I tried to use it to my benefit and make it look like fur.


The little image is from Penny Johnson/Sampavie and the name is "Bear with Butterfly"

I have quite a bit of practice ahead of me in order to perfect this technique but I will have fun along the way. Suzanne will also be having a class on Prismacolor pencils soon. Yes, I will be one of the first to sign up! LOL

Wednesday, February 9, 2011

Thinking of You

Crafter's Digital Art Center is having a sketch chalenge. The illustrator of this wonderful digital image is Nettie Grooms and her shop is called Nettie G's Digital Gems. Check it out ... HERE

Everyone has such wonderful cards... The talent blows me away! Here is my entry for the challenge.


I just love the image. It reminds me of the times I would just sit and daydream at that age! OOPS... maybe I still do! LOL!

I have a week off from work. Yaaa - that means I will have time to get a few cards made. Check back soon!

Smiles and hugz!
Marie

Friday, February 4, 2011

Incredible Friends!!!


I discovered a new exciting place called "Crafters Digital Art Center". The site has new digital images by many gifted artists. The site is just waiting for you to sign on as a member and join in for challenges and fun.

This darling little image is called "Incredible Friends". As you know, digital images are the rage. They can be sized and the images flipped. The possibilities are endless! This digital image is from Nicecrane Designs and created by the very talented Ignacio. He has a passion for "Vintage" images. His website and digital images can be found.....
HERE

This a close up of the image, "Incredible Friends".


This is how I created my vintage background.


The challenge was to use this "Incredible" little image created by Ignacio and to give it a vintage look of at least 100 years. I used designer paper for the background and sponged Vintage Photo" Distress Ink around the edges. I used white ribbon and altered the color with a Copic marker that matched the color of the distress ink. W!hy invest in every color of ribbon when you can alter them with your markers? LOL OK, I confess, I alter my ribbon ... but I also have every color under the sun... You just have to have it!!! LOL


The focal image was place on the distressed background. As you can see, the altered ribbon coordinates nicely with the background and focal image. I then curled one bottom corner of the focal image with a quilling tool to enhance the vintage effect.

I hope you enjoyed my card and will stop by soon. If you haven't tried the Crafters Digital Art Center or visited Nicecrane Designs, please take the time to do so... you will be in for a treat!
Marie

Crafters Digital Art Center

I discovered a new fun site Crafters Digital ARt Center. The site has new digital stamps by many gifted artists. The site is just waiting for you to sign on as a member and join in for challenges and fun.

This is my first challenge with a wonderful Nicecrane Design by the very talented Ignacio The darling little image is called "Incredible Friends".


The challenge was to use this cute little image and to give it a vintage look.
This is a close=up of the background I used.


I sponged the designer paper with distress ink and used a plain white ribbon. I colored the ribbon (the area that would show) with a copic marker that matched the distress ink.


I am so excited. I lan to get Photoshop Elements today and I hope I improve the look of the edges of my cards for posting. I just love the way my Copic instructor, Suzanne Dean posts her cards. She makes a wonderful edge that blends and drawas the eye to the actual card without altering the original look. It just makes it look like it belongs on the screen! She emailed me the instructions on how she does this and I can hardly wait to get started!