Tuesday, December 27, 2016

Heartfelt Creations - Peaceful Woodsy Woodland Card


Welcome! 
Today is Inspiration Wednesday for Heartfelt Creations.     
We are on week 2 for the wonderful


I love this collection!   As you know from last week - we have all the fun woodsy creatures but we also have great stamp elements like this log, grass, flowers and bushes.    This fits perfectly  in the foreground for the wonderful scenic backgrounds that come with the paper collection!


Woodsy Wonderland Designer paper Collection, HCDP1-274
Woodsy Wonderland Cling Stamp Set,  HCPC 3767
Woodsy Wonderland Die, HCD1-7123
Double Dots 100 pc - 3D Foam Circles, DDots
Designer Dries Clear Adhesive, 159723
Metal Tip for Adhesive Bottles, 352854
Memento Dye Ink Pad - Tuxedo Black, TSMP900
Deluxe Flower Shaping Kit, HCST1-401
Scor-Pal Measuring & Scoring Board, 173842
Glue Pins, Pins6
Sizzix Vagabond 2, 532423


X-Press It Blending Card-Stock, Copic Alcohol Ink Markers, brown card stock, paper trimmer, double sided tape, 

Close up


  • Create a 5 1/2 x 5 1/2 inch top fold card from heavy white card-stock.     Select the blue paper from the Woodsy Woodland Paper Collection and create a base layer at 5 1/4 x 5 1/3 inches.   Select the Scenic picture as seen in the card from the mat section in the Woodsy Collection.    Cut at 5 x 5 inches.   See what a great background it makes for your card?    


  • Stamp the log, flowers, grass, leafy bushes and mouse image on X-Press It Blending Card-Stock using Memento Tuxedo Black Dye Ink.  The image is one stamp so that makes it so easy to create your focal scene!  Color   the image using Copic Alcohol Ink Products or your ink of choice.   The image was colored with flicking motions in a lateral direction.   Keeping the coloring in one direction (lateral) gives the appearance of texture and you can see the levels of bark pop up.   Sharp edges are used for the bark so avoid over blending.  


  • The following Color Combo was used for my image - 
  • Log - E00, E11, E13, E33, E35, E45, E 49
  • Grass - G40, G28, YG61, YG63
  • Leafy Bushes - YG 01, YG23, YB63
  • Flowers - V11, V09,   V20, V22
  • Mouse - C1, C3, C4


  • The image was die cut using the  corresponding Woodsy Wonderland Die.   Three additional layers were cut using brown card-stock and adhered to the back for form a thickness like chipboard.  This will add strength to the image when it's popped up from the scenic background.    The layers of the focal image were adhered with Designer Dries Clear Adhesive.  


  • The  base layer and scenic layer  were adhered and then applied to the card base using double sided tape. This adds extra strength for images that have weighted embellishments.    


  • The focal image was added with foam dimensional dots.   I love how the image pops up from the background scene and gives it dimension and texture. 


  • Your card is now ready to give to someone special!  


Thank you for stopping by and come back soon!  


Tuesday, December 13, 2016

Heartfelt Creations - Woodsy Wonderland Collection New Release


Today is inspiration Wednesday for Heartfelt Creations.   

I live in the heart of California in the beautiful foothills of the Sierras.  
I have the opportunity to see a little bit of Heaven from my back yard -  with  deer, bunnies and other furry animals coming daily to visit  my back yard.
Not to mention all the turkeys that come for dinner! 

Heartfelt Creations new release is the  


For the rest of you that love nature, this is the perfect wildlife collection!


Woodsy Wonderland Designer paper Collection, HCDP1-274
Woodsy Critters Cling Stamp Set, HCPC-3768
Woodsy Critter Die, HCD1-7124
Double Dots 100 pc - 3D Foam Circles, DDots
Designer Dries Clear Adhesive, 159723
Metal Tip for Adhesive Bottles, 352854
Memento Dye Ink Pad - Tuxedo Black, TSMP900
Deluxe Flower Shaping Kit, HCST1-401
Scor-Pal Measuring & Scoring Board, 173842
Glue Pins, Pins6
Sizzix Vagabond 2, 532423


Heavy white card-stock, green card-stock, brown card-stock, paper trimmer, double sided tape and Copic Alcohol Ink Markers. 


  • Create a 5 1/2 x 5 1/2 inch top fold card base with heavy white card-stock.  Cut a dark green base layer at 5 1/4 x 5 1/4 inches.   Select the gorgeous designer paper from the Woodsy Woodland Collection and trim at 5 x 5 inches.   Adhere the layers.  
  • Using Memento Tuxedo Black  Dye Ink, stamp the deer image on X-Press It or any Copic compatible card-stock.   Color the image with the ink of your choice.  I selected Copic Alcohol Ink Markers.     
  • Copic Color Combo
    • Deer - Y11, E00, E50, E51, E53, E11, E13, E44, E46, Colorless Blender
    • Grass - G40.  YG 05, YB65, YG 67
    • Flowers -  B29, RV09 
  • Die cut the focal image with the Woodsy Critters  Die.    Using the Deluxe Flower Shaping Kit, Lightly shape the hip, and upper leg area for a little dimension.   Die cut two images using brown card-stock.  and adhere the two brown images and colored image together using Designer Dries Clear Adhesive.  This will add a lot of strength to your image.   
  • Adhere the deer image to the lower right hand corner using dimensional foam dots.  This will pop the image up and away from the background for more dimension. 

Thank you for stopping by and come back soon!
Check out all the great projects from my "teamies"
Links on my sidebar! 


Tuesday, December 6, 2016

Heartfelt Creations Pampered Pooch Collection - Special Delivery


It's time for Heartfelt Creations Inspiration Wednesday! 
Today's feature is the 
Pampered Pooch Collection!   


Pampered Pooch Designer Paper Collection, HCDP1-275
Your Paw-fect  Cling Stamp Set, HCPC-3761
Cut Mat Create Die 2A, HCD2-751
Cut Mat Cretae Die 2B, HCD2-752
Border Essentials Die,  HCD1-783
Double Dots 100 pc - 3D Foam Circles, DDots
Designer Dries Clear Adhesive, 159723
Metal Tip for Adhesive Bottles, 352854
Memento Dye Ink Pad - Tuxedo Black, TSMP900
Deluxe Flower Shaping Kit, HCST1-401
Scor-Pal Measuring & Scoring Board, 173842
Glue Pins, Pins6
Crystal Lacquer 3D, 245125
Sizzix Vagabond 2, 532423
Flourishes Pearl White, 335866


Heavy white card-stock, olive green card-stock, X-Press It Blending Card-Stock, paper trimmer, double sided tape, Viva Pearl Pen- Salmon, small square of burlap,  70% alcohol, Copic Alcohol Ink Markers - C3, C5, C6, C9, R20, R24, E30, E33, E35, E29, G40, G43, G29, YG61,


  • Create a 5 1/2 x 5 1/2 inch top fold card using heavy card-stock.   Cut base layer green card-stock at 5 1/4  x 5 1/4 inches.  Select the designer paper from the Pampered Pooch Designer Paper Collection and cut at 5 x 5 inches.   Adhere the layers.    


  • Cut the trim on the side using the Essential Borders Die and embellish  the right side with the white pearl flourishes  as shown on the card.    


  • Using Copic compatible paper, stamp the image from Your Pawfect Cling Stamp set using Memento Tuxedo Black Dye Ink.  The image was colored using Copic Alcohol Ink Markers.  After coloring some green around the image to ground the image, apply 70% alcohol to a small square of burlap and apply to the grass for 4 seconds.  Finish the grass by flicking the Copic marker for grass and add some dotted flowers.  


  • The focal image and mat were cut using Create Mat Create 2A and 2B Mat Die.   Adhere to the card using dimensional foam dots.   Crystal Lacquer was added to the milk bottles to give  dimension and shine. 


  • The sentiment was cut from the designer appear collection and adhered with Designer Dries clear adhesive on the focal image and a dimensional foam dot on the side that pops over the designer paper.   A pearl drop was added using a salmon colored Viva Pearl Pen. 


Thank you for stopping by and come back soon!   


Tuesday, November 29, 2016

Heartfelt Creations Pampered Pooch Collection - Life Is Good


It's time for another Inspirations Wednesday with our November 
Pampered Pooches Collection!   

I am hearing so many great things about this collection.  
So many people love the little pooches!    


Pampered Pooch Designer Paper Collection, HCDP1-275
Pampered Poch Cling Stamp Set, HCPC-3759
pampered Pooch Die,  HCD1-7115
Delightful Daisies Cling Stamp Set, HCPC-3656
Delightful Daisy Die, HCD1-760
Prills - Ribbit (Bright Ideas Set), ANC852
Double Dots 100 pc - 3D Foam Circles, DDots
Designer Dries Clear Adhesive, 159723
Metal Tip for Adhesive Bottles, 352854
Memento Dye Ink Pad - Tuxedo Black, TSMP900
Memento Dye Ink Pad - Cantaloupe, TSMP103
Memento Dye Ink Pad - Olive Green, TSMP708
Deluxe Flower Shaping Kit, HCST1-401
Scot-Pal Measuring & Scoring Board, 173842
Gala Glitz - White,  12Wht
Elements  Earth Textures - Tailings, 35Tailings
Glue Pins, Pins6


120 lb. card-stock, 65 lb. white card-stock, flowers were stamped using Memento Cantaloupe Dye Ink.  The image was sponged and the petals were cut using cantaloupe card-stock,  green card-stock, X-Press It Blending Card-stock, double sided tape, paper trimmer, Copic Alcohol Ink Markers - E30, E33, E35, E42, E45, G20, YG 61, YG 63, YG69, Y00, Y01, B000, B01, YR21, YR24, RV000, RV0, BV00, BV02, C1, C3, Opaque White Ink.


  • Prepare a white card base 5 1/2 x 5 1/2 inches.  Cut the base layer at 5 1/4 x 5 1/4 inches using  cantaloupe colored card-stock.  Select paper from the pampered Pooches Collection and cut at 5 x 5 inches.   Adhere the layers using double sided tape. 


  • Using Tuxedo Black Ink, stamp the image of the puppy in the suitcase onto X-Press it Blending Card-stock or any Copic Compatible paper.  Color your image with the ink medium of your choice.  I used Copic markers.   Die-cut the image using the coordinating Pampered Pooch Die.   Fold the luggage so the lid pops up some and adhere the  bottom portion of the image to the card using Designer adhesive and pop the lid up a little with Dimensional Dots.   


  • The  leaves from the Daisy collection  were stamped on green card-stock using Olive Green Dye and cut with the coordinating die.  Another leaf was cut on white and stamped with Cantaloupe.    They were lightly sponged with the ink pads and gently shaped with the Deluxe Flower Shaping Kit.   Adhere the leaves using Designer Adhesive and apply the Earth Texture Elements - Tailings to areas on the leaf.   


  • The Daisies flower petals were stamped on light weight white card-stock using Memento Cantaloupe Dye Ink and die-cut with the corresponding Delightful Daisy Die.  The edges and center was sponged with the Cantaloupe ink. The flowers were spritzed light on the back with water and shaped using the Deluxe Flower Shaping Kit.   The flowers were adhered using Designer Dries Clear Adhesive.   Ribbit Prills were applied to the center.  Gala Glitz - white was applied to the edges of the petals.   The flowers were adhered to the leaves.   


  • The sentiment was selected from the Pampered Pooch Paper Pack and adhered to the card as shown. 


Thank you for stopping by!   I always love your visit!   


Thursday, November 24, 2016

The Outlawz- Twisted Thursday Challenge -Believe!


That's right.   Anything Goes! 
Our sponsor for this month is 


I am sorry to say this is my last Guest DT creation  for Twisted Thursdays.    I have loved being a part of this great team but it is time to move over and make room for new blood!   LOL  
Having said that......   For this week, I created this little fella using a stamp from
Whiff of Joy called Penguins First Snow.    
I created some ice glaciers and heavy snow fall using a "Bokeh" technique.   


120# Heavenly White Card Stock

Navy card stock
X-Press It card stock
Double sided Tape
Stencil - Crackle
Icicle Stickles
Copic Markers
Q-Tips


Alcohol 70%

Colored Pencil
Grey
Black Colored Pencil
Copic Combo 
Penguin: C0, C1, C4, C6, C8, Y32, Y38, R20, Colorless Blender
Cap - C0, C1, R20, R22, R24, G21
Ice and Sky- B00, B01, B91, BG10


Thank you for stopping by and hope you come back soon! 


Tuesday, November 22, 2016

Heartfelt Creations Black Friday Hop


Hello and welcome to Heartfelt Creations BLACK FRIDAY HOP!


I have great news for you!    
There will be special gift package offered to some lucky person 
that comments 
on the blogs as they hop along!   
 Look at what you can will!  


  The hop begins Wednesday 23 and runs through Monday 28.  
 The lucky winner will be announced on the 
Heartfelt Creations Blog on November 30th.   
I hope you win!


Pampered Pooch Designer Paper Collection,  HCDP1-275
Fold Out Card - White, HCCFl-443-2
Fleur Border Die, HCD1-7120
Your Pawfect Cling Stamp (sentiment), HCPC-3761
Classic Rose Cling Stamp, HCPC3752
Classic Rose Die,  HCD!-7110
Designer Adhesive - Clear,  129723
Metal glue tip, 352854
Double Dots 3 D Foam Circles, DDots
Deluxe Flower Shaping Kit, HCST1-401
Scot-Pal Measuring & Scoring Board, SKU-173842
Memento Olive Grove Dye Ink, TSMP708
Memento Summer Sky Dye Ink - TSMP604


Navy card, stock, mini sponge dauber mini mister, pearl flourish, double sided tape, Misty, nesting circle die, paper trimmer,


The Fold Out Card - White, HCCFl-443-2 was selected.    This is a card base that is measures 4 1/2 inches x 5 1/2 inches when folded.  The fold out card base comes cut and pre-scored.   It doesn't get much better than that!    

The blue and green designer paper was selected from the  Pampered Pooches Collection.  The border die that matched  the curve on your flip-fold card was selected.  The border die was aligned on the designer paper and cut to fit the panels with a 1/8 inch border on sides and bottom.   A navy layer was cut for the last panel with a 1/8 inch margin.   The green designer paper with the dog collar was cut 1/4 inches smaller  on the top and side than the navy layer.   This gives a 1/8 inch border. 

The Fleur Border Die was used to cut the beautiful scalloped  border.  The layers were adhered with the Fleur Border sandwiched between the card base and designer paper.   

The sentiment was taken from the "Your Pawfect" Cling Stamp Set.   Memento Tuxedo Black ink was used to stamp the sentiment on white card stock.  A nesting circle die was used to cut the sentiment and a larger nesting die was used to create the navy sentiment mat.   The sentiment was popped up using dimensional foam dots.   

The flowers are created from  the Classic Rose Collection Cling Stamp set and coordinating die.   The roses were stamped using Memento Summer Sky and the leaves were stamped with Memento Olive Grove  Ink.  The images were  cut with the coordinating die.   The flowers were  sponged with the Summer Sky Ink and lightly misted on the back They were shaped using the Deluxe Flower Shaping Tool Kit.   The leaves were lightly sponged with Memento Olive Grove Ink.  They ere lightly spritzed with a water mini mister and highly shaped.  The flowers were adhered with Designer Adhesive - Dries Clear.   Emma Lou has a wonderful tutorial on creating roses HERE  


I love the Pampered Pooch Collection so much, I just had to create a second card for this week!   


Heartfelt Creations Products
Pampered Pooch Designer Paper Collection, HCDP1-275
Paw-fect Pooches Cling Stamp Set,  HCPC-3760
Paw-fect Pooches Die Set, HCD1-7116
Delightful Daisies Cling Stamp Set, HCPC-3656
Delightful Daisy Die Set, HCD1-760
Memento Tuxedo Black Die, TSMP900
Memento Olive Grove, TSMP70
White Embossing Powder,  RPEJ685
Designer Adhesive - Clear,  129723
Metal glue tip, 352854
Double Dots 3 D Foam Circles, DDots
Deluxe Flower Shaping Kit, HCST1-401
Scot-Pal Measuring & Scoring Board, SKU-173842
Bright Ideas Prills (Ribbit), ANC852
Elements - Earth Textures - Tailings, 35Tailings 

Other Products
120 lb white card stock, apricot card stock, green card stock,  light weight card stock, paper trimmer, nesting circle die, double sided tape, sponge dauber, heat tool, Versamark Ink, Ranger Fossilized Amber Distress Ink, Ranger Squeezed Lemonade Distress Ink, white texture paste, paw stencil, Copic alcohol ink markers, X-Press It Blending Card Stock.
  
Instruction
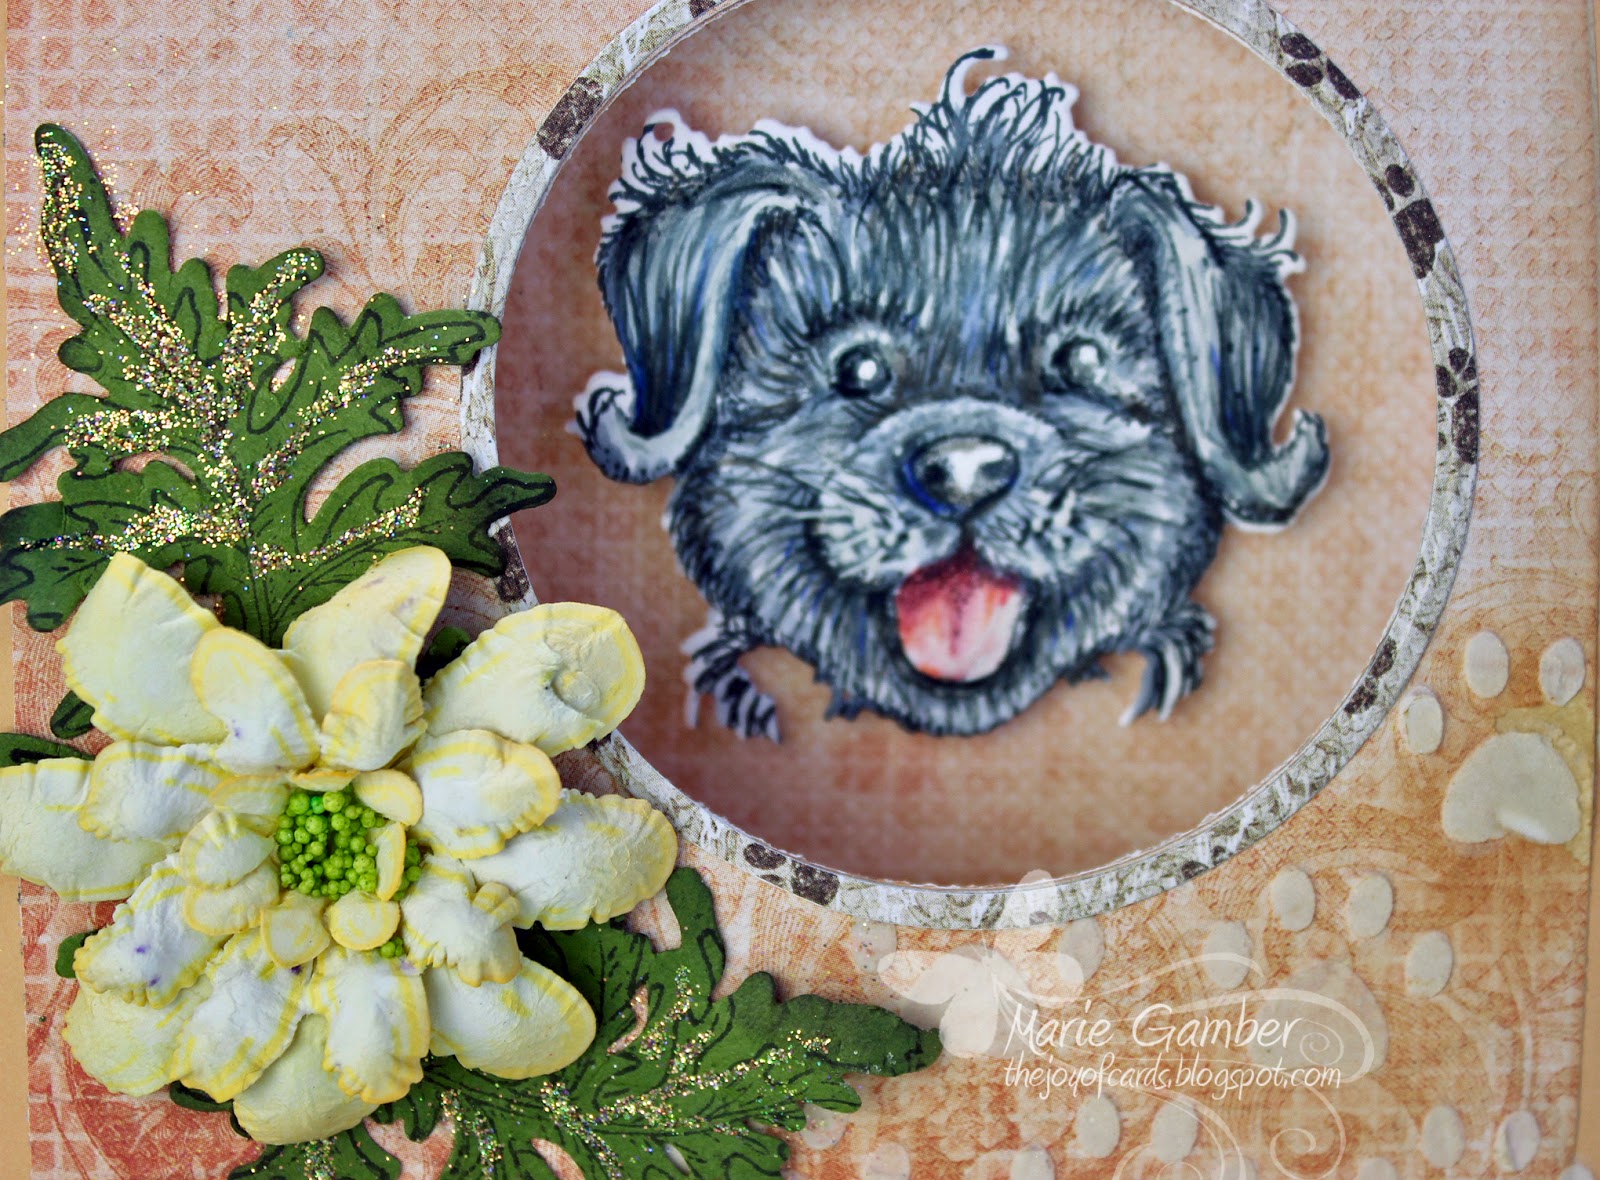
Create a 5 1/2 x 5 1/2 inch card using heavy white card stock.  I cut a 5 1/2 inch x 11 inch piece of heavy card stock and scored it  at 5 1/2 inches  using  the Score-Pal Measuring & Score Board.     The base layer was cut at 5 1/4 x 51/4 inch using  apricot card stock.  I cut this  twice.  The designer layer was  cut 5 x 5  twice.   Adhere the layers to the front and the inside  using double sided tape.  

Texture paste was  spread over the right lower corner over a stencil with a cute paw image.  I allowed the texture paste to dry.  It takes a few hours to fully dry.  If you are in a hurry, you can use a heat tool but be careful to not scorch the paste or designer paper. 

A circle nesting die was used  to  cut a circle through the layers of card stock at  the upper right hand side of the card.  I selected  designer paper with images of paws and cut a circle with two nesting die in order to create a band that would  mat the circle.   This will give it a finished look. 

The little pooch was stamped on  X-Press It Blending Card Stock using Memento Tuxedo Black Ink.   The pooch was colored using Copic Alcohol Ink Markers - C3, C5, C7, C9, R20, R22, R24.  The image was die cut using the coordinating die. I closed the front of the card flap and applied the colored  image from the front in order to center properly.  The pup's head was adhered using dimensional foam dots.  

I created a Daisy  flower embellishment.  I used Delightful Daisies Cling Stamp Set and Delightful Daisy die.   I stamped the image using Versamark Ink and white embossing powder.  The flowers were heat set.  The flowers were sponged with Fossilized Amber and Squeezed Lemon  Distress Ink.    I stamped the leaf using Tuxedo Black Dye ink.  The leaves were sponged using Olive Grove Die Ink.  

 The images were lightly spritzed with a mini mister on the underside to soften the fibers and shaped using the Deluxe Flower Shaping Tool Kit.   The layers of petals were adhered using Designer Adhesive - clear.   Prills were applied to the center.  I used the Ribbit bottle that came with the 12 pack set. Designer Adhesive - dries clear was applied to the leaves and sprinkled with Tailings Earth Textures Elements.   

The flower and leaves were applied using Designer Dries Clear Adhesive. 


An now -   It's time to move on to our next Designer.    
The next fabulous Designer for you to hop to will be
Olga Jewell  !    


Hope list in care you started in the middle!   
Marie Gamber This is Me!

Thank you for stopping by -
Now it's time  to HOP on to the following Blog

Hugs, Marie


Wednesday, November 16, 2016

Heartfelt Creations - I Wuff You


Hello and Welcome!   

It's Inspiration Wednesday for Heartfelt Creations!   
We get to play with  the Pampered Pooches Collection!   
This collection is super cute!   


Pampered Pooch Designer Paper Collection, HCDP1-275
Pampered Pooch Cling Stamp Set, HCPC-3762
Classic Rose Cling Stamp Set, HCPC-3752
Classic Rose Die, HCD1-7110
Cut Mat Create 2B, HCD2-752
Cut Mat Create 2A, HCD2-751
Ranger Embossing Powder - White -  RPEJ685
Memento Dy Ink Pad - Olive Grove, TSMP708


Heavy weight white card stock, navy blue card stock, X-Press It Blending Card Stock,  light yellow card stock,  olive green card stock, Misty,  double sided tape, paper trimmer, mini mister,  colored pencils, Copic alcohol ink markers, pink and white Bakers Twine,  Champagne Glitter Pen, heat tool  and Versamark Ink Pad 


  • The card base was cut at 5 1/2 x 11 inches heavy weight white card stock.  Using the Scor-Pal Measuring & Scoring Board, score  at 5 1/2 inches and fold away from the groove to prevent cracking.   


  • The base layer was cut at 5 1/4 x 5 1/4 inches using navy blue card stock.  The designer paper was selected from the Pampered Pooch Collection and cut at 5 x 5 inches.   I chose to cut another set of layers to adhere to the inside.  I adhered the layers using double sided tape.   The double sided tape will allow the layers to securely adhere to the card base even when heavier flower arrangements are applied.


  • The adorable pooch image was stamped with Memento Tuxedo Black on X-Press It Blending Card Stock.   The image was coloring with the following Copic Markers E11, E31, E33, E35,  E15, Y11, R20, R22, R24, B00, B21, B24, RV11, RV32, RV34, G21, YG63, YG68.  I love texture so I added brown colored pencils to the puppy on top of the Copic markers.  Avoid coloring over the pencil with your Copic markers.    I loved the bubbles that was on the image so I added a few more bubbles for fun.   


  • The focal image and mat were cut using Cut Mat Create 2B and 2A die.   I also cut an additional white mat for the inside of the card to allow space for a personal message. 


  • The Sentiment was cut from the designer paper collection.   I love that all of  Heartfelt Creations designer paper collections come with sheets of papers that have  great tags, mats and sentiments.    


  • The Classic Rose Collection was stamped on light yellow card stock using  a Versamark Ink Pad and Ranger Embossing Powder - white.  The flowers were heat set and allowed to cool.    The leaves were stamped on green card stock using a Memento Olive Grove Ink Pad.  The leaves and flowers were shaped using the Deluxe Flower Shaping Kit.   I gently misted the under side of the petals to soften the fibers prior to shaping with the tools.  Emma Lou has a fabulous tutorial for shaping the flowers HERE.  


  • Baker Twine was coiled and applied to the card using Designer Dries Clear Adhesive.   The matted focal image was adhered using dimensional foam dots.   The floral arrangement was adhered using Designer Dries Clear Adhesive.   The sentiment was applied using a small piece of the foam dot and Designer Dries Clear Adhesive.   For a little sparkle - a dot of Champagne Glitter Pen was applied to the side of the sentiment tag.  


  • Your card is now ready to give to someone special! 


Thank you for stopping by.     
If you are interested in having the Pampered Pooch Collection of your own - 
It can be found at Heartfelt Creations!   

I hope you check out the gorgeous creations by my co-designers.  
Their blog links can be found on my sidebar.