Monday, December 29, 2014

Ringing In the New Year Together - A MarkerPOP Challenge


Let's get ready to Ring in the New Year!   

I am sharing a card I created for our MarkerPOP Challenge.   Our theme is "Blue".   
I hope you will join us HERE.


Stamp

Ink


Paper
120# white cardstock

Other
Stickles (Ranger)
Blue Glitter
Iridescent Glitter Spray
Post-It Labeling Tape
Distressing tool

Copic Markers Used
Skin Tones:  E000, E00, E11, E21
Jewelry: YR 21, YR23, YR14, B000, B21, B24, B34
Glasses:  B0000, BG10
Background: C0, C1, 
Bubbles B0000, B000, V0
Wine: V01, V04, V91, V93, V95, Booo


So how did I work this theme into my card?
    
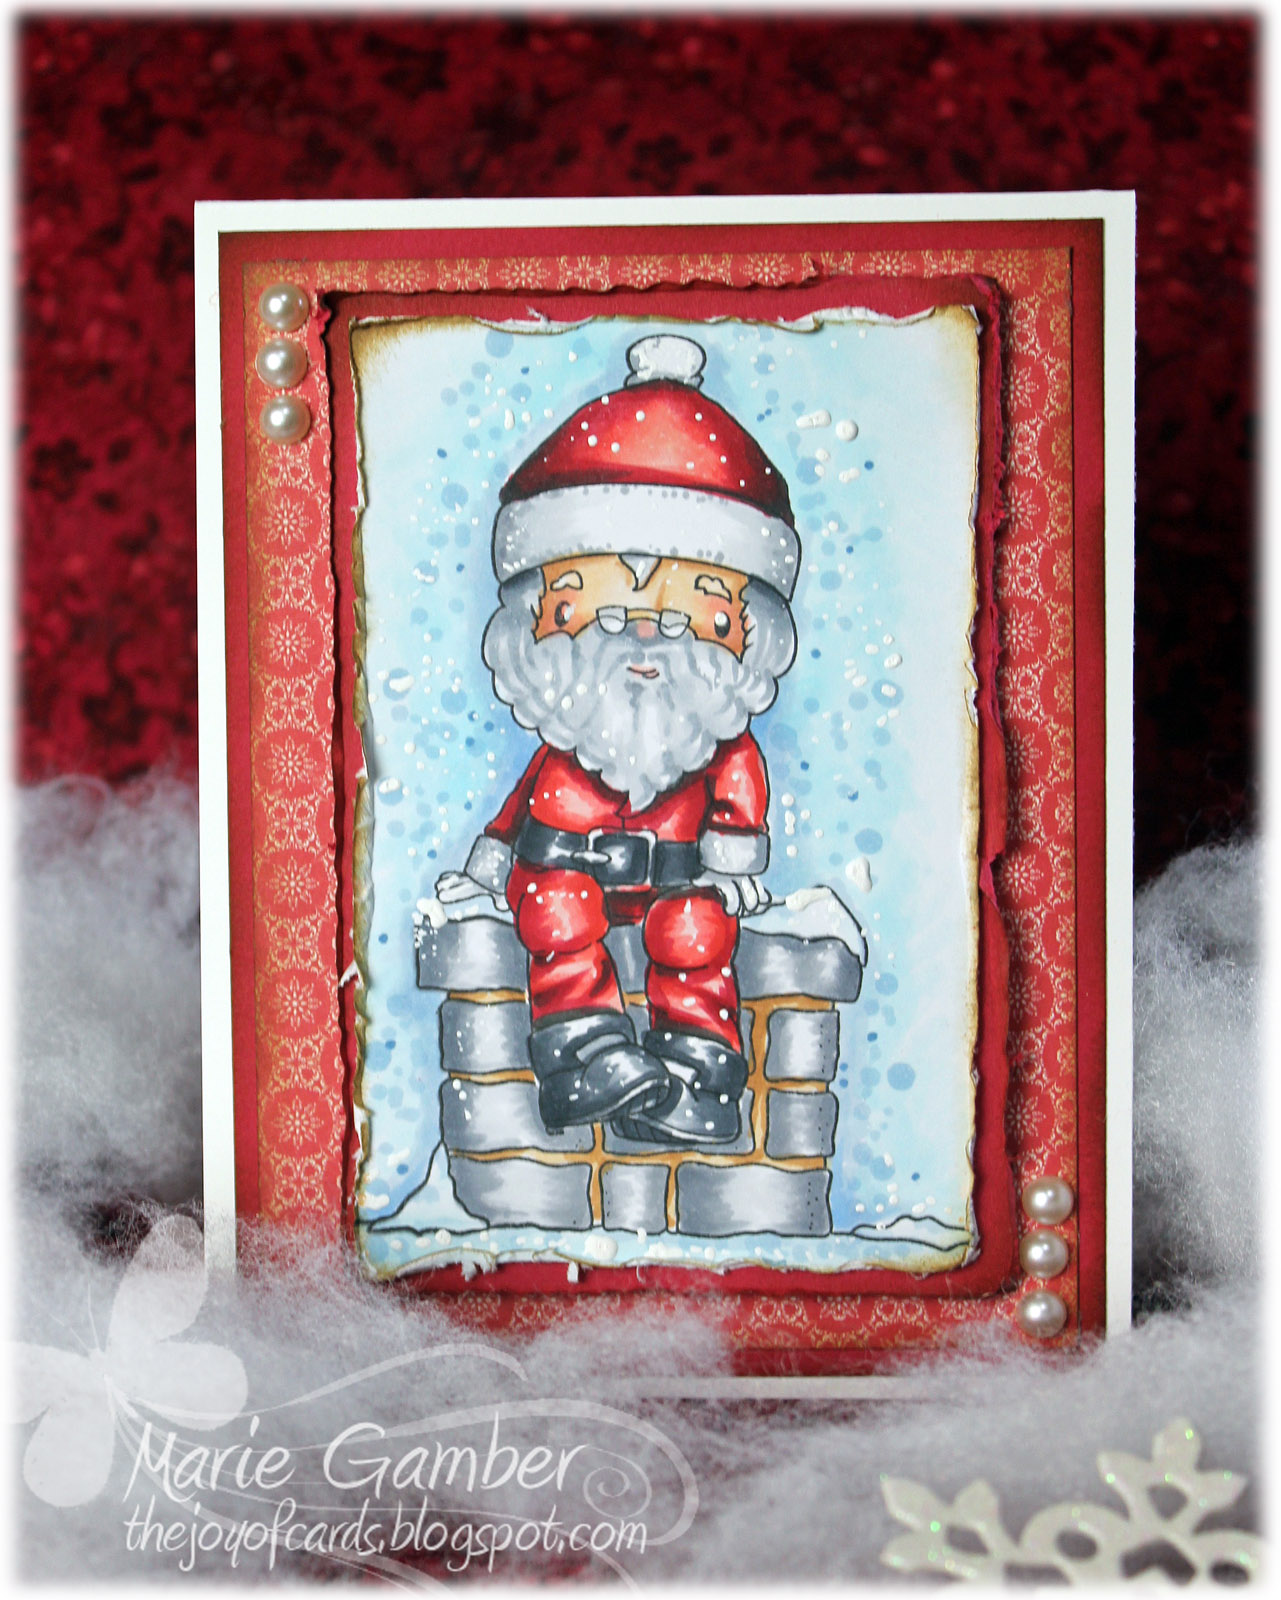
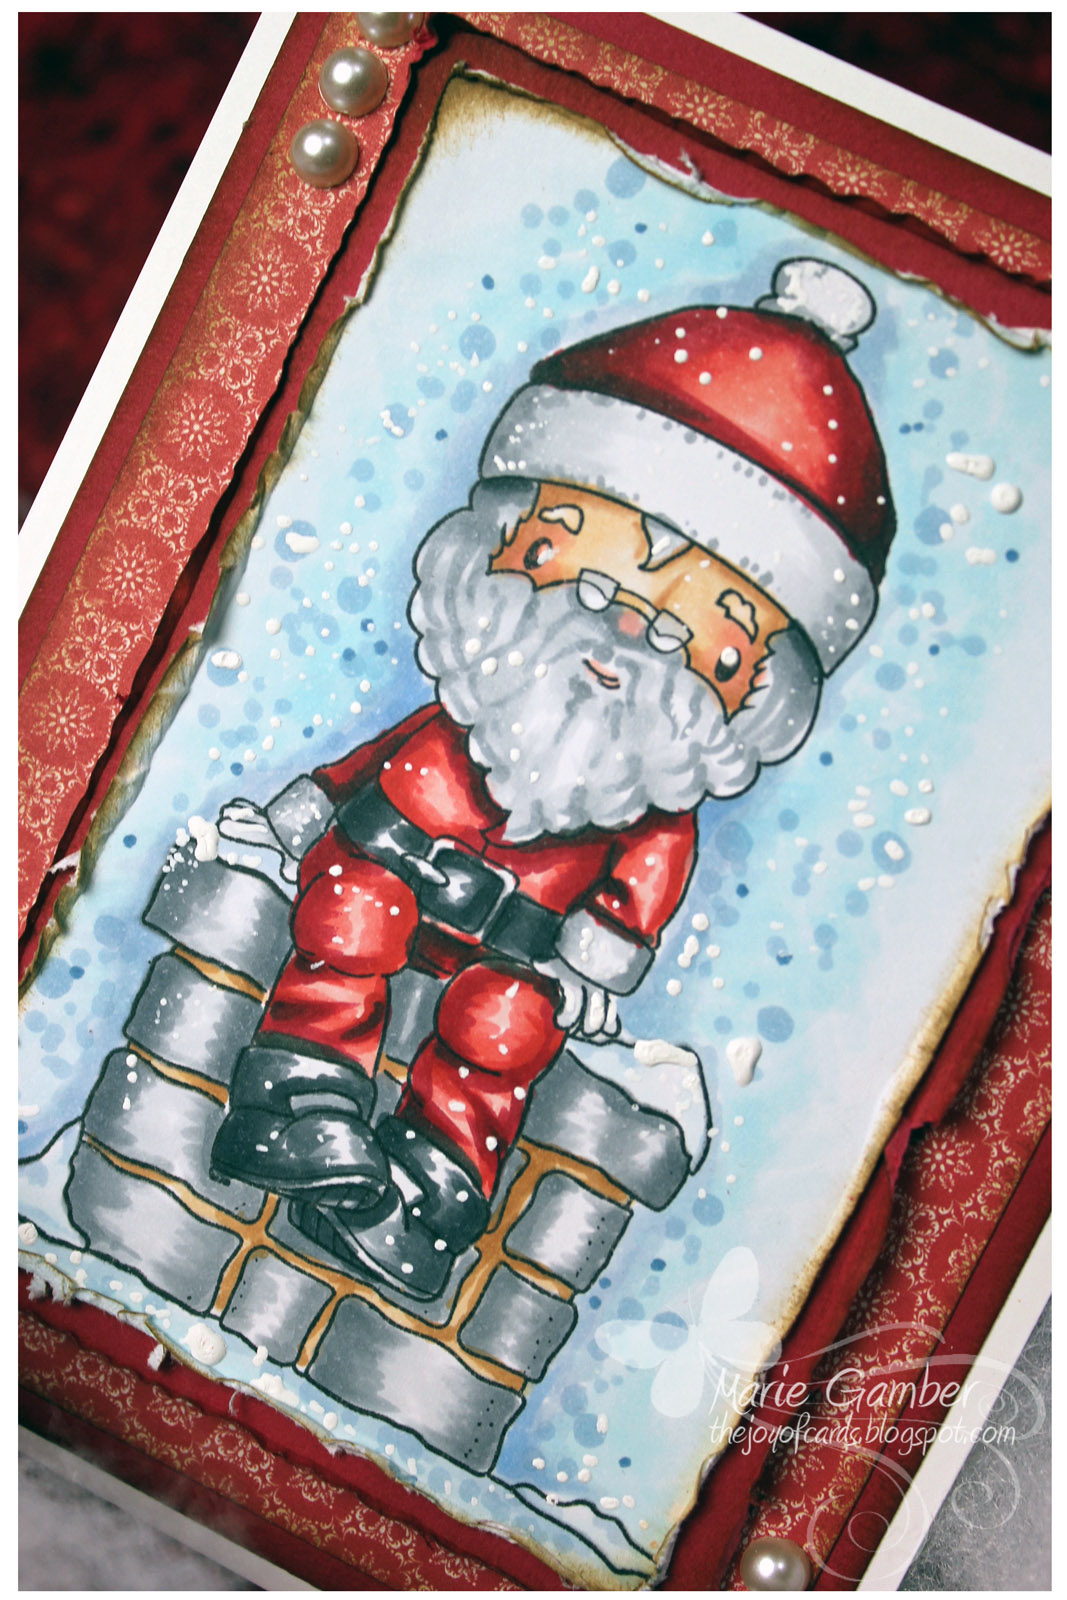
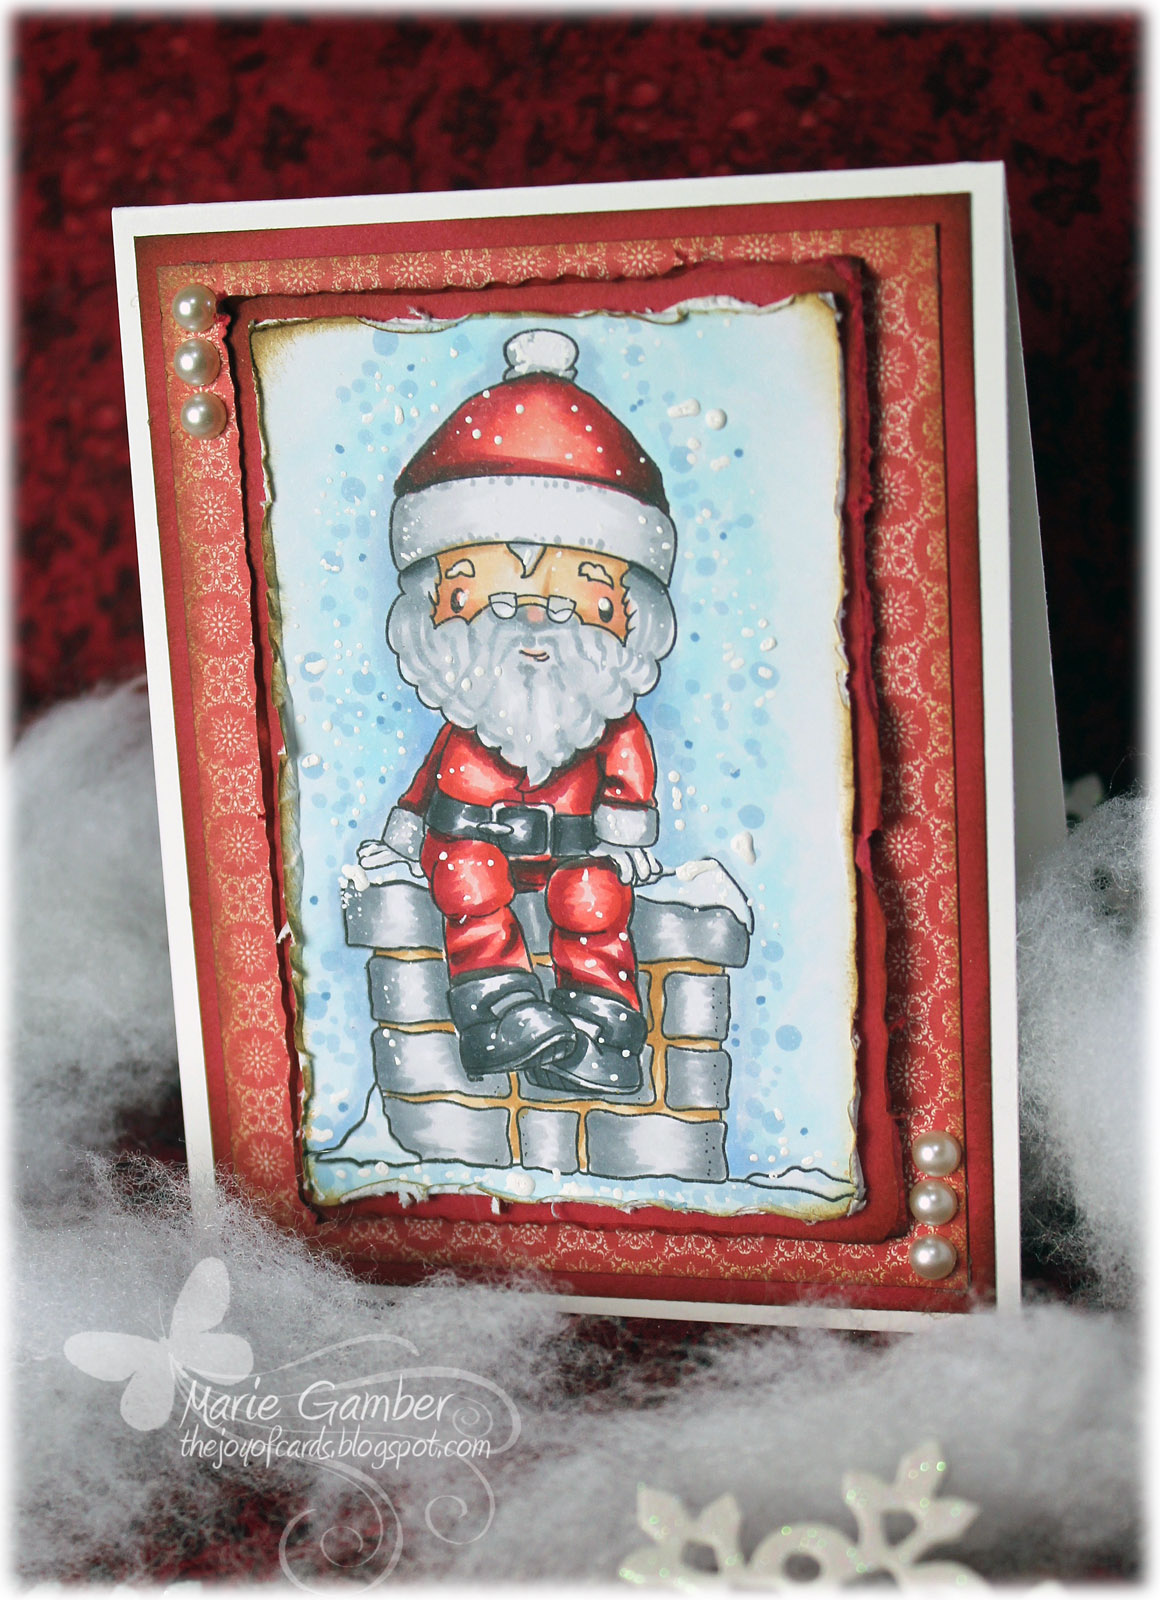
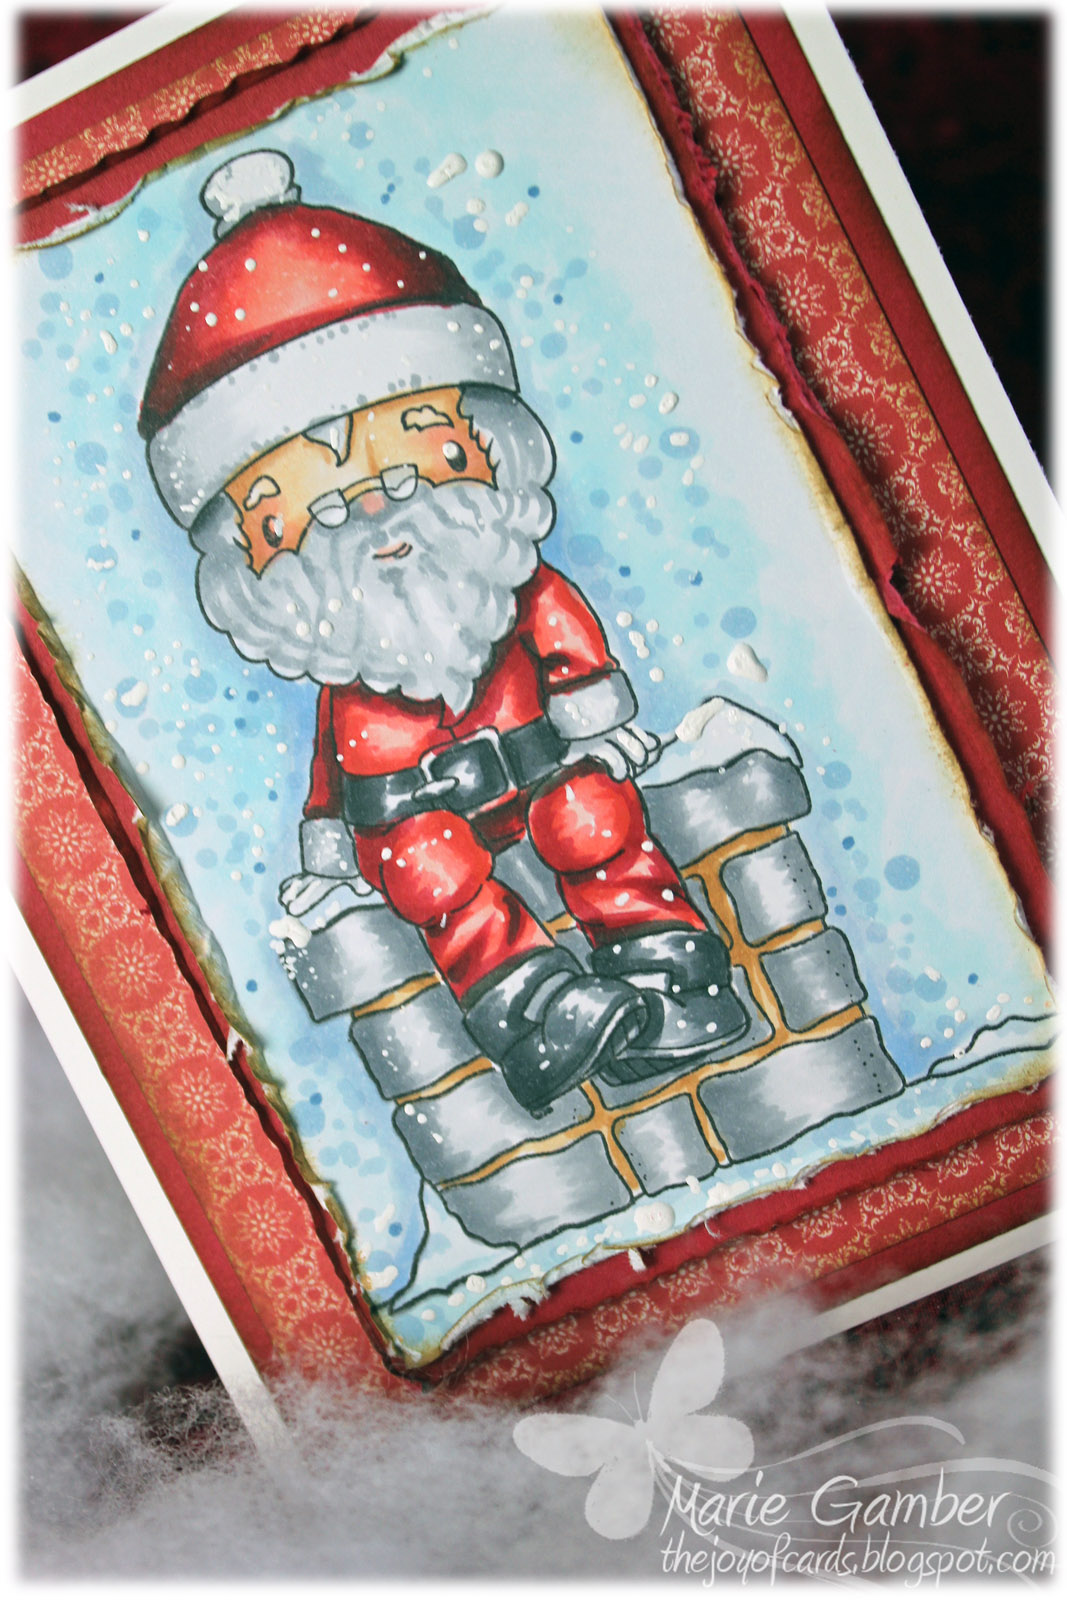
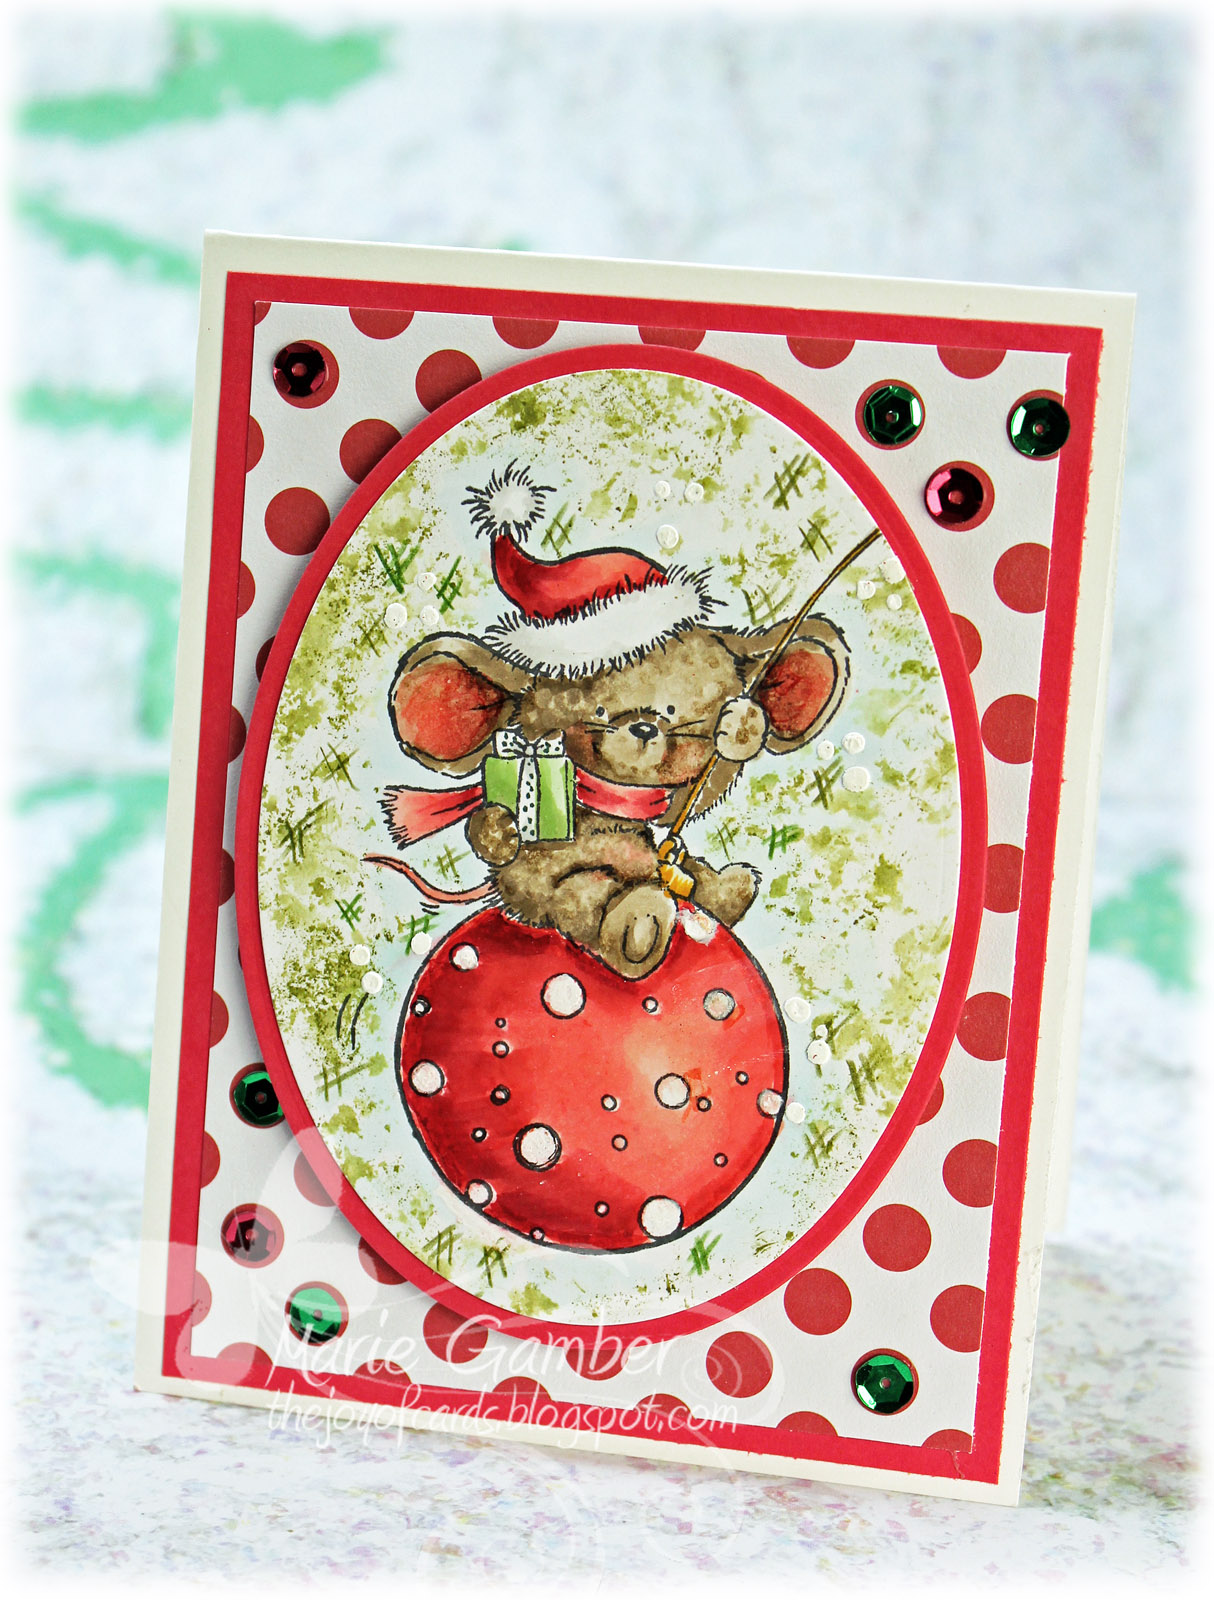
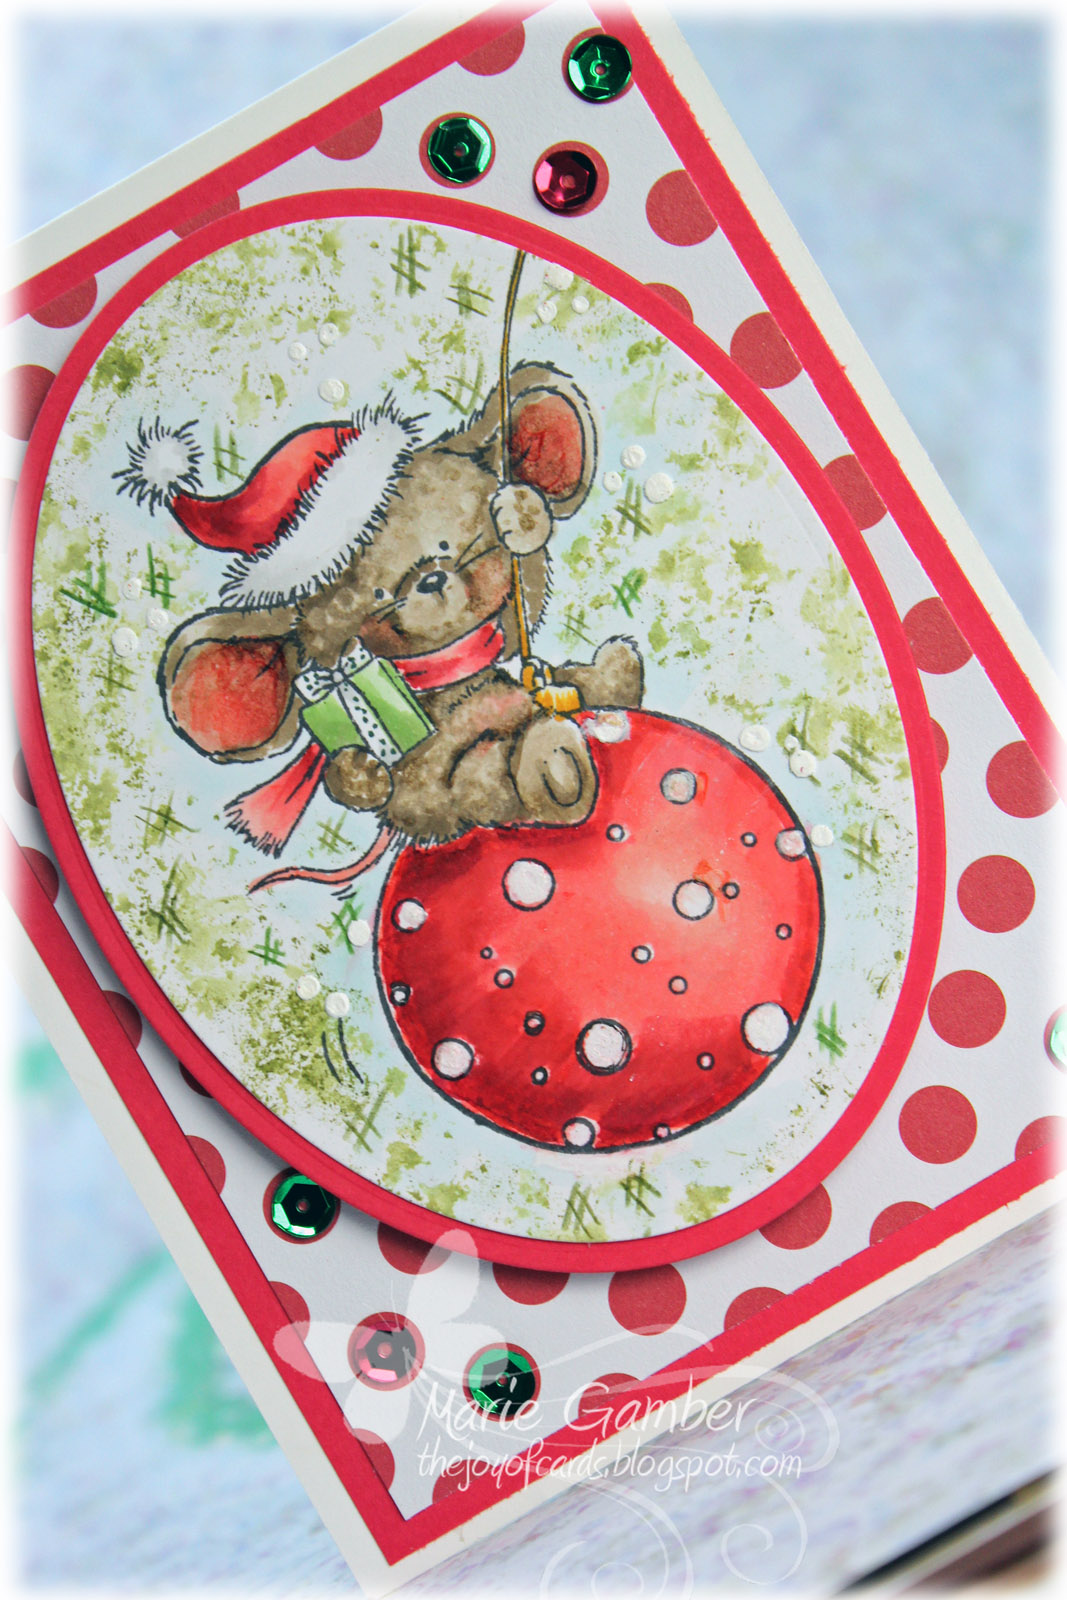
I decided to create a  New year's themed card 
and add some blue in the glasses  and the the ring.  

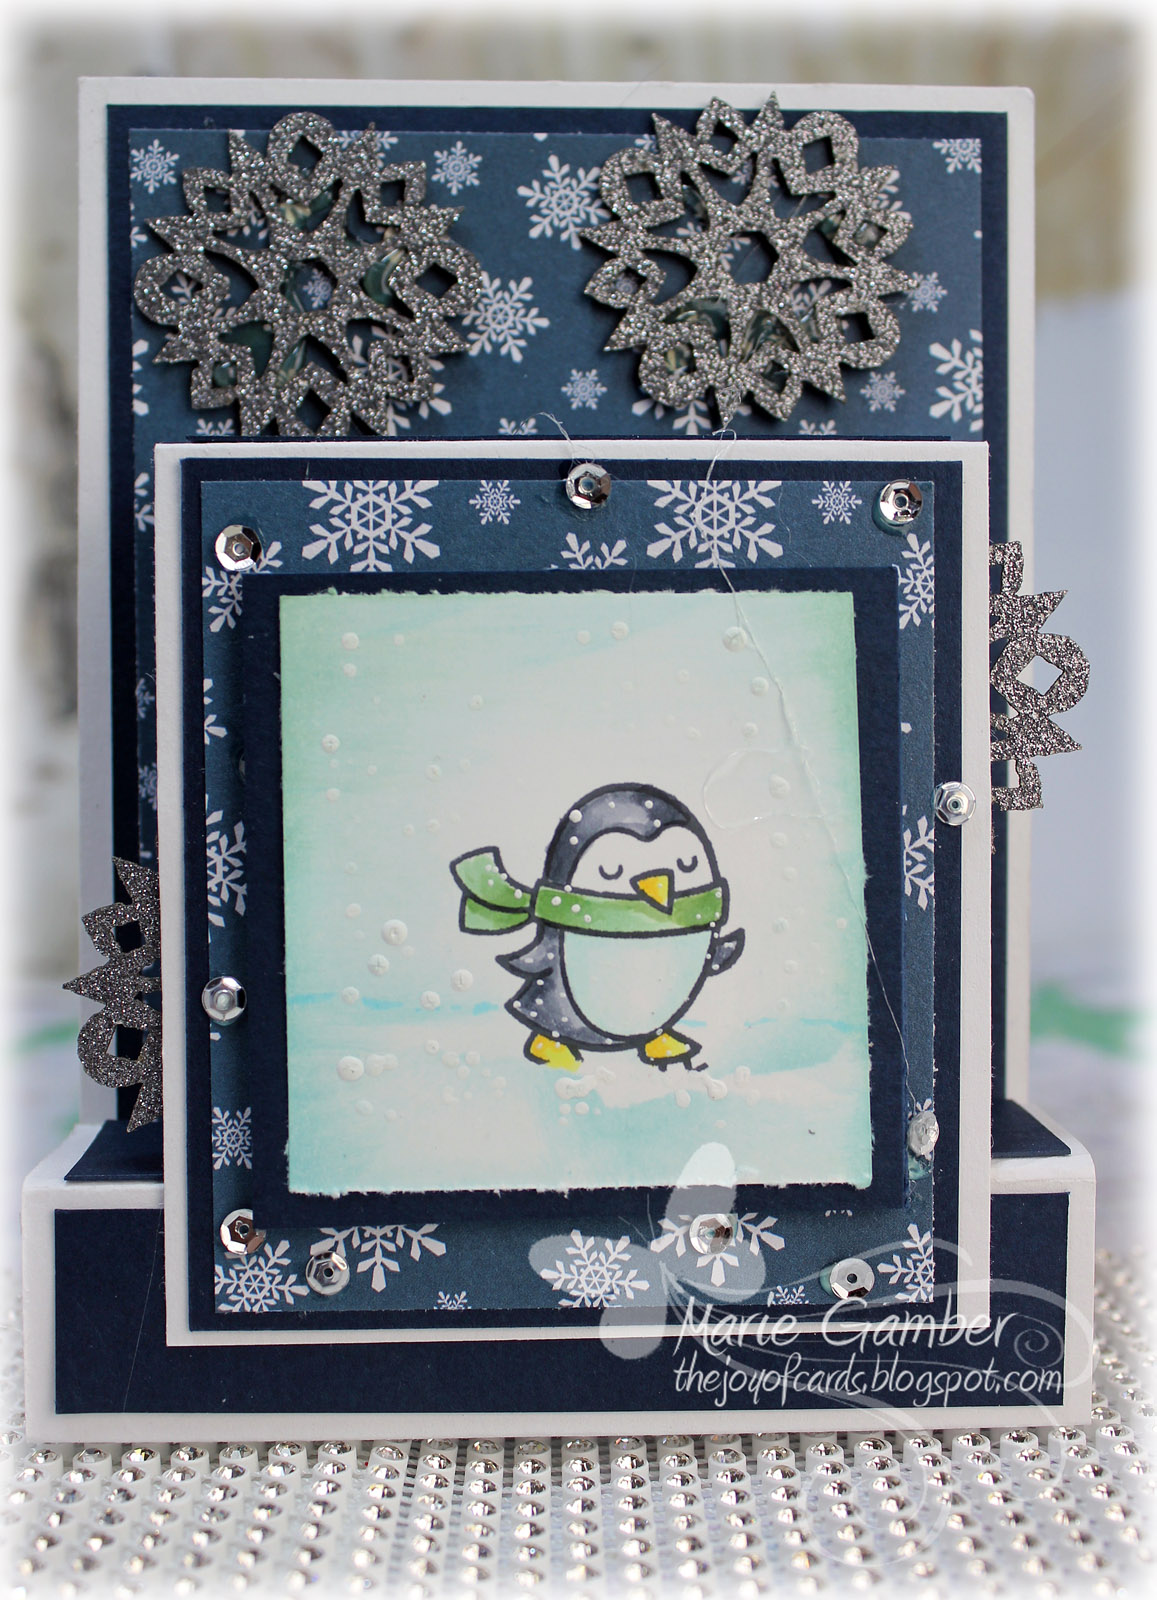
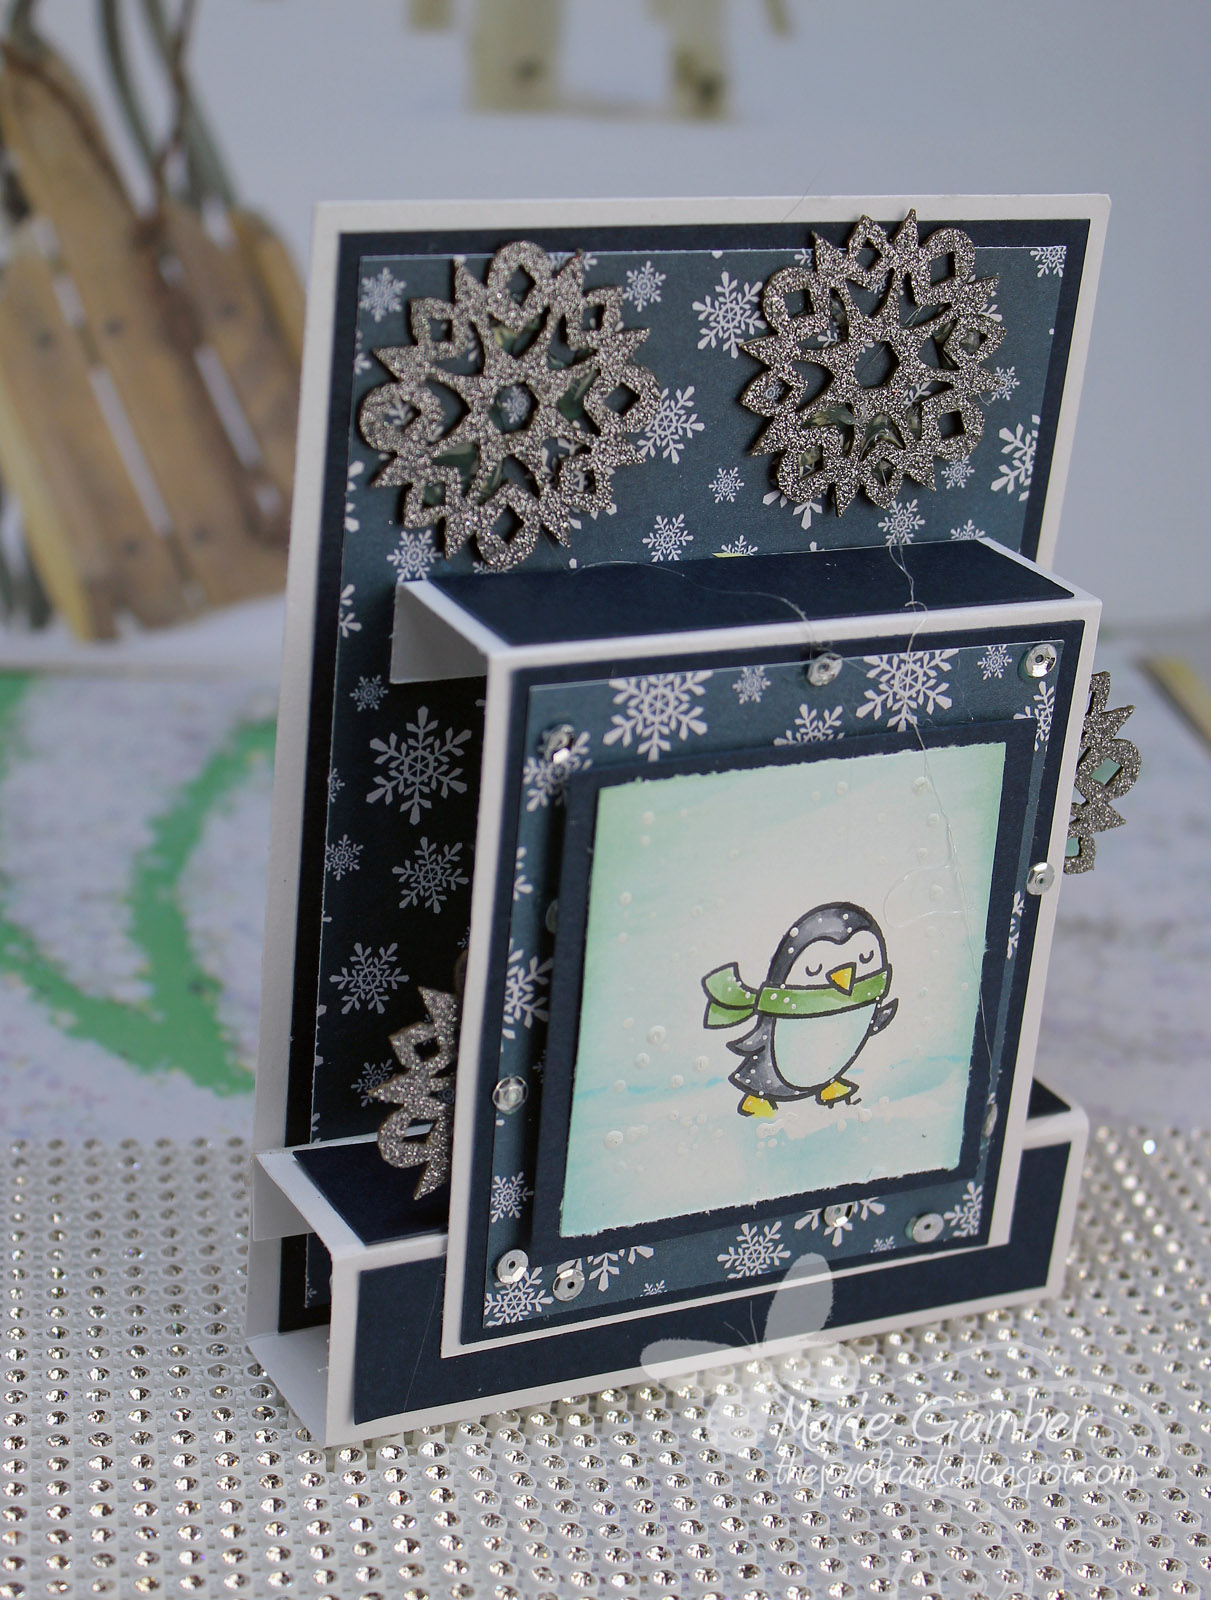
I used a  blue patterned  designer paper 
and  embellished the designer paper 
and corners of the focal image with glitter!

(Just a little something new, shiny and bright for the New Year!)

The edges of the image were heavily distressed.   

The focal image was masked and the background colored with cool grey Copic markers 
and bubbles were added for fun. 

Dots were added to the  background to represent confetti and then 
sprayed with iridescent glitter s
to give the feel of magic -
that comes with the New Year!   


This is the sentiment on the inside of my card.


Cheers to the New Year!   

Hugs,
Marie

Wednesday, December 24, 2014

Winter Song - The Outlawz - Twisted Thursday Challenge


Happy Holidays!  

I hope you are enjoying some wonderful time with family and loved ones!
I am delighted to share my Guest Designer card for 
Our challenge is an anything Goes!   

We would love to have you join our challenge!  


 I colored the image using Copic alcohol ink markers.  

 The image was fussy cut and placed on a background that I created with a  
Copic airbrushing technique.

The layers were applied and the card was sprinted with iridescent glitter spray.  

Tickles were added to the corners of the focal image.  


I hope you enjoyed this card.  

Stay safe, warm and happy.   

We hope to see you at our challenge at The Outlawz - Twisted Thursday  
See you there!

Hugs,
Marie

Wednesday, December 17, 2014

Out With the Old and In With the NEW! Masking with Post-It Labeling Tape

mp121814a

Happy Holiday's!
Marie here with a fun winter scene for you today.

Out with the OLD and in with the NEW!!!
I will share my technique for masking an image using a wonderful new product that is new to me.
In the past, I often masked images with Post-It Notes....   
No More!  
My new addiction is to mask an image with.....  
POST-IT Labeling Tape!!!

Wow -   It's super cool and easy to use!
Check out how I did it on my video.
***

My other YouTube tutorials can be found HERE

mp121814d
SuppliesChrstmas
Paper
Card Base 120# White
Layer:  Bazzill Card Shoppe Paper - Red Hots
Designer: Keepin' Cozy (Echo park)
X-Press It Blending Card
Other
Crafter's Companion Double Sided Tape
Pearls
Distressing Tool (Manual or electric)
Sponge Dauber
Stylus for Opaque Ink application
Post-It Labeling Tape
Precision scissors for cutting masking image
mp121814c
Copic Markers Used
Skin Tones:  E000, E00, E11, E21, R20
Hair/Beard:  C0, C1, C3
Suit/Hat:  R20, R22, R24, R27, R37, C5
Belt/Shoes:  C3, C5, C7
Chimney:  C0, C1, C3, C5, E30, E33
Background:  B000, B41, B91, Opaque White Ink
mp121814b
That's it for today.
Thank you for stopping by.
Have a wonderful, Safe and crafty Holiday!
badge_marie

Wednesday, December 10, 2014

Sponging a Snowy Winter Background - Basic Technique

mp121014f

Hello everyone!
Marie here with a snowy winter scene for you today!
Today I am going to share how i create a basic sponged winter background.
This will be a technique that anyone can use to create a quick and fun snowy background.

***


My other YouTube Tutorials can be viewed HERE.

mp121014c


Supplies

Paper
X-Press it
120# White cardstock - Heavenly White
 Designer:  Jack Frost (American Crafts)
 Layer:  Jelly Bean Bazzill Card Shoppe

Other
Crafter's Companion Double Sided Tape
4mm Silver Pretty Pink Posh Cup Sequins
Scor Pal
Sponging Dauber
 Stylus
Post-It note paper or light weight paper


mp121014b

The focal image was applied to a folding box card and embellished with snowflakes.  
4mm Sequens were added for a little fun embellishment!

mp121014d


Thank you so much for visiting! Come back soon!
Have a safe and Merry Holiday!


badge_marie

Creating a Folding Box Card - My Besties Project Share


I am so behind with my posting!   I promise to do better for the next year LOL    

So Here a one of the video's I created using  a folding box technique.    I just love this folding box!


This is a link from Kathryn's blog.   She has some measurements 
that are in cm and are a little different.   Check it out!   
Kathryn's blog  http://stempeleinmaleins.blogspot.it/2012/07/3d-karte3d-card.html


You can change your layer sizes to meet your needs.    
This is just an idea!  
Large Card Size
Card base 12 inches x 6 inches
Score at 1/2 in, 2 in, 3 1/2 in and a light line at 5 inches(to mark the bottom)
Mat 6 3/4 in x 5 3/4 in.
DP 6 1/2 in x 5 1/2 in
Focal base 3/1/2 x 4 1/2 
Score base of focal image at 1/2 in and 2 1/2 in.
Decrease you mat and DP olayes so you have 1/8 in around primeter.  
Add your colored image as desired. 

Small card Base
Smaller version to fit standard envelope (5 1/2 x 4 1/4 inches )
Card base 81/2 x 41/4 inches
Score at 1/2 in, 21/2, 31/2 and light line at 41/2 in.
Focal image base 5 in x 31/4 in
Score at 31/2 in and 41/2 in.
Base mat  4 x  43/4
Focal image mat 3 1/4 in x 3 in.
DP  3 3/4 x 4 1/2
Dp for focal image 3 1/8 x 2 7/8 in.
Add you colored image.   
You can place it to one side and have fun adding trees or 
other fun embellishments to the platform :D 


Happy Holidays, my friends!  
Hugs,
Marie

Tuesday, December 9, 2014

Getting Ready for the Holidays


Hello!   
Brrr   
There is a chill in the air and it is feeling like winter is here!   
I had to turn the heat up!  LOL   

Here is a Holiday video I created for you.
I wanted to share how I add deep intensity into my shadows
for my poinsettia!     
***

Can you tell I love my Copic Opaque White ink?   LOL


I tried applying a dark Red/Maroon colored fine glitter to the inside of
the petals after they were molded but before gluing them
into a flower.   
Do you like the look?   I do!

I hope you enjoyed this tutorial and come back soon!   
Hugs,
Marie

Sunday, November 30, 2014

Winter Wonderland

PT120114A
Hello everyone!  
Marie here to share some Holiday cards I created using some paper from 
Paper Temptress.   
I need to make 205 cards for our County's Social Service Department for
the children's party on December 18th.
Keep your fingers crossed I will get them done.  
I have 130 pinwheels done and 130 Reindeer Candy Canes...
now for the 205 cards
and
205 cakePOPS! 
Whew!  
PT120114D

Supplies Blue

Ink
Copic Alcohol ink Markers (Blue)
Memento Nautical Blue Ink pad
Copics White Opaque Ink
Stamp
Sentiment - Cheerful Christmas Greetings (MFT)
Christmas Stamps (Recollections)
Other
Rylynn Snowflake Craft Die
Stylus for Ink Application
Adhesive
Red/White Baker's twine


pt120114e
See how easy it is to save money and to  double  the number of cards from each die?
I was able to use the negative space from my die cut to create a
second snowflake card!    
I added various size dots using a dark Copic blue marker.

PT120114B

I added white spots of various sizes using Copic Opaque White Ink.

PT120114C

And now - three wraps with some baker's twine to add some embellishment!
This is totally optional!   

pt120114f

I created this card by stamping a sentiment on a circle die.
I colored a sprig of holly with Copic markers.
I thought this would make it look like a holiday ornament.  
  
pt120114g

I hope you enjoyed these cards.   Keep your fingers crossed that
I get my 205 cards done for the children's party!  
Have a safe Holiday Season!  

ButterflyBlueClouds

Saturday, November 29, 2014

A Magical Winter Cottage Scene

pt111714d
Hello and welcome!
Marie here with a winter card to share with you!
Although I live in California, I can still feel the change in the weather and know that winter is on it's way!
Many of my cyber friends are digging their way out from under a pile of snow all ready.
Here is a card for all of you that have the bite winter snow nipping at their nose and toes!
pt111714b
The entire card was created using paper from
Paper Temptress.
The focal image was die cut using a very light green called Sno Cone

popsnowcone-20130730162404

and the card base is a heavy weight dark green called   Green  :D  (Basis)
pt111714a
Can't you feel the bite of this snowy day?
In case you are wondering about the gorgeous die-

Cottage Cutz Elites Die - Winter Cottage Scene

Isn't it gorgeous?
I found it works great with the light weight paper.
pt111714b
I hope you have a wonderful week.
Stay safe, healthy and crafty!
Marie

Using Liquid Masking Fluid


 mp111714a

Hello and welcome!   Marie here with a holiday card to share.   
Today, I will share my technique for masking a part of an image using liquid masking fluid.  
***

You will find my other YouTube Tutorials HERE

mp111714b


SuppliesChrstmas


mp111714c

I embellished my gorgeous designer paper  North Pole  (American Crafts) with beautiful Holly-Day
Mixed Cupped Sequins for some added bling!    
mp111714a

I hope you enjoyed my tutorial and will give it a try.
Just remember.......   wash your craft painting brush off immediately! 
Be safe, happy and have a crafty day!

badge_marie 

Saturday, November 15, 2014

A Magical Snowflake Hop


WELCOME TO THE MAGICAL SPARKLES AND SNOWFLAKES HOP!

We are so grateful for all the wonderful support you have given us and to Sharri that we want to give back in return!    In addition to the Mega Prize - I will be drawing a random name from a subscriber and commenter on my Blog/and Youtube and sending a surprise gift bag as well!    So many opportunities to WIN!!!  

Here is how you can have an apportioning to win the MEGA prize!  
WELCOME TO THE MAGICAL SPARKLES AND SNOWFLAKES HOP!
1. "HOP" to each of the members listed below
2. Must subscribe to each channel and leave a comment :)
3. Watch for giveaways on their channels too!
4. When you've finished, title an email "SPARKLE!" and send to signace@yahoo.com to be entered for:

Our GRAND PRIZE!!! 
(Sponsored by Sherri Baldy and also Mai Larsen!!) Creating With Details is sponsoring a $110 Prize. Includes Gorjuss Stamp Sets, Gorjuss 6x6 paper packs, 3 Want2Scrap chipboard albums, Want2Scrap bling and nestaboard, Mini distress inks, and Kaisercraft flowers! Also, the fabulous MY BESTIES stamps and goodies by Sherri Baldy!


STORELINKS:
Sherri'sEtsy Store- http://www.etsy.com/shop/SherriBaldy

My-Besties- http://www.my-besties.com this is the same as www.inspirationalbath.com

ScrapbookStamp Society- www.scrapbookstampsociety.com
CREATING WITH DETAILS - https://www.etsy.com/shop/CreatingWit...


OUR HOP LINEUP!!

OUR HOP LINEUP!!

#1 Jen Evers  (Our coordinator)

#2 Melissa Cooper

#3 Marie Gamber

#4 Janie (Rinta) LaCasella

#5 Stephanie Rafos

#6 Tina Kucinic 

#7 Leslie Owens

#8 Bonnie Kohane
  
#9 Mai Larsen

#10  Bernadette Mares

#11 Sherry Wolfe


Hugs, Marie

Friday, November 14, 2014

Coloring Short and Long Fur

IMG_6732
Hello and welcome!
Marie here with another mini tutorial.
I thought I would color this adorable stamp with two little squirrels.
It's a wonderful Fall stamp!
Today, I will share how I color short and long fur.
***
My other Video tutorials HERE.
mp111314a
Supplies Used
Stamp
Roberto's Rascals Squirrels (CC Designs)
Paper
X-Press It Blending Card
120# card base
Autumn Song Collection (Bo Bunny)
Other
 Pretty Pink Posh Cupped Sequins - Metallic Bronze
Sea Sponge
Crafter's Companion Double Sided TapeLemonade Baker's Twine
D
istressing Tool
Liquid Adhesive
Artists Sandpaper Block
mp111314b
 Copic markers Used
Squirrels and Acorns:  E000, E02, E11, E13, E15, R20, Colorless Blender, Sepia Multiliner
Basket: Y21, YR24, Colorless Blender
Background:  Sepia Multiliner
mp111314c
Thank you so much for stopping by!

badge_marie