Wednesday, December 25, 2013

The Outlawz - Twisted Thursday: A Magical Winter Day


I just wrapped up my Christmas shift at the hospital and that means I have a few crafty days ahead of me!     How great is that!   

We have a new challenge up and rolling at The Outlawz:Twisted Thursday.   Our challenge is always "Anything Goes" but if you choose to make a single layer card, your chances to win will double!    
Our wonderful sponsor is Stitchy Bear Digi Outlet.   I love, love, love that site.  The digital images are just so adorable....   I want one of each!   LOL    


I just had to use this gorgeous image from Stitchy Bear's Digi Outlet called Red Cardinal.  I am a bird lover and my three birds would just not let me hear the end of it if I didn't use it!  It would not be a happy home!  LOL 

I used Copic Alcohol ink markers to color the focal image and background.   
Berries: R20, R22, R24, R27, Opaque white.   
Branch and legs  C000, C00, C3, Opaque white,
Background: Marbleized Copic  background  technique with B0000, B00, B71, CB and Opaque white.   


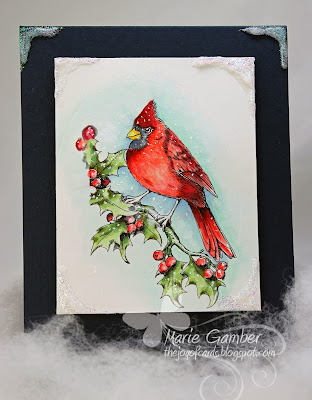
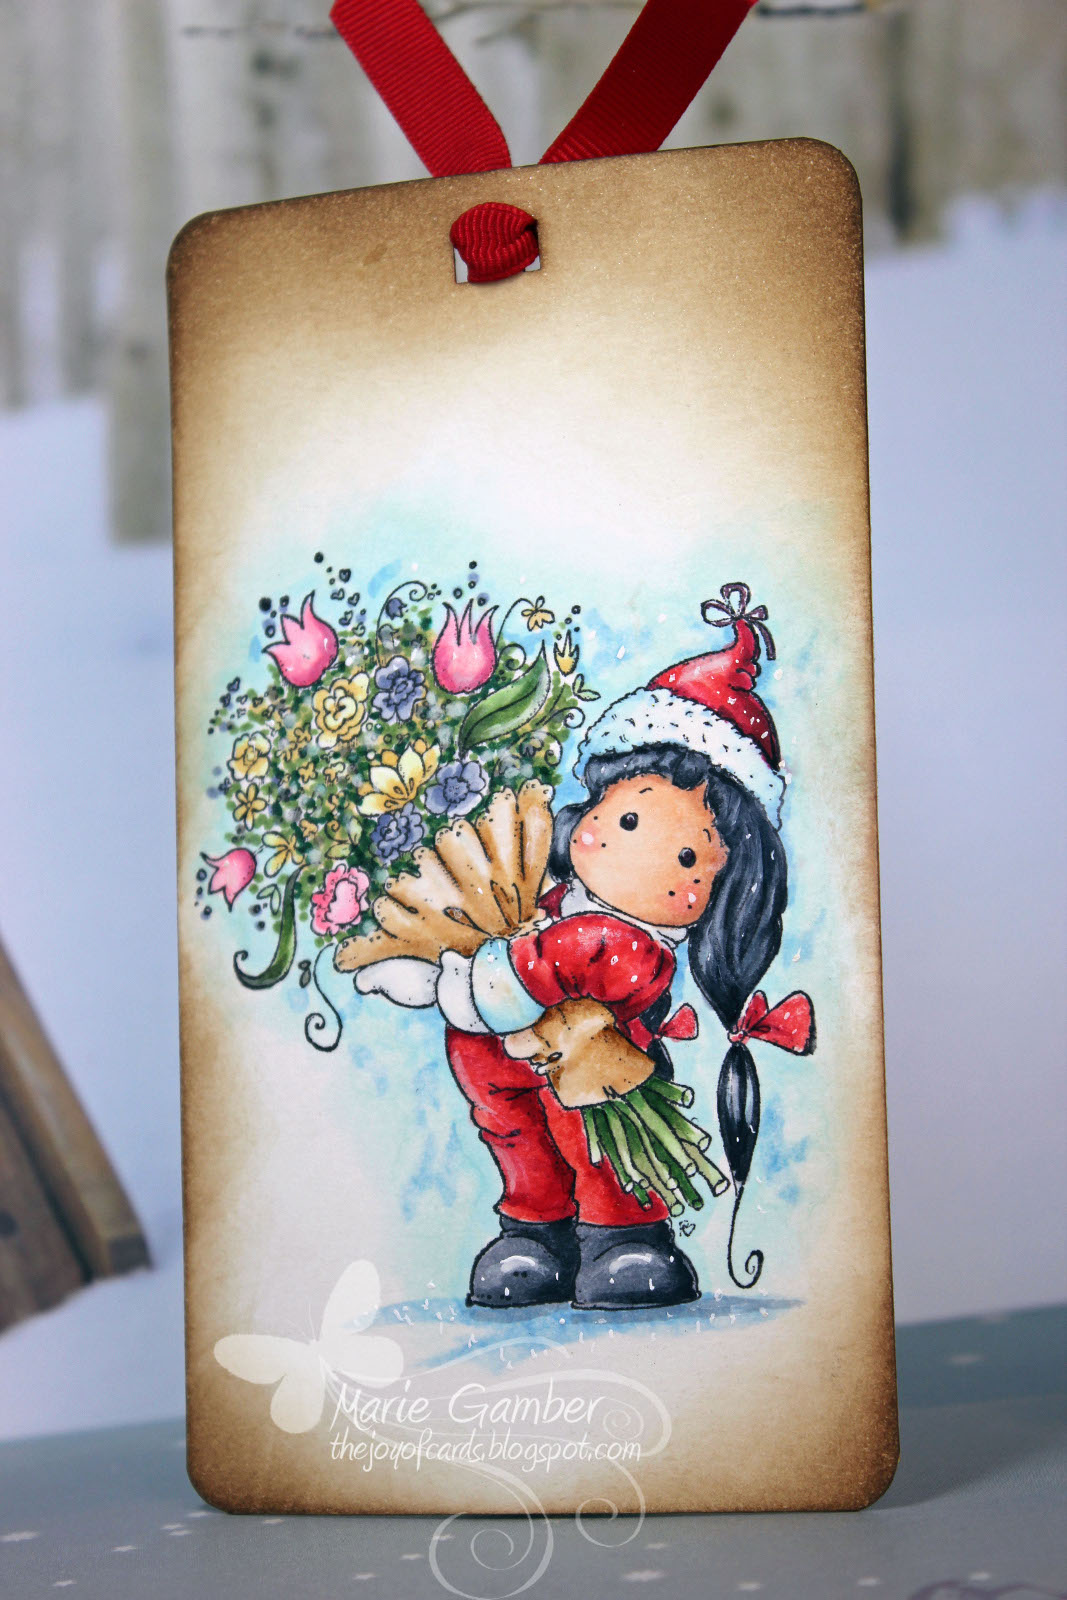
I wanted to keep the card simple so I applied stickler on the corders and then glitter dust on top.    
I just want you to know..... (as the cockatiel would say)  -  This card has been approved by three very opinionated feathered friends.   

I am linking this card to the following fabulous challenges
The Outlawz: Twisted Thursday - Anything Goes (option - single layer)
Make It Monday - Anything goes
Chocolate, Coffee and Cards - Anything to do with the Holidays

Tip/Technique Thursday
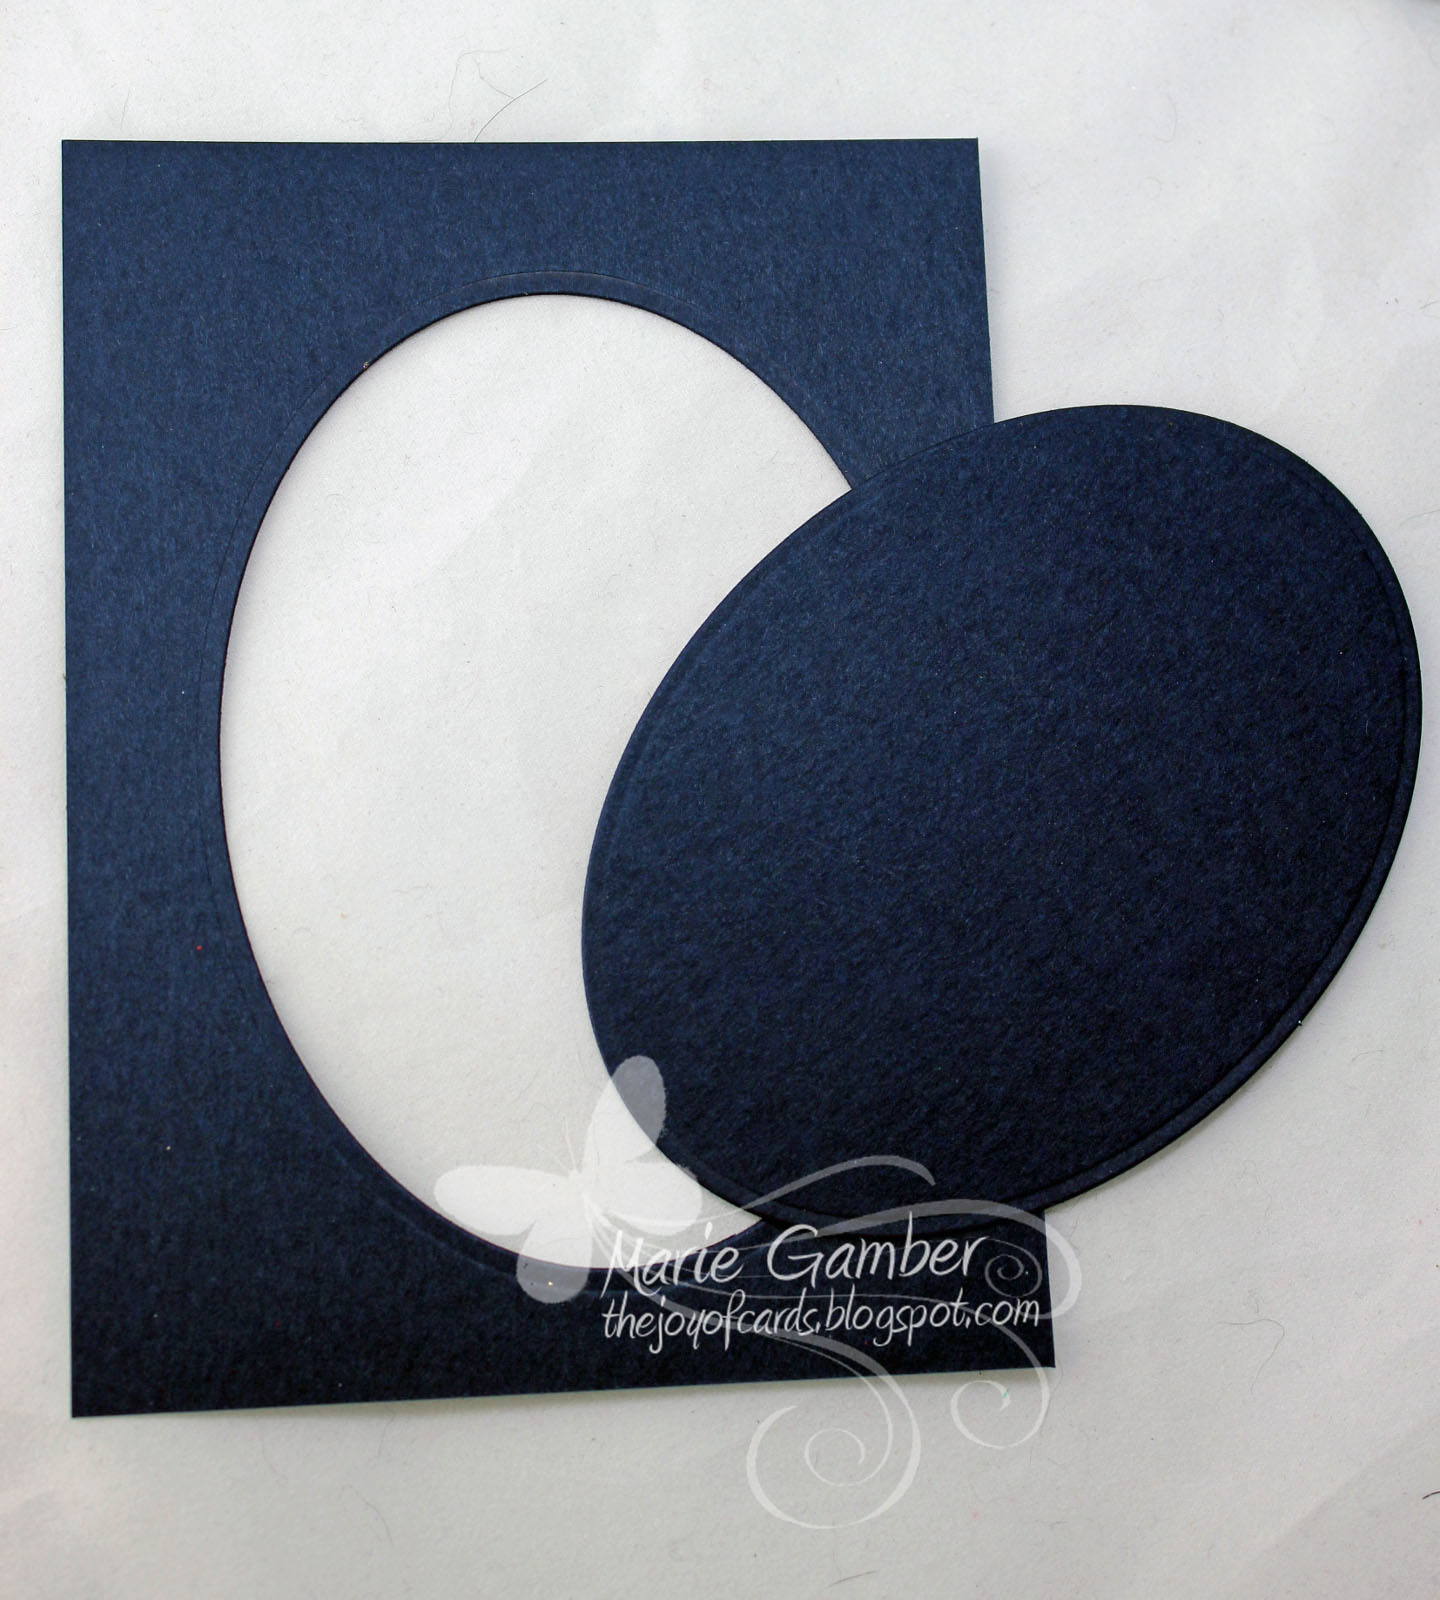
I have a little tip for you.  Have you ever had to pull out a new sheet of card stock to create your mat for the focal image?   Have you ever struggled to find the same shade of paper to coordinate with your base layer?   Take care of both challenges by cutting your mat layer from the center of your base layer. You have a perfect mat for your focal image.    You can now adhere the designer paper layer on top of the base layer and the area that was removed will never show.   Wow!  Think of how much money you will save on paper and have perfect coordination of the base layer and the focal image mat!    


Thank you for stopping by and have a safe and wonderful New Year! 
Hugs, Marie


Sunday, December 22, 2013

Our Christmas Blog Hop for Suzanne


 This post is dedicated to our 
fearless,
fabulous 
fantastic and 
fun
 "Boss Lady" Suzanne Dean!   

            Merry  Christmas  Suzanne! 

Hi everyone!!  It's almost Christmas and though we all have family and friends we enjoy spending time with at this time of the year, we also have family and friends that we don't see or visit with often enough but still mean just as much to us!  Color Me Creative Challenge Design Team wanted to take a moment to send a big HUG and a special thanks to our fearless leader, Suzanne Dean.


I know I have said this before
But I will say it again! :D   

For those of you who may not know Suzanne,  she  created a wonderful on-line classroom for learning to use Copic Markers.  The link can be found at Color Me Creative Classroom  The classroom quickly expanded to Distress Inks, Prisma Pencils and Magnolia Images and Creative Backgrounds. 

Some of the fabulous classes Suzanne teaches are:  
Class I :  Wonderful "Must Have" Resources, Colorless blender, Highlights, Shading, Skin Tones, HairClothing and various  Color Combos

Class 2: Shadowing Images and Grounding images, Using the Colorless Blender, Light and Shodows (where to begin), Basic Shading and Highlighting, Coloring White and Black, More combos, Feathering Technique, Coloring Wood Tones and Coloring Hair and appropriate shading, Creating New Colors with Two Markers and Using the Multi-liner

Class 3:  Advanced Shading and Highlighting/Contrasts, Flicking Method of Blending, Landscapes, Reds/Dark blues/ and Browns, Metallic Tones, "T" Copics, Fur and Texutes, Spica pends, Products that enhance Copics, Copic Distress Ink Effect, and Pastels 

Class 4: Large Background areas, Flowers, vintage, Sheer Items,
Airbrushing, Refills to Create Backgrounds, Fabric and other cool tricks and tips.

Class 5:  Layering Copics, copper, Patina, Terracotta,  Rust, Tie Die, Hispanic Skin Tones,  Hispanic Hair,  Hot Pink, Animal Prints, Birds/Wings, More about Folds, Hair (Advanced) and Fur.  

All About Hair:  Covers a total of 14 videos): Dread-locks, Large big hair, boy's hair, braids & ponytails, super curly hair wavy hair, black hair, ethnic hair, all hair colors and tones, hair w/o lines, spiky fun hair and more.  

This list doesn't include everything...  but .....Where to begin???   At the beginning!   Every  class is jam packed full of learning opportunities!     This wonderful classroom can be found at:

I started my journey 3 years ago  when I found Suzanne's wonderful classroom  and I have learned so much!   I never had a Copic Alcohol Ink Marker in my hand before...  and Suzanne was patient and helpful EVERY STEP OF THE WAY! I am proud to be a Senior Design Team member for Color Me Creative .  We have a fun group of wonderfully talented women  and have a great time with our challenges.  Each challenge provides the opportunity to put those wonderful new  skills to use! 


Thank you Suzanne for all you do 
and
 all you ARE! 
This is my card I created - Just For YOU! 
I hope you like it!   
   Our cards are posted here so we can share the fun with you 
and 
then they will "wing" their way to her home!

So here's to you, Suzanne... we love you, your crazy ways and think you are just like family to  each and every one of us.   We love you, Suzanne and you are our inspiration! :D 

And now...head on over to Michelle Spera and enjoy the awesome project she is sharing with Suzanne.  If you entered our Hop in the middle, you can start at the top of our list and work your way through the wonderful inspirational blogs!    Happy Hopping...

Thanks for stopping by and sharing our little Blog Hop with us.    We hope you  have a Very Merry Christmas and that you  are enjoying your memories and treasured times with  family and friends!


We love you, Suzanne 
and thank you for another fabulous year 
with the CMC DT "family"!!


I am linking this card with the following amazing challenges


HAPPY HOLIDAYS EVERYONE!!!!
Hugs, 
Marie

Thursday, December 12, 2013

The Outlawz: Christmas Lights

TT121213a

Hello and happy Thursday!     Wow!   The HOLIDAYS are here and there is a lot of hustle and bustle!    I need to make 100 crds for our county”s Foster Children… due by the 18th.  I guess you know why I will be doing for my days off this week!   I am going to start early and when Christmas is over… I am just going to keep making Christmas crds so I will have them done early!    LOL   Think it will work?    :D (Big Grin)   I also am making 100 reindeer candy canes and 4 batches of cookies and two cakes.    And then….   I have my own Christmas party at work.    LOL

Our challenge at The Outlawz: Twisted Thursday is up and running.    Our theme for this week is  “SNOWFLAKES”   Our wonderful sponsor is Stitchy Bear and her digital images are fabulous!     
Sticky Bear

Tt111212c
Techniques:
  • Copic Ink to Paper, 
  • Copic Tip to Tip Inking
  • Creative Background:  Copic Marbleized  
  • Creative Baackgrund Fun and Whimsical with Stencil

Supplies and Tools
Image: Christmas Lights (Stitchy Bear)
Medium:  Copic Sketch Markers, Copic Opaque Ink, Tim Holts Vintage Photo Distress Ink (Ranger), calligraphy ink
Paper: Cryogen (Curious metallic), Pure Luxury White (GKD), Ocean Mist cardstock  (GKD)
Tools:  Paper Trimmer (Fiskars), Tonic Scissors (Tim Holtz), Scor Pal and tool, Stencil brush, Calligraphy pen

TT121213b

I added a creative background by marbleizing the background with my blue’s and then applying a cracked glass stencil to give the appearance of a cold winter day!   I imaging looking in the window through an icy cold window pane and seeing this little fella untangling all those Christmas lights!    I know I had a few to untangle this year!   LOL    
I am participating in the following amazing Challenges

TT121213a

Thank you for stopping by and visiting my little part of the world!    I hope to see you at our Twisted Thursday challenge and send you wishes for a  wonderful and awesome day!   

Hugs,
Marie

Hope to see you there! :D

Wednesday, December 11, 2013

CMC Month Long Holiday Bash: Winter Wonder

CMC120613 edited 1

Hello everyone!     Our new month long challenge and fun Holiday activities is up and running!    It is an exciting month with opportunities to win BIG prizes!  

Color a Holiday or Winter image
with Holiday Fun colors of your choosing!
We want to see you use YOUR COPICS, ProMarkers, other alcohol markers or Colored Pencils!!
********
Lots of ways to win for each challenge completed during the month of December!  

Challenge #1 - Word Scramble (click here)
3 winners

Challenge #2 - Holiday Trivia (click here)
3 winners

Challenge #3 - Project Challenge/ Holiday Themed
(enter in InLinkz below)
4 winners - see below for details

******************************

CHALLENGE RULES
-Use any image you want BUT MAKE SURE YOU LINK BACK TO THE CMC CHALLENGE in your blog post!!
-ALL PROJECTS MUST BE NEW & NOT BACK-LINKED!!
-Image MUST be colored with Copics, ProMarkers, other alcohol markers or Colored Pencils!
-NO more than 3 projects may be entered
UPLOAD YOUR ENTRIES to the Photo Gallery and TAG them with the word CMCBASH13 so they can be seen easily!
**IF you post your project in your blog MAKE SURE TO LINK BACK TO THE CMC CHALLENGE **
Entries MUST be tagged and uploaded to the photo gallery by Jan 2nd at 8:00 pm EST!
PLEASE ALSO PUT YOUR PROJECT IN THE LINK SYSTEM BELOW THE PRIZE INFO AS WELL SO WE CAN SEE THEM ALL!
*******************

FOUR (4) PRIZES GIVEN FOR THIS CMC HOLIDAY CHALLENGE

1 winner will win: $25 Gift Certificate to La La Land Crafts
1 winner will win: 1 Ciao Copic Marker (skintone) set from iCopic
1 winner will win:  a Free Class from CMC of their choosing
1 winner will win:  One Scor-Pal
 And check out the sale on CMC Classes!   

Hollysalefin


Techniques:
Inking:  Copic Alcohol Tip to Tip, Tip to Paper
Creative Background:  Copic Marbleized Background
Other: Sponging, Paper Quilling

Supplies and Tools:
Medium: Memento Tuxedo Black (Tsukeniko), Copic Sketch Markers, Copic Opaque Ink
Paper: Cryogen (Curious metallic), Pure Luxury White (GKD), Pure Luxury In the Navy (GKD), Greorgia Pacific
Tools:  Paper Trimmer (Fiskars), Tonic Scissors (Tim Holtz), Scor Board and Scor Tool, Die Cutter, Oval Spellbinder Die, Adhesive, Crystal Stickles (Ranger), Quilling Tool, pearls, **** Die, Leafy Bunch (Silhouette)

Cmc120613b

Copics Used:  
Doves:  Y00, Y11, Y15, YR23, YR24
Background:  BG0000, BBG000, BG10, Colorless Blender

Wonderful Challenges I am participating in this week! 

Thank you for stopping by and visiting my little part of the world!    I hope you have a wonderful and awesome day!  I holt to see your at our Month long Holdiay Bash!     

Hugs,
Marie

Hope to see you there! :D

Friday, December 6, 2013

The Outlawz: Christmas Lanten

Tt120413
Happy Thursday!   The Outlawz:Twisted Thursday just posted their new and fun challenge.   Our challenge is always “anything goes” but for an extra opportunity to win….   the twist is “BINGO”  

Outlawzbingo1

Our wonderful Sponsor is Stitchy Bear's Stamps.    Drop by and check out the wonderful digital images !
Sticky Bear

Techniques:
Copic Ink to Paper, Tip to Tip Blending
Creative Bakground:  Copic Marbleization
Paper Quilling


Supplies and Tools
Medium: Memento Tuxedo Black  Copic Sketch Markers, Copic Opaque Ink
Paper: Cryogen (Curious metallic), Pure Luxury White (GKD),  Christmas Green Cardstock (Recollections)
Tools:  Paper Trimmer (Fiskars), Tonic Scissors (Tim Holtz), Scor Board, Computer and printer, Quilling paper (Red and Golden yellow), Qilling tool and adhesive. Die machine, Petite Oval Die (Spellbinders), Leafy Bunches (Silhouette)

TT120413b

Copic Sketch Markers Used
Lantern Y00, Y11, Y15 YR23, YR24
Leaves: G40, G45, YG63, G91, Touch of Y11, G18
Pine Cones: E11, E15, E18, Opaque White Ink
Ribbon:  R20, R24, R27, R38
Background:  B0000, B000, B00, a Touch of B24 and for the glow of lantern: Y00, Y11, Y15, 
Colorless Blender

I am linking this card with the following wonderful challenges:

Thank you for stopping by and visiting my little part of the world!    I hope you have a wonderful, safe and awesome day!   

Hugs,
Marie

Hope to see you there! :D

Tuesday, December 3, 2013

MarkerPop: Tilda with a Big Bouquet


120213l
Hello to all our friends out there in CYBERland!    Marie  here with a coloring tutorial on this adorable Tilda image from Magnolia.
It is getting nippy outside and snowflakes are biting many little noses!   It looks like the winter holidays are here for some of us!  And for those with warm and sunny weather at this time, it is the perfect opportunity to get an early start on you winter projects!  I don't know about you but   I know I can ALWAYS use extra  gift tags at this time and I will let you in on a little secret.... I think tags are my new addiction!     Here is one that I created and I hope you like it!
Techniques:
  • Copic ink to paper Blending
  • Copic Tip to Tip Blending
  • Texturizing
  • Creative Copic Marbleized Background with Fun and Whimsical Snowflakes
  • Distress Sponging for an antique look
Supplies
Paper: Cryogen Iridescent White (Curious Metallic Inc.)
Medium:
Copic Sketch Markers,  (.too, Inc.)
Tim Holtz Vintage Photo Distress Ink (Ranger)
Copic Opaque White Ink (.too, Inc.)
Directions:
Coloring Techniques:   The terms will be used in the tutorial for your reference. 
  • Highlights:  Plan ahead and establish the highlight area of  the focal image.   It will be important to be consistent with this source throughout the entire image.
  • Smooth Color Application:  Any job is easiest when you break it into small  baby steps.   The same rule applies to coloring.   Work in small areas in order to keep the base layer lightly saturated for easier blending. Completely finish the small section before moving to the next.  For example...  the leg or the arm.
  • Base Coat:  This is a smooth layer that is lightly applied to a small area. It is applied with one layer only.  Additional layers will darken the color and  prevent you from getting the best highlight.  Remember -  Contrast draws the eye and is a good thing as long as it is blended.
  • Flicking Method of Blending:  Ink application by applying a light flicking motion with the hand and wrist.   Remember those check marks we always got on our homework?  Similar !
  • On-Paper Blending:  The tip or side  of the marker is applied directly to the paper.
  • Tip to Tip Blending:  Another word for this technique is "Bridging".  The tip of the light marker is touched to the tip of the darker marker.   The  light marker is quickly applied to the paper.    This  creates a mid-tone between the light and dark colors.    TIP:   If you are missing that important mid-tone in among your Copic collection - bridge the mid-tone by using the Tip to Tip Blending Method.   This will not harm your markers.   Example:  R20 to R24 will  give you the R22 bridge.  
  • Texturizing:  There are many methods of adding texture to your focal image.   One method I used on this project is a dotting motion with the tip  my Colorless Blender to the focal once it dried. I avoided the outer edge of the focal image in order to avoid the ink from bleeding outside my lines.
mp121213b
Step 1:  Light Source- Determine where you want your light source.  I have selected the front left side.   Skin Tones: E000, E00, E11, E13, R21 -  Apply a smooth single layer (Base Coat)  of E000.   Avoid coloring the base coat more than one time.  Repeat coats darken the color and you want to keep you highlight.   Using Ink to Paper Blending, apply a small amount of E11 on the shadow side of the image (right).   Using a Flicking Method of Blending, flick toward the center from the inner margin of the E11.  Apply E000 from the inner margin of E00 toward the center.   Apply a very light touch of R20 or R21 to the cheeks and blend out with E00o.   Tip:  Avoid over-saturation of your image.  If the paper is over saturated it will pool and form blotches and will spread outside your lines. 

mp121213c
Step 2:  Santa Suit:  R20, R22, R24, R27,  R39 and Colorless Blender -  Work is always easiest when you break it into small projects.   Coloring with Copic markers is the same.   Work in small areas to allow your image to lightly saturated for easy  blending.  Apply a light base coat of R20.   R27  is applied to the darkest shadow side (right).   A  flicking method is used to apply the R24, R22 and R20.   Plan ahead in order to make certain you do not get too much shadow side or mid-tone coving your image.  You can always darken your image but it is difficult - (near impossible) to lighten an image.  In order to add a little more contrast, a small amount of R39 can be added to the very darkest part of the shadow area.   Blend the colors for a smooth appearance.   A Colorless Blender (the very tip) was applied to the suit to give it that fuzzy, santa suit look!.  I love adding texture!

mp121213d
Step 3:  Hair - C3, C5, C7, C9, B000 -   Highlights were  established with B00.  It is important to be consistent with you light source throughout your coloring.    Apply C7 to your shadow area and slightly blend out (using a flicking wrist motion) toward the  highlight.  Flick in the direction the hair is flowing.   Continue with a small amount of C5, C3 and B000.   The white part of the Cap was colored with a small amount of B000.   I think it is fun to add a surprise that grabs the view's attention.   A touch of B000 may just do the trick !

mp120213e
 Step 4:  Greenery - Ga40, YG63, YG67, YG91, G29, W6.   G40 was applied and the Greenery was texturized with the other colors.   The shadow area of the bottom stems was established and the YG91, W6 and G29 was used n the darkest area.   Blend the stems.

mp120213f
 Step 5:  Flowers - Copic R34, RV23, RV10, Y23, Y00, BV000, BV34.   Determine where you light source would be hitting.  The flowers are darker on the petals  in the back.    Apply base coat to a small area with a single layer.  The mid tone on small areas are colored the easiest by touching the tip of the light marker to your dark marker.  For example,  BV000 tip is touched to BV34 and then quickly applied as a mid-tone.  It will not harm your markers!   TIP: Tip to Tip Blending Method is a great way to blend small areas.  It is difficult to blend very small flowers with 3 blenders - solution...   Tip to Tip Blending will give you a highlight, mid-tone and shadow.   

mp120213g
 Step 6: Paper Wrap Around Flowers:  E30, E33, E35, E37 -   Apply E30 lightly (one layer) as your base coat and then apply the E37 to the shadow side.   Smoothly blend the E35, E33 and E30 with the Flicking Blending Method.    The white sweater was colored with C1 and C00  applied to the shadow area and blended with C00 out a little.  Avoid coloring the entire sweater.  You do not want a grey sweater.

mp120113a
 Step 6:  Finishing touches:   The shoes are colored with C3, C5, C7 and C9 with a touch of Opaque White applied with a quill pen for a highlight.  The grounding was colored with B21, C3 and Opaque White Ink.   Snow flakes  were applied using a quill pen with Copic Opaque White Ink.   A Creative Copic Marbleized background was applied to give the appearance of  a snowy day.    The edges of the paper  are sponged with Vintage Photo Distress Ink.    Sponge from off the paper to the paper using a  small circular motion with the Tim Holtz Felt applicator.   This give a vintage feel to any project.

I am linking this card with the following wonderful challenges:


I hope you enjoyed this coloring tutorial.   We would love to see your projects in our current MarkerPOP Blog Challenge!  THE CHALLENGE:  Turkey Time
Create a Thanksgiving themed project using your Copics and/or ShinHan markers!  Our wonderful Sponsor is Sharri Baldy.      I hope to see you there.
dt_marie


Wednesday, November 27, 2013

The Outlawz - Twisted Thursday: Shades of Blue


Hello!   It's time for our new challenge at The Outlawz - Twisted Thursday!   Our challenge is always "Anything goes" but if you want to participate in the twist for an extra chance to win, the theme for this week is ..... drumroll.......    Shades of Blue.

Our wonderful sponsor for this month is Oak Pond Creations.   Check out her site HERE  for some wonderful images!   :D  


Techniques:
Copic Ink to Paper, Tip to Tip 
Creative Background: Copic Marbleized

Supplies and Tools
Image: Butterfly Blue by Karen Middleton (Sweet Pea Stamps)
Medium:  Copic Sketch Markers, Copic Opaque Ink
Paper: Cryogen (Curious Metallic), Pure Luxury White (GKD), Bella Blue designer Paper
Tools:  Paper Trimmer (Fiskars), Tonic Scissors (Tim Holtz), Scor-pal/tool, Adhesive, Die Cutter, 
Other:  Leaf Cluster file cut (Silhouette), nested Circle Die (Spellbinders), Gardenia die,  Stickles glitter glue.   


Copic Sketch Markers used: 
Skin Tones: E000, E00, E11, R20, B000
Hair:  C3, C5, C7, C9, B000
Dress:  Booo, Boo, B91
Wings: C0 C1, C3
Butterflies:  Y000, Y00, Y21 and brown marker
Background:  oooo, Booo, B91, Colorless Blender


I am entering this card in the following challenges: 


Thank you for stopping by and visiting my little part of the world!    I hope you have a wonderful and awesome day!   

Hugs,
Marie


Hope to see you there! :D