Thursday, July 28, 2011

Victorian Beauty

Click image to enlarge

Happy Thursday to all my special cyber friends!   It is time to announce the fun and crazy Color Me Creative Copic Challenge.  It is time to get out those Copic Alcohol Markers and make some wonderful creation!   The challenge is to use Re, Aqua and cream/whites. 


The Prize is from The Paper Shelter
$15 Gift Certificate to spend in their online store!!

In addition, one random winner that has entered a challenge during the month will have the opportunity to win a $50.00 gift certificate from


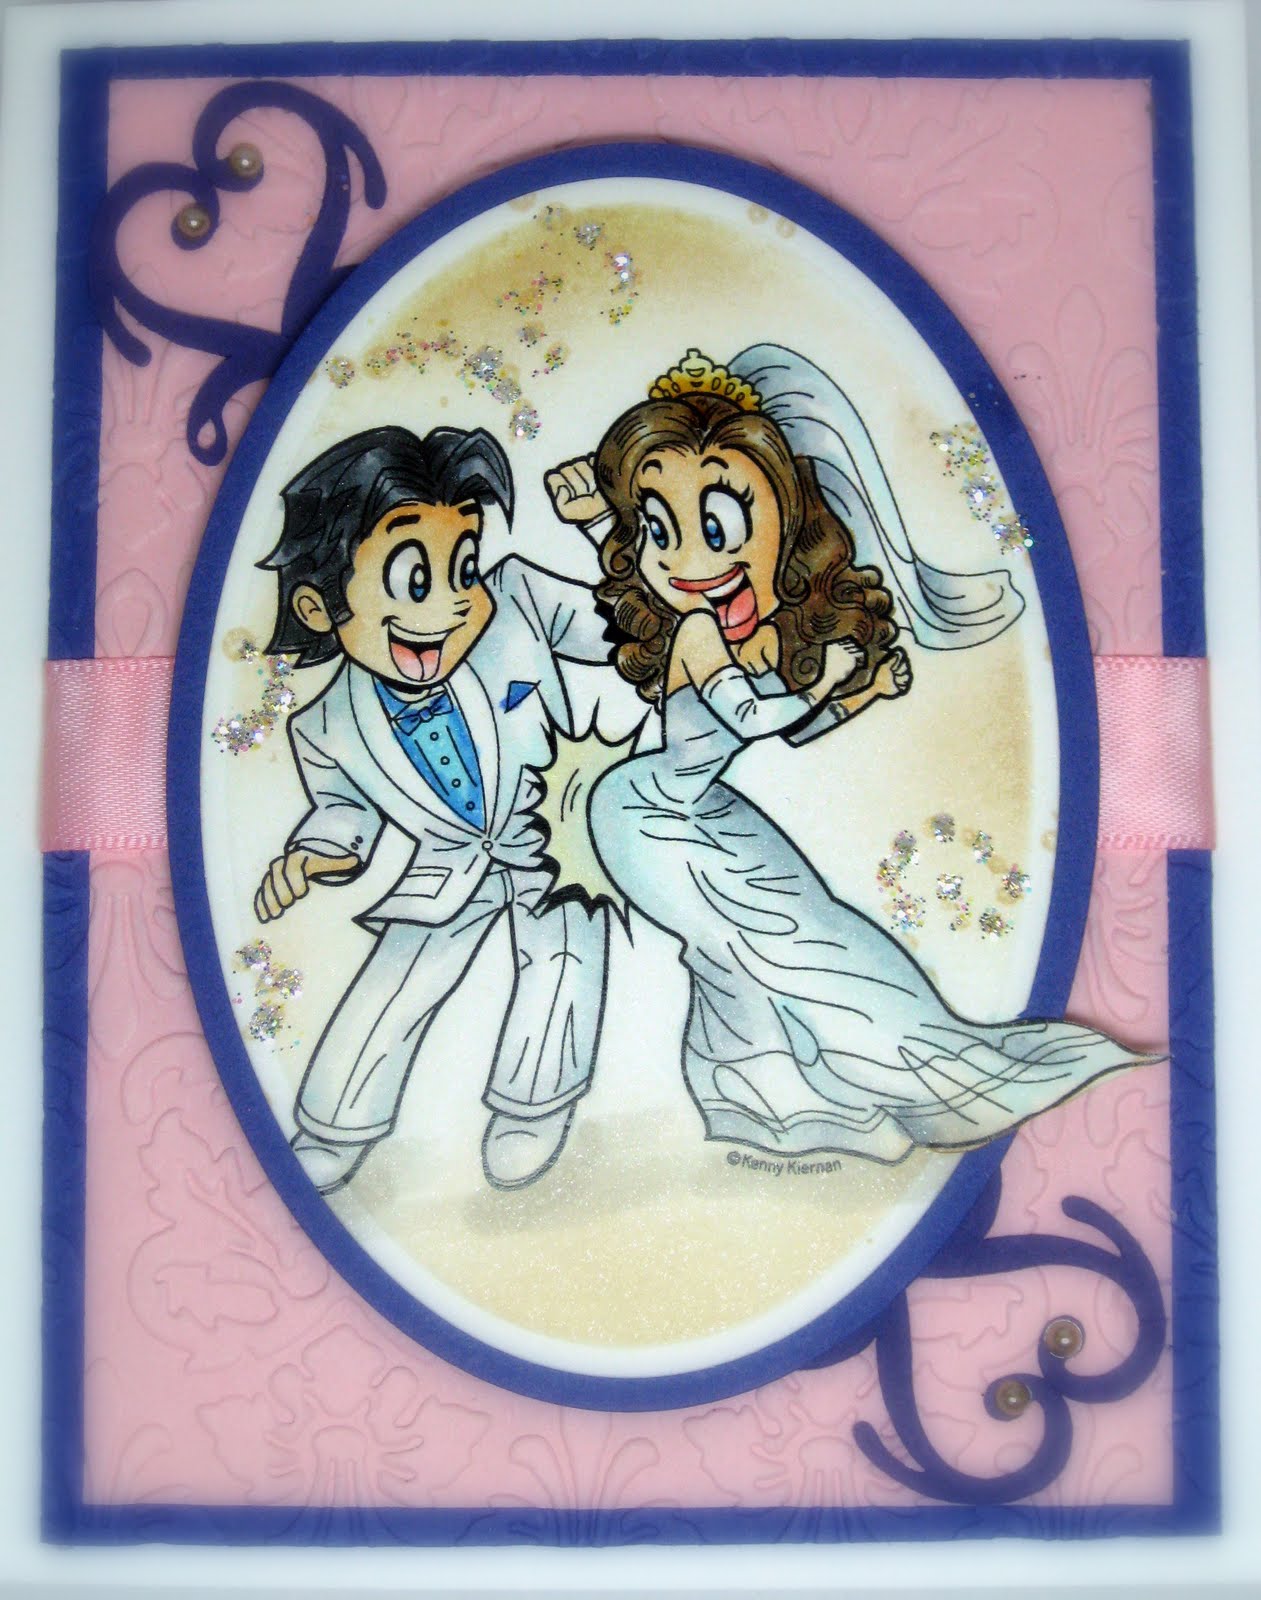
The cute little image I selected from  The Paper Shelter is called Victorian Beauty and she really is a little beauty!!!   It was a lot of fun working with the image


Click image to enlarge

Technique:
Copic Markers
Folds
Copic Tip to Tip Blending
Colors:  Red, White and Aqua 


Measurements:
Card Base 5.5 in. X 8.5 in.
Score and fold  at  4.25 in.  (This makes card for a 2A envelope)
Card Base Layer  4 in. X 5.25 in.
Focal  Image  printed on Cryogen and cut with   Nestabilities Die

Supplies: 
 Focal Image: Victorian Beauty digital image (Paper Shelter) 
                                                                                                                           
Paper:
Cryogen White for focal image, (Curious Metallics)
Pure White Pure Luxury 120# (GKD)
 Ocean Blue Pure Luxury White (GKD)

Ink :
Memento  Summer Sky (Tsukineko)
Copic Alcohol Markers (.too corp.)
Skin:  E0000, E000, E00, E11, R20
Hair:   C3, C4, C7, C9
Dress and Hat :  C00,  BG000, BG00 BG2, R00, R20, R22, R24
Mirror:  Colorless blender, E000, BG000

Tools: Scor-Pal or Scor-Buddy, Paper Cutter ( Fiskars), Scissors  (Tim HoltzTonic scissors are great for people with arthritis and painful joints),  Spong Daubers,  Pop Dots Cuttlebug (Provo Craft),  Big Dots Embossing Folder (Provo Craft),  Lablels Fourteen Nestabilities Die (Spellbinders), Flower Paper Punch (unknown)
Embelishments:   Red Prisma Roses,  hand made white  flowers, red ribbon and Ranger Crystal Ice Stickles.


Tip of the Day:  Did you know that Copic Alcohol  Markers are a lifetime investment?  They are refillable and the nibs can be replaced.   They are a little pricy but with a little care – your Copics with be your life long friend.

Click image to enlarge
Thank you so much for stopping by and visiting our little Victorian Beauty.   I hope you come back really soon.    Stamper's Quest has some really exciting news so stop by their link and check it out.   It is a free online crafting magazine with some amazing artist guides.  Hope to see you there!


Hugs,
Marie

Friday, July 22, 2011

Small Wonders

Hello to all my cyber friends!   I hope you are having a great weekend. I posted this ahead because I am working my 12 hour shifts for the next 4 days.

Click image to enlarge

Copic Creations challenge #  43 is to color "pastel" with your Copic markers.   I just love pastels!   I selected an  image from Sugar Nellie for my card.   It is an image named "Melissa"

Technique:
Measurements:

Card Base 5.5 in. X 8.5 in.
Score and fold  at  4.25 in.  (This makes card for a 2A envelope)
Card Base Layer  4 in. X 5.25 in.

Designer Layer  3.75 in X 5 in.
Focal Image Layer  2.25 in X 4.5 in.  
Focal  Base Layer  2.5 in X  4.75 in

Supplies:
Focal Image:  Digital image  by Sugar Nellie "Melissa"


Copic Markers
  • Skin:  E000, E00, E11
  • Blouse:  YG63, G40, Colorless Blender
  • Pants:  B000, B00, B2, B4, Colorless Blender
  • Shoes:  C00, C1, C3,
  • Shadow W0, W1
  • Hair:  E40, EE43, E44, E47
Card stock :  Cryogen White for focal image,  GKD Pure Luxury White,  Bazzell Kiwi Crush, designer paper. 
Ink : Memento Tuxedo Black  ,Ranger Spiced Marmalade Distress Ink, Ranger  Dried Marigold Distress Ink.

Tools: Scor-Pal or Scor-Buddy, Paper Cutter (I use Fiskars), Scissors  (Tim Holtz helps reduce pain for those with arthritis!), Quickie Glue Pen, Adhesive, jumbo sponge daubers, Die cutter for flourishes of your choice  and Pop Dots.
Embelishments: Prisma Flowers Rose and  "Branches 2 " cut from Cindy Loo Cricut Cartridge  for flourishes, Ranger Stickles
 Lightly sponge the upper left and lower right corner with Spiced Marmalade Ink with your jumbo dauber and then sponge Dried Marigold over the very tip of both corners to add dimension and depth.

Tip of the Day:  An easy way to reference your images from your Cricut Cartridge booklet is to assign a number to  them and write them in your booklet.  For example, there are 5 rows and 10 keys to each row.  I number mine 1.1, 1.2, 1.2 etc.  I write them in the corner of each page.  When I make notes for future reference,  it is easy to locate the image I used in the past. 

Click image to enlarge

Thank you so much for visiting.  I hope you come soon.  Have a wonderful weekend!

Hugs, 
Marie

Looking At You!


 Hello everyone!   It is time to post a card I did for week's  Top Tip Tuesday Challenge.  We are to create a card.... anything but square.   Does rectangle count?  I hope so.....  When I pulled out my Cricut Expression to make flourishes I realized that I have been missing some of the cute things that could be done on my Cricut.  Therefore, I am going to begin incorporating Cricut and other cards in along with my Copic cards.  That way.... things will stay fresh for you.
Remember how much fun you had  as a child with things that would "spin"?  My mother was raised in very difficult economic times and she would make the things she would give me.   I remember her making me pinwheels that she would attach to a stick.   I always had so much fun with that!  Well, I created a spinner card and just made me smile.... remembering those wonderful times!

This is "rectangle"   I just photographed it against orange (won't do that again!)  I hope that counts.   Anything but square!  LOL

Technique
  • Spinner Card
  • Cricut Expression
    I made a ot of these cards a few years ago.  I believe my original recipe came from a blog from a wonderful  SU demonstrater named Angie.  Her blog can be found HERE
    I wanted to make sure I gave Angie credit for her wonderful  tutorials!
    1. Cut  heavy base cardstock at  6in x 6in  and score down the middle at 3 inches (landscape)  This makes your base card.  
    2. Cut one  white cardstock at 5.25 in X 2.5in.  (This will add firmness to your card)
    3. Cut Designer paper 5.5in X 2.5 in and layer on top of your white cardstock.
    4. Cut a center line horizontally.   You can use a label punch  (extending it in length so there is plenty of room to slide!). If you do not have a label punch, you cut a long rectangular square with your blade)  Make certain to leave 0.75in or 3/4in on both ends . 
    5. Attach dimentionals between the base card layer and your top layer in order to create a space.  
    6. Create any image you want to use as a spinner image.   I used some spirals... they look like a "top" spinning when it is tipped.   Be creative.   
    7. Attach your spinner  to a penny add a dimentional (mini round) to the other side of the penny and attach another penny.  
    8. Slip the underside penny into the slotted center line you have  created.  Your top penny that is attached to the spinner image will rest outside the cut center groove.  The little mini dimentional you have between the two pennies will fit within the center groove you cut.   When you tip the card,  the spinner will slide down the entire length of the card.  
    9. You may need to adjust it a little to allow it to spin rather than just slide.
    10. You see why you needed to pop your top layer up from your card base.  You needed room to allow the inside penny to roll down the length of the card.   
    11. Experiment with different images....  They all look so different.  
    12. I attached Goofy to the front of the card. I cut it out with the Disney Mickey Mouse  Cricut cartridge .
    13. Enjoy!


     This is square and it cannot be included in the challenge.  Anything but square!!! LOL   But I can certainly include it in my blog for you.

    I also made this card in preparation for fall  with owl designer paper and cut an owl from my Cricut and used that as a spinner.  It was really cute!


    Check out the challenge....   Top Tip Tuesday  It is always a lot of fun and you can pick up fabulous tips!!!!!

    Tip for the Day:   Use pennies on your spinner cards.  I have tried many different things and a nickle is too heavy and  dimensionals alone  are not heavy enough.  Pennies add just the right amount of heaviness to allow your image to just spin, spin spin!!!

    Check back really soon - I plan to upload a Copic card for a pastel challenge for  Copic Creations tomorrow!  We also have a fun challenge at Color Me Creative Copic Challenge
    that will be posted on Sunday!  

    Hugs,
    Marie

    Monday, July 18, 2011

    Stamper's Quest

    I just wanted to make a brief post to share the good news.  I have just been invited to to join Stamper's Quest  as one of their Artist Guides.  This is such an honor to be selected to serve with such talented men and women!   Take the time to check this free online magazine out!  It is well worth your time!

    This is what the Stamper's Quest has to say about their  online magazine:

    Stamper's Quest is free rubber stamping magazine (e-zine) devoted to assisting you in discovering your Artistic Grail. We provide a panoramic hiking trail full of the freshest and best tips, tools, ideas and techniques for you, the rubber stamping artist.
    Join our super talented Artistic Guides in their studios as they bring you creatively delicious monthly projects and tips and techniques posted weekly at The Watering Hole.  Take our Side Trails to discover the untold hidden vistas of card sketches. Our card sketches are created exclusively for Stamper's Quest by our multi-talented Guide, Regena.  Check out our Backpack for news on new tools of the trade and product reviews. From time to time, we also feature individual stamp companies and their rubber stamp images through designer's challenges.
    To receive notices whenever we update the magazine, you may subscribe to our mailing list. Just go to the home page and click on the subscriptions button. Our updates are RSS feeds provided by Feedburner and will arrive in your inbox through your email.  When you subscribe, you will need to verify your subscription in order to have it become active by replying the email they will send you. Once done, you will begin receiv
    ing updates! 
    We hope you enjoy the journey as you hike down our rubber stamping trail!

    Hope to see you there.  The new August publication should be coming out soon!

    Hugs,
    Marie

    Thursday, July 14, 2011

    Thinking of You


     Hello everyone!  Happy Thursday!  I hope everyone is getting ready for a wonderful weekend!   
    I have been practicing for my Magnolia Class   at Color Me Creative Classroom.  I decided to do this tutorial so show my step in creating this card.   

    Technique: 
    • Copic Markers
    • Tip to tip blending
    • On paper blending
    • Copic Markers with watercolor effect for background
     Challenge:  I am entering this card in the fabulous Top Tip Tuesday   for the Top Tip #42 Tipper Week Sketch Challenge.   There are two sketches to choose from.  Don't you just love choices?  I selected this wonderful sketch by Chris:


    Measurements:
    Card Base 5.5 in. X 8.5 in.
    Score and fold  at  4.25 in.  (This makes card for a 2A envelope)
    Card Base Layer  4 in. X 5.25 in.
    Upper  Base Layer  3.25  in. X 4.25 in
    Focal Image Layers : spellbinder Large Rectangle Nestabilities and  Scalloped Rectangle Nestabilities

    Supplies:

    Focal Image:  Rubber Stamp:  Magnolia Stamp “Secret Tilda”

    Copic Markers: B0000, B000,
    Skin E13, E11, E00, E000, E0000
    Hair:  E25, E27, E35, E31, E30
    Clothing:  V17, V15, V12, V01, V0000, C00, C0
    Gift :  R24, R22, R20, R0000
    Ribbon and hair bow:  V17, V15, V12, V01, V0000
    Butterfly:  Sketched freehand with Copic multiliner .03, G28, G18, YG 63, G40
    Watercolor background effect:  V17, R22, C3, C0, B0000, B00

    Card stock :  Cryogen White for focal image,  GKD Pure Luxury  in White, Violet and designer paper

    Ink : Memento Black,Summer Sky

    Tools: Scor-Pal or Scor-Buddy, Paper Cutter (I use Fiskars), Scissors  (Tim Holtz helps reduce pain for those with arthritis!), Quickie Glue Pen, Adhesive,large sponge daubers, Cuttlebug or die cutter, Nestabilities Large Rectangles and Scalloped.

    Embellishment:  brads
                               
    Tip of the Day:  You can add cohesiveness to your picture by using some of the colors you used in your image in the background.  In my card, I used Copic Markers to dot my background and then blend with B00 and C00, C01 to give a watercolor effecct.  


    Skin E13, E11, E00, E000, E0000


    Hair:  E25, E27, E35, E31, E30


    Watercolor background effect:  V17, R22, C3, C0, B0000, B00


    Thank you for taking the time to  look  at my card.  I hope you come back soon and spend some time!
    Have a wonderful weekend!

    Hugs,
    Marie

    Saturday, July 9, 2011

    The Dancing Dress

     Click image to enlarge


    It's time for Color Me Creative Challenge for Copics #22  and it will run until July 22nd!  The challenge is to  use your favorite Copic technique on your images!  You can do more than one of course and  there are so many techniques  so just try a few out and have FUN with it!

    Suzanne Dean suggests:
    • You may want to try one or more of these  techniques: feathering, coloring embellishments, airbrushing, bridging colors, folds, hair colors, colorless blender techniques, black/white/sepia, and more!
    • Use any image you want BUT MAKE SURE YOU TELL US WHAT THE TECHNIQUE(s) YOU USED ARE IN YOUR POST or Photo Info!!
    And we are super lucky to have the  FABULOUS   Tiffany Doodles as out wonderful SPONSOR  for this challenge!  
    The Prize for the winner of this challenge (randomly chosen) will get:

    The Prize is from Tiffany Doodles Digi Store 
    10 DIGI STAMPS of your choice---WOWZA!!
    Thank you Tiffany!!!

    In addition, all participants will have an opportunity to have their  name in the pot to win a $50.00 gift certificate from OOZAK!  This  winning certificate will be drawn at the end of the last challenge for each month!  Good luck!


    This is  my design team card I created for  Color Me Creative Copic Challenge.


     Click image to enlarge.  If you have an IPad.... you know what to do!

     Techniques
    Measurements:
    Card Base 5.5 in. X 8.5 in.
    Score and fold  at  4.25 in.  (This makes card for a 2A)
    Base Layers  4 in. X 5.25 in. and 3.75 in. X 5 in
    Focal Image :  Digital images cut out of any size paper.  (You can copy to the bottom half of another image prior to printing  in order to save your precious paper!)

    Supplies:
    Focal Image:    Tiffany Doodles  Digital image:  “Dancing Dress”

    Paper:  GKD I Luxury  “Pure White”, “In the Navy” and  Designer Paper

    Ink:  Copic Markers:  
    Red:  R20, R22, R24, R27, R37
    Blue:  BG0000, BG00, BG02, BG05, BG34,
    Yellow:  Y0000, Y02, Y04, Y08, Y26
    Violet:  V0000, V00, V01, V04
    Green:  G40, G28, YG63
    And of course my much loved Colorless Blender!
                                       
    Tools: Scor-Pal or Scor-Buddy, Paper Cutter (I use Fiskars), Scissors  (Tim Holtz helps reduce pain for those with arthritis!), Quickie Glue Pen, Adhesive  digital image printed from your computer.

    Embellishments: Pearls and pearl flourishes 

     Click image to enlarge

     Tip of the Day:  Did you know you can have a lot of fun with digital images?  You  can  size a digital image to an  appropriate size for your focal image.  For a really nice touch, you can size multiple smaller images of the  digital image, color them  and then paper piece them around  the focal image.  You can see what I did on my card using “Dancing Dress” but you can use just about any image and just play with it.  You can actually change angles and flip your digital images.  Wow!  So versatile!  I think I will try to do one in the near future keeping by background images a soft, soft, soft monochromatic color!!   Doesn’t that sound fab? 

     Click image to enlarge

    Thank you for visiting and please come back soon.  I am working on another sketch of Bella  so we can all have another good laugh.  Be sure to stop by and see all the wonderful cards  that will be posted at Color Me Creative Classroom Challenge  and please feel free to join in on the fun!   Teapot Tuesday Challenge will be coming up soon too so check back real soon!

    Hugs,
    Marie

    Friday, July 8, 2011

    Bam!!! Wedding Dance


     Happy Friday to all my wonderful cyber friends!   I have a day off and yet bet.... I am spending as much time as I can in my craft room!
    There are two wonderful challenges I am participating in today.   
     
    Copic Creations   The challenge for Copic Creations is to use you Copic markers to create "white" clothing.    The wonderful sponsor and prize for one lucky winner will be:

    What’s the prize this week??!

    A $25.00 GIFT CERTIFICATE TO LA LA LAND CRAFTS!!!!

    Woooooooo Hoooooooooo!

    The challenge for Top Tip Tuesday is to create a "wedding" card or and "anniversary" card. This site is just wonderful.  If you haven't had a chance to stop by yet, you will be in for a surprise!  They offer "tips" and who couldn't use tips on new and easier techniques!  The    is the wonderful sponsor and the  winner will receive  2 digi's from: 


    and Glitterbabe - is offering our Featured Tipper 2 images of their choice from her shop,

    What fantastic sponsors!!!
     The card I made for these challenges is from Kenny K's Digital image called "Wedding Dance".

     Click image to enlarge
    Technique:
    • Coloring White with Copic Markers
    • On Paper Blending Technique


    Measurements:
    Card Base 5.5 in. X 8.5 in.
    Score and fold  at  4.25 in.  (This makes card for a 2A envelope)
    Base Layers  4 in. X 5.25 in. and 3.75 in. X 5 in
    Focal Image Layer  Large Petite Spellbinder Nestabilities
    Base Focal Image Layer Large Petite Oval Spellbinder Nestabilities

    Supplies:
    Focal Image:  Kenny K  Digital Image:   “Wedding Dance”
                GKD: Melanie Muenchinger “Bring the Bling”

    Copic Markers:
                Face:  E000, E00, E01, E11 touch of  R20
                White Clothing:  C1, C0, C3,  B10
                Groom’s Shirt:  BG05, BG00,BG0000
                Groom’s Hair:  C3, C5, C7, C9
                Bride’s Hair:  E49, 47, E44, E41

    Card Stock Cryogen White,  GKD Pure  White, Bubblegum Pink and Bazzill Smoothies Boysenberry

    Ink : Memento Black and Desert Sand

    Tools: Scor-Pal or Scor-Buddy, Paper Cutter (I use Fiskars), Scissors  (Tim Holtz helps reduce pain for those with arthritis!), Quickie Glue Pen, Adhesive,large sponge daubers, Spellbinders Nestabilities  Large Oval Die, Cuttlebug and Kassie’s Brocade embossing folder, Criicut Die Cutter .

    Embellishment:  Stickles, Pearls, Flourishes from Cindy Loo Cricut Cartridge

    Tip of the Day.  Save mega bucks by using you Cricut cartridges for flourishes.  I spent $25.95 for one flourish die and decided I would pull out my Cricut and find flourishes on my old carts that work!  I used Cindy Loo Cricut Cart for my flourishes and made them look like hearts.  I discovered that just about every page of the Cindy Loo Cart has flourishes!  Great discovery!

    Click image to enlarge

     I stamped the background of the focal image with "Bring the Bling" with a vry light ink by Memento called "Desert Sand" and then used Stickles on the spiral design.  I then used my Cuttleug to emboss the base card layer.   I used Cindy Loo Cricut Cart for my flourishes.  I put them together to form a heart and added pearls. 

    I hope you have a fabulous day and weekend.  Thank you for stopping by.  Come back soon.  I will post the new Color Me Creative Challenge  Sunday.

    Hugs,
    Marie

    Tuesday, July 5, 2011

    A Big Fish Story

    The purpose of  Teapot Tuesday's Challenge 153  is to create a card, inspired by the  story that our "mudder"   has provided for us.  It is a Sisterhood of the Traveling Teaparty!   To understand the inspiration story, you must check it out at our challenge for Teapot Tuesday  because  the mad tea party is still going!


    This is my card and story for this challenge:


    This is a fish tale  so listen carefully.  

     You may have not known that Golfsalot has a brother called Twosportsinone.  You see, he has a very long name too, just like his brother!   He is a very busy but wants to make sure he get’s his time for sporting into his schedule.  He is also a bery brilliant man so  so in keeping with his name, he tries to multitask and usually tries to do two sports in one.   Hence, the story…

    Twosportsinone
     wanted to have some fun.

    Fishing was his game,
    but his golfing was very lame.

    But  much to his surprise,
    And right before his eyes,

    He saw what he had done…
    He scored a “hole in one”!


    Technique: 
    Copic markers
    On paper Copic ink  blending
    Sponging  
    Paper Piecing          


    Measurements:
    Card Base 5.5 in. X 8.5 in.
    Score and fold  at  4.25 in.  (This makes card for a 2A envelope)
    Card Base Layer  4in X   5.25 in..
    Focal  Image Layer   3.75in X 4.75in.
    Focal Layer 3.5 in. X 4.in.

    Supplies:
    Focal Image:  GKD / Theresa Momber  “Gone Fishing”

    Copic Markers:
    Dock:   E47, 3E45, E35, E31, E41, E49
    Water and Sky::  BG0000, BG00, BG32, BG34, B0000, B00, B02, (Sky is a combination of Copic markers and sponging)
    Fish:  C0, C1, C3, R20, YG 99 using tip to tip with Y0000
    Ground ,Trees and Catails:  W1,  G27, G40 YG 63, E49, E44, E 42, (Tree Sillouette in water  C0)
    Golf Ball C0
                                                                                                                               
    Card stock :  : Cryogen White for focal image,  GKD Pure Luxury White for Card Base, , Pure Luxury Chocolate Kiss and Fresh Asparagus

    Ink : Memento  Tuxedo Black, Summer Sky, Paris Dusk, Angel Pink,

    Tools: Scor-Pal or Scor-Buddy, Paper Cutter (I use Fiskars), Scissors  (Tim HoltzTonic scissors are great for people with arthritis and painful joints . stamping block, Cuttlebug, Distressed Stripes embossing folder and  sponge Daubers.


    Tip of the Day:  You can make shadows in the water, such as  trees, by turning the tree stamp upside down, masking the trees and stamping the upper part of the stamp over the water.  It works well to use a very light shade of grey and then stamp off the paper first to make it even lighter before stamping the water
    Thank you for taking the time to look at my card and jump in and play along!

    Hugs,
    Marie

    Friday, July 1, 2011

    Tiny Teacher Toby Turtle

    I was invited to join a new forum called "Teapot Tuesday".  No invite is necessary by the way- anyone can join through Splitcoast Stampers.   I decided to see what this was all about.  It is a bit of a stretch but I thought... why not!  Well after viewing a few cards and reading their stories  I had to pick myself up off the floor  while still laughing and dust myself off! (That alone says something about my housekeeping)!
    So what is Teapot Tuesday all about?  You can read all about it  HERE.
    This is what  this fun site is all about.
    • Anyone is welcome to play! You automatically become a Teapotter the first time you play in our challenge.
    • You can write a little story to go along with your card.  You do not have to write a story. You just have to be inspired by the  picture  of the week and/or by the story,
    • Have fun!
    • this is your first Teapot Tuesday Challenge, please mention that in your commentary so we can be sure to greet you properly, in pure Teapot Tuesday fashion!
    • Every last Tuesday of the month is Tickle A Teapotter Week! You can choose to send your card to a selected "destination" if you desire.  Your participation in Destination Station is 100% voluntary and not at all required. Just have fun! 
    Well ..... this is my first go at it....  The challenge for this week is:

    WELCOME TO TEAPOT TUESDAY
    THE SISTERHOOD OF THE TRAVELING TEAPARTY
    AND CHALLENGE #152


    Back to School, Back to School
    To learn to count would be so cool!


    Back to School, Back to School!
    To prove that we are not a fool!


    Back to School, Back to School!
    I'm sure there's not a single rule!


    Tiny Teacher Toby Turtle
    "Would you tell me, please, which way I ought to go from here?"
    "That depends a good deal on where you want to get to," said the Cat.
    "I don’t much care where--" said Alice.
    "Then it doesn’t matter which way you go," said the Cat.
    "--so long as I get SOMEWHERE," Alice added as an explanation.
    "Oh, you’re sure to do that," said the Cat, "if you only walk long enough."
    Lewis Carroll
    (Alice's Adventures in Wonderland, Chapter 6)

    Unlike Alice, Tiny Teacher Toby Turtle knows just where he is going. He knows when he will get there because he knows that the school is just 152 steps from his home. Teacher Toby also knows that 152 is also his age (in human years, that it).   He is diligently counting his steps.. When he finishes making 152 steps, he will be at Turtle School where he will teach all the other little turtles how to count so they will not lose their way in this life! 
    Technique: 
    Copic Markers
    Copic On Paper Blending Inking Method
    Sponging
    Paper Piecing

    Measurements:
    Card Base 5.5 in. X 8.5 in.
    Score and fold  at  4.25 in.  (This makes card for a 2A envelope)
    Base Layer  4 in. X 5.25 in.
    Base Focal  Layer 3.5 in. X 4.25 in.
    Focal Image  3.5 in X  4 in

    Supplies:  GKD:  Little Critters and Happy Camper

    Copic Markers:
                Turtle: E40, 43, E45,
                Shell:    YG91, YG93, EY95, YG97, YG99
                Grass: G16, G19
                Sign:  E35, E37, E47, E44

    Card Stock Cryogen White,  GKD Pure  White, Pumpkin Spice and
    Fresh Asparagus

    Ink : Memento Tuxedo Black, Angel Pink, Summer Sky, Cottage Ivy, Paris Dusk and Desert Sand

    Tools: Scor-Pal or Scor-Buddy, Paper Cutter (I use Fiskars), Scissors  (Tim Holtz helps reduce pain for those with arthritis!), Quickie Glue, Adhesive and large sponge daubers

    Tip of the Day:  If you are going to paper piece your project, it is ok to color outside the lines.   The outside will but cut away and you will have a clean finish!

     I hope you enjoyed this cute little card and story.  Stop by the Teapot Tuesday site at Splicoast Stampers and join inthe fun or look at some of the fabulous cards!

    Stop back soon,
    Hugs,
    Marie