Tuesday, December 26, 2017

Heartfelt Birthday Greetings


Hello my friends and welcome!  

Today is Inspiration Wednesday for Heartfelt Creations December release -  the Camelia Carnation Collection.   Can't you just feel Spring around the corner?    


HCDP!-285, Camelia Carnation Paper Collection
HCPC-3807, Large Camelia Carnation Cling Stamp Set
HCD1-2765, Large Camelia Carnation Die
HCPC-3806, Small Camelia Carnation Cling Stamp Set
HCD1-7164, Small Camelia Carnation Die
HCFB1-464, 3D Floral Basics Shaping Mold
HCST1-401, Deluxe Flower Shaping Kit
HCDA1-450, Stack and Store Daubers - Pack of 6
PGM15015, Rajni Chawla's Frosting Powder
159723, Designer Dries Clear Adhesive
352854, Glue Tips - Metal
Pin6- Glue Pins
HCCC2-451, 8.5 x 11 Cardstock - White
TSMP802, Memento Dye Inkpad - Peanut Brittle
TSMP200, Memento Dye Inkpad - Tangelo
TSMP708, Memento Dye Inkpad - Olive Grove
532423-Kit, Sizzix Vagabond 2 With Solo Wafer-Thin Die Adapter
173742, Scor-Pal Measuring and Scoring Board


Burnt orange cardstock, green cardstock, Fossilized Amber Distress Ink,   glue gun, heat tool, Ranger clear crackle paint, beaded embellishment, double sided tape. 


Cut the white cardstock at 11 inches x 5 1/2 inches.   Score at 1 5/2 inches to create a top-folding card. Cut the burnt orange cardstock at 5 1/4 x 5 1/4 inches.  Cut the designer paper from the Camelia Carnation Paper Collection at 5 x 5 inches.  Adhere the layers with double sided tape.  
Stamp the flower petals from the Large Camelia Carnation stamp set onto white cardstock using Peanut Brittle Memento ink.  Cut with the corresponding die.  Stamp the leaves from the corresponding sets using Olive Grove ink onto green cardstock.    Sponge the  center of the flowers with Fossilized Amber Distress ink and the edges with Tangelo.  Sponge the leaves with Olive Grove ink.   Lightly mist and place the petals in the 3D Floral Mold and run through your die/embossing machine.   A small amount of additional shaping was done with the Deluxe Flower Shaping Kit.   The petals  were off-set and  adhered  with Designer Dries Clear Adhesive. You can refer to the video I have linked  for shaping instructions.  The leaves were slightly shaped with the Deluxe Flower Shaping Kit.   A light coat of Ranger clear Crackle Paint was applied to the petals and leaves, sprinkled with Rajni's Frosting Powder and heat set.   The flowers, leaves and pearl embellishments were adhered to the card with a glue gun.
The sentiment was fussy cut from the Camelia Carnation Paper Collection,  tucked under the flowers on the lower left hand side and adhered with Dries Clear Adhesive. 

I hope you have a safe Holiday, a wonderful and prosperous New Year and success in all your endeavors for the 2018!    


Tuesday, December 19, 2017

Santa's Reindeer House


Can you hear the bells ringing?   

The Holiday time is almost here and San'a's Reindeer are resting up for the big day!    


Heartfelt Creations Products
HCPC-3822, Poinsettia and Holly Clusters Cling Stamp Set
HCD1-7176 , Poinsettia and Holly Clusters Die
HCDP1-285, Camelia Carnation Paper Collection
HCFB1-463, Poinsettia Shaping Mold
HCST1-401, Deluxe Flower Shaping Kit
HCDA1-450, Stack and Store Daubers - Pack of 6
ANC852, Bright Ideas Prills - 12 Pack
159723, Designer Dries Clear Adhesive
352854, Glue Tips - Metal
Pin6, Glue Pins
HDPP3-452, 12 x 12 Cardstock - White
PGM15015, Rajni Chawla's Crystal Clear Glitter
TSMP400, Memento Dye Ink Pad - Rose Bud
TSMP708, Memento Dye Ink Pad - Olive Grove
532423-Kit, Sizzix Vagabond 2 with Solo Wafer Thin Adapter
173742, Scor-Pal Measuring & Scoring Board


SVG file - Santa's Sweets,  electronic die cutter,  green cardstock, candy canes, pipe cleaners, felt pom poms, texture paste, palate knife, google eyes, glue gun, Copic Markers for candy cane house trim -  (R20, R22, R24, R27),  flower rhinestone, 


Using Santa's Sweets SVG file, cut the house with an electronic die cutter. The svg file can be found HERE.    The step by step instructions are included and very straight forward.   Use the Camelia Carnation Designer Paper for the trim and panels.   The candy cane embellishments on the corners of the house were cut on white cardstock and the candy cane coloring was applied with Copic alcohol ink markers - (R20, R22, R24, R27).

Apply texture or molding paste to the roof and sides of the house.   Sprinkle with Crystal Clear Glitter while the texture paste is still wet.  Allow to air dry.     

Cut the poinsettias and holly using the Poinsettia and Holly Cluster stamp set.    Sponge the poinsettias with Lipstick Red ColorBox Ink and the Holly with Olive Grove Ink.   The tips of the Stack and Store Daubers are pointed and work well with the small flowers.    Lightly mist the petals and shape with the Poinsettia and Holly Cluster mold.   Additional shaping can be done with the Deluxe Flower Shaping tool, if desired.   Yellow prills were adhered to the centers with Designer Dries Clear Adhesive.  Adhere to the reindeer house.   

The candy cane reindeer were created with pipe stems, google eyes and little red pom poms.  A glue gun works best but be careful of your fingers!  The flower rhinestone was adhered to the front of the door with Dries Clear Adhesive.   


Thank you for stopping by and I hope you have a safe and wonderful Holiday Season! 


Tuesday, December 12, 2017

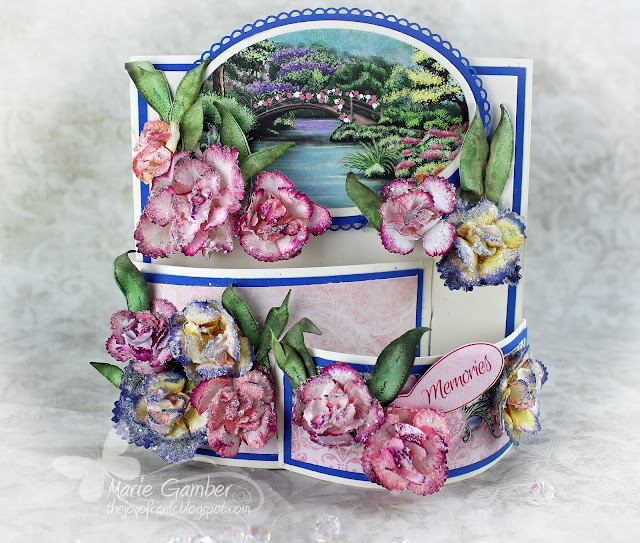
Memories - Bendi Card


Hello my friends!   

It's time for a new release at Heartfelt Creations!   Out new release is the Camelia Carnation Collection!  This is a fun and versatile stamp and die set that you can use through out the year!   I chose to create a Bendi-Card to showcase the Camelia Carnation Collection!    


HCDP1-285, Camelia Carnation Paper Collection
HCPC-3806, Small Camelia Carnation Cling Stamp Set
HCD1-7164, Small Camelia Carnation Dies
HCPC-3807, Large Camelia Carnation Stamp Set
HCD1-7165, Large Camelia Carnation Dies
HCD1-757, Eyelet Oval and Basics Large Dies
PGM15015, Rajni Chawla's Frosting Powder
159723, Designer Dries Clear Adhesive
HCPP3-452, 12 x 12 Cardstock - White
HCST1-401, Deluxe Flower Shaping Kit
HCDA1-450, Stack & Store Daubers- Pack of 6
532423-Kit, Sizzix Vagabond 2 with Solo Wafer-Thin Die Adapter
173742, Scor-Pal Measuring & Scoring Board
71006, ColorBox Fluid Chalk Inkpad - Rose Coral
71015, ColorBox Fluid Chalk Inkpad - Rouge
71034, ColorBox Fluid Chalk Inkpad - Blue Iris
TSMP708, Memento Dye Inkpad - Olive Grove


Blue cardstock, Ranger clear Crackle Paste, heat tool, healing mat, craft knife, glue gun, mounting tape, Squeezed Lemonade Distress Ink, 


Create a Bendi- Card by following these easy and wonderful instructions  by Cheryl on YouTube > https://www.youtube.com/watch?v=HMiPKozFUCI     

The card was altered by creating a blue cardstock layer 1/4 inch smaller in width and height  than the base card and designer paper layers 1/4 inch smaller in length and height than the base layer.  The designer paper was from the Camelia.  The picture of the bridge was selected from the paper collection and cut with the oval die from the Eyelet Oval and Basics Large Dies.  The eyelet oval mat was cut from blue cardstock.   The oval scene was adhered on the bottom half with Designer Dries clear adhesive and adhered to the card.   

The flowers were cut from the Camelia Carnation stamp and cut with the coordinating die.   They were assembled using the Basic Flower Mold.  Final shaping was done with the Deluxe Flower Shaping Kit.   It wasn't needed but I am addicted to it so I use it for everything!    The flowers were colored with the following ink pads - Rose Coral, Rouge and Blue Iris ColorBox Fluid Chalk Inkpads and Squeezed Lemonade Distress Ink.   The leaves were sponged with Memento Olive Grove.    

The flowers were adhered to the card  with a hot glue gun.  The sentiment was cut from the Camelia Carnation Paper Collection.  


Thank you for stopping by and check out the new release at Heartfelt Creations!    


Tuesday, December 5, 2017

Heartfelt Love Treat Bag


Welcome friends!    

As you may know -  I love having parties and creating fun treats as "give-a-ways".   This is the time I usually create fun things for our local Social Service Department to give to children that may not have much at this time of year.   I also love giving to our super cute neighbor kids!    This is an easy project that takes very little time to create!   

I created this treat bag featuring Heartfelt Creations Eyelet Hearts Die, Heartfelt Love paper Collection and the Rose Mold and Sweetheart Border Die.   I hope you like it! 


HCDP10284, Heartfelt Love Paper Collection
HCD1-7161, Sweetheart Border Die
HCD1-7162, Eyelet Hearts die
HCPC-3804, Heartfelt Love Sentiments Stamp Set
GBKK811B1, Clear Cardstock 8.5 x11
HCPC-3752,  Classic Rose Stamp  Collection
HCD1-7110,  Classic Rose Die Set
HCFB1-462, 3D Rose Shaping Mold
HCD1-7341,  Sun Kissed Fleur Die
HCPC-3533, Sun Kissed Fleur Cling Stamp Set
HCD1-755, Circle Basics Large Die
HCS1-457-1, Pastel Pearl - Small Stamen
71006, ColorBox Fluid Chalk Inkpad - Rose Coral
71015, ColorBox Fluid Chalk Inkpad - Rouge
159723, Designer Dries clear Adhesive
352854,  Glue Tips - Metal
Pin6, Glue Pins
HCST1-401, Deluxe Flower Shaping Kit
HCDA1-450, Stack and Store Daubers - Pack of 6
432423-Kit, Sizzix Vagabond 2 With Solo Wafer Thin Die Adapter
173742, Scor-Pal Measuring & Scoring Board
359848, Spellbinders Tool in One
GBKK811B1, Clear Cardstock 8.5 x 11


Red Cardstock, light weight white cardstock, Versamark embossing Ink Pad, Detail Black Embossing Powder, double sided tape, glue gun, heat tool, white ribbon, Misty, mini mister, stapler, Avery Elle Stamp and Die Storage Pockets - clear.


Select the plaid paper from the Heartfelt Love Paper Collection and cut at 12 x  inches.  Score at 5 and 7 inches.   Position the Eyelet heart and a smaller nesting heart on the font panel and die cut.   Cut a piece of clear cardstock slightly larger than the heart and adhere with Dries Clear Adhesive.   Allow to dry.    

Cut the red topper at 5 x 2 inches and score at 1 inch.   Cut the Sweetheart Border Die  on white cardstock.   Use the Spellbinder Tool N' One to weed any remaining pieces that may remain in the die cut.  Adhere to the bottom of the topper with Dries Clear Adhesive.    

Stamp the sentiment from the Heartfelt Love Sentiments Stamp set with Versamark Ink on white cardstock.  apply Detail Black embossing powder and heat set.   Die cut with the Circle Basics Large Die Set.   

Stamp the petals of the Classic Rose Stamp Set using  the Rouge ColorBox Fluid Chalk  Inkpad on white cardstock.    Die Cut with the coordinating die.   Sponge  the tips of the petals with  the Rose Coral ColorBox Fluid Chalk Inkpad.  Spritz lightly with water with a mini mister and shape with the Rose  Shaping Mold.  I added additional shaping with the Deluxe Flower Shaping Kit.   Assemble.   Stamp the Sun Fleur Cling stamp on green cardstock with Memento Olive Grove Ink.  Die cut with the coordinating die.  Shape gently with the  Flower Shaping Kit.   Use one of the petals for the sepal under the flower.  Assemble the sepal and petals.   Punch a hole in the middle using the  sharp end of the Spellbinder Tool N' One or the Deluxe Flower Shaping Kit.  Insert a few of  the Pastel Pearl - Small Stamen.  

Fill an Avery Elle Stamp and Die Storage Pocket with the treat of your choice.   I used Lindor Truffles.   Insert in the pocket inside the treat bag flaps and place the topper on top.  Staple in place.  Wrap with a ribbon and tie a bow.  Adhere the flower and sentiment to complete your Heartfelt Love Treat Box.   

Thank you for stopping by.   I appreciate your visit and wish you a day filled with happy crafting!