Showing posts with label Winter. Show all posts

Tuesday, September 6, 2016

Heartfelt Creations Vintage Winter Box Card


Today I had some fun with a Vintage Winter Box Card.  
I used the gorgeous paper, stamp and die sets from Heartfelt Creations' August release - 
Snow Kissed Collection

When I think of the Winter Holidays and Christmas, I think of "Vintage".  
I love the vintage theme that takes us to memories past.    
Thank made me want to create a vintage themed card 
that has the crisp and chilly feel of Winter. 


HCDP1-269  Snow Kissed Paper Collection
HCD1-7107   Frolicking Frosty and Spruce Die Set
HCPC-3740  Snow Kissed Spruce Cling Stamp Set
HCD1-745  Luggage and Tags Die
TSMP801 - Memento Tuxedo Black Dye Ink Pad
173842 - Scor Pal Measuring and Scoring Board 
DDots - Dimensional Foam Dots
159723 - Designer Dries Clear Adhesive
352854 - Metal Glue Tip 

 White card stock, navy blue card stock, opaque white ink, Vintage Photo Distresss Ink, Weathered Wood Distress Ink,  diecut/embossing machine, paper trimmer, double sided tape,  Star Dust  Clear Stickles,  self adhesive silver pearls, Box Card SVG Kit - from svgcuts.com


The box card was cut from the Box Card SVG Kit from svgcuts.com.   The layers were cut from navy blue card stock and the light blue designer paper from  the Snow Kissed Paper Collection.  The spruce tree was stamped on the background of the designer paper using Weathered Wood Distress Ink.   I continued to stamp 3 times with the stamp without re-inking in order to give a dimensional look.  I repeated the process.  

 The box was easy to assemble with the directions that came with the kit.  I omitted the design elements that came with the SVG Box  Kit (see other product list).   I substituted various sizes of spruce trees, a tag from Luggage and Tag's Die set and  snowflakes.  For the tag, I selected designer paper that had a snowman image.  Silver pearls were adhered to the center of the snowflakes.

The edges of the box card was sponged with Vintage Photo Distress Ink for that vintage look.  The box was embellished with Star Dust Stickles.    I love how the card folds flat for mailing. 


Smile for the Day


Thank you 
so much for stopping by and I hope you enjoyed my vintage box card.  
I hope you check out all the August stamps and die from heartfelt Creations 
and come back and see the new September release next week.  
You will not be disappointed!  


Tuesday, August 30, 2016

Heartfelt Creations - Winter Sleigh Ride


Today's card is a sleigh ride stamp set from Heartfelt Creations August Release - 
Snow Kissed Collection.   
I remember living in Colorado and going into the mountains for a delightful sleigh ride to a log cabin.    
It looks like the one in this image.    
Once we arrived, there was a wonderful prime rib dinner and hot spiced cider waiting for us!   
I will never forget the magical time we had.   


HCDP1-269 Snow Kissed Paper Collection
HCPC-2749  Snow Kissed Spruce Cling Stamp Set
HCD2-750  Cut Mat Create 1B
DDots   3-D Foam Dots 
173842  Scor-Pal Scoring and Measuring Board
TSMP900Memento Tuxedo Black Dye Ink Pad


120 lb. white card stock, green card stock, Xpress It Blending Card Stock, Copic Alcohol ink Markers,  Stickles, double sided tape, paper trimmer, die and embossing machine, painters tape, Weathered Wood Distress Ink Pad and dauber. 


Create a 5 12 x 4 1/4  inch top fold card base.  Cut a base layer from green card stock measuring 5 1/4 x 4 inches.   Select the scenic mat paper from the Snow Kissed Paper Collection with the boughs and ornaments.  Trim the designer paper to 5 x 3 3/4 inches.  Adhere the layers with double sided tape.  

Stamp the sleigh design on X-Press it or any Copic compatible paper.  The 2.5 x 3.5 inch die from Cut Mat Create 1B was placed over the image and the edges taped to the die.  The image was colored with the following Copic Alcohol Ink Markers - R20, R22, R24, R56,  C5, E40, E42, E44, E46, RV91, RV95, Y11, B000, B00, and B41.   Weathered Wood Distress Ink was lightly sponged over the top  of the die to give a border.  Die cut the image with the Cut Mat Create 1B Die.   Cut a mat out of green card stock to fit the die cut image and pop it up with dimensional foam dots.  

Add some Stickles to give an look of the sunset reflecting on the trees, roof and snowy bank. 


Smile For the Day


Thank you for stopping by a checking out my Heartfelt Creations card!  
I hope you have a wonderful week!  
The blog links of my fabulous team members can be found on my sidebar! 


Tuesday, July 26, 2016

Celebrate the Season - Winter Fun!


Hello and Welcome! 

It's time to share another project for Heartfelt Creations!   

This is week two of our "Celebrate the Season Collection" for July.    
I just love to  create projects that showcase the magical time of winter holidays! 
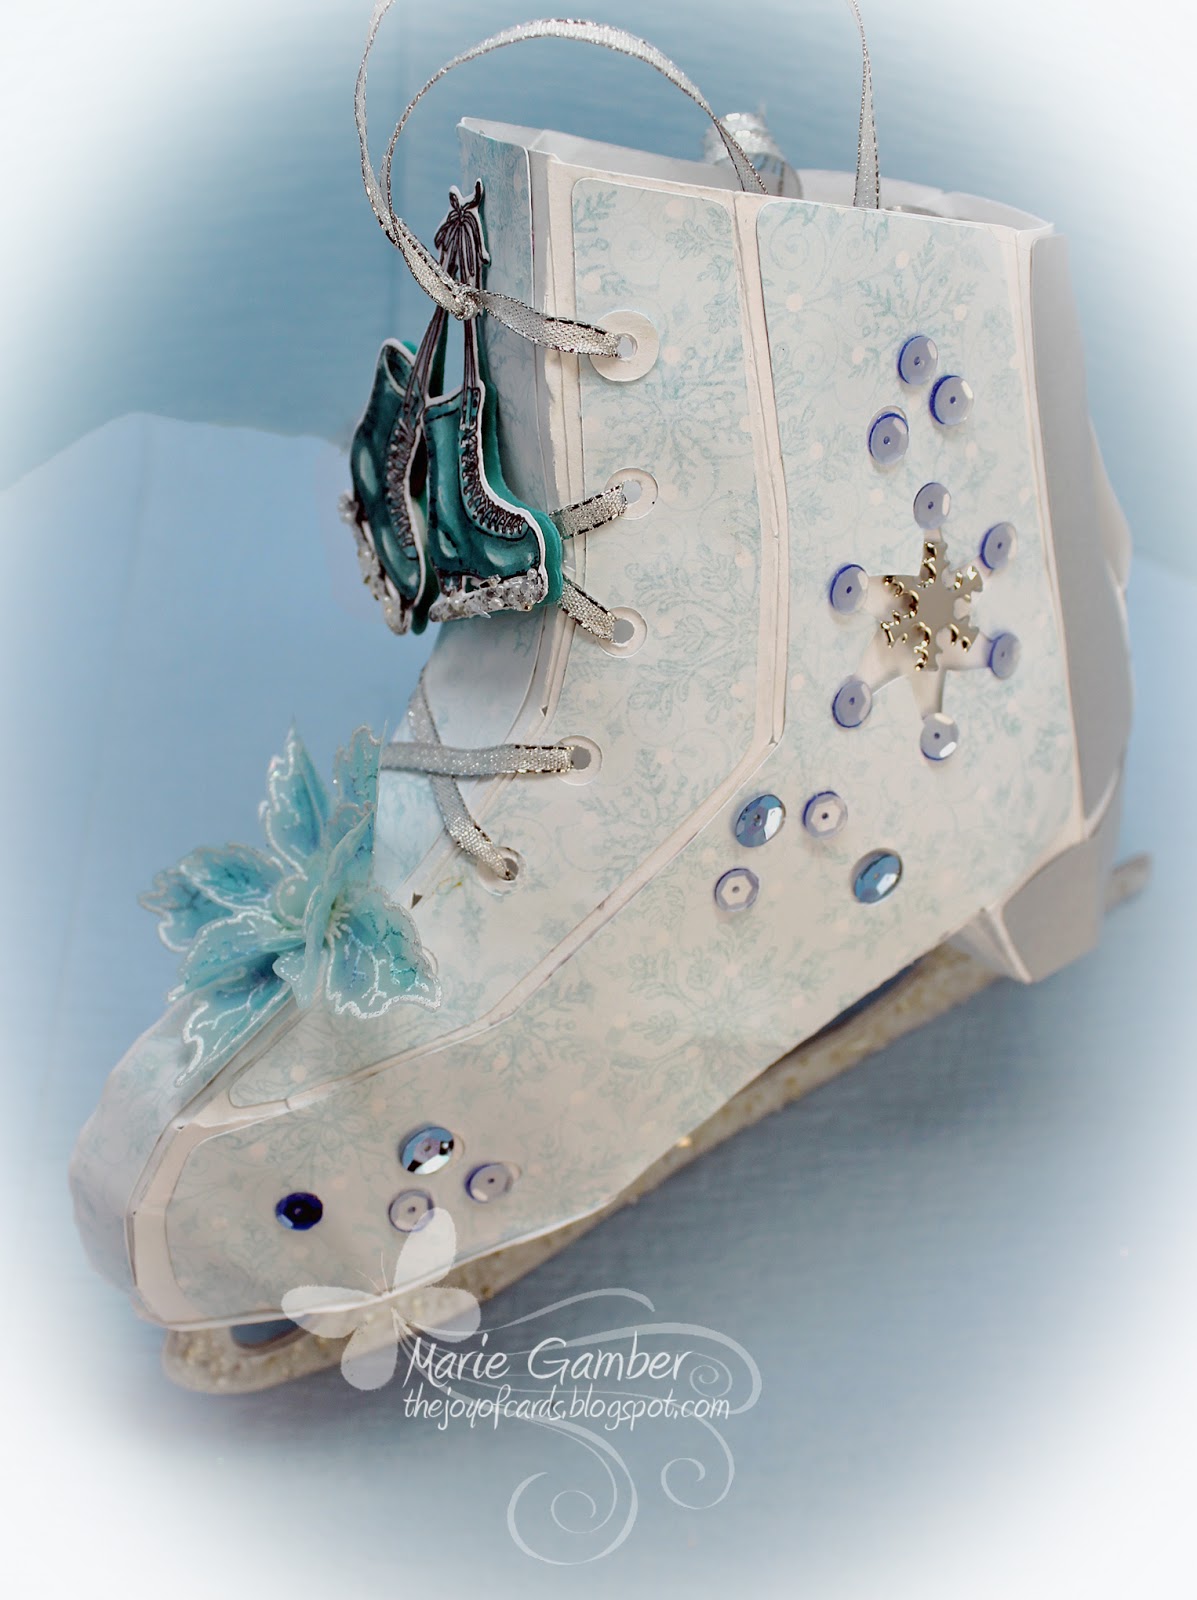
I created a skate to coordinate with the ice skate in the Celebrate the Season Collection.   I also added a poinsettia from the Sparkling Poinsettia stamp and die collection.    
I can almost hear the sound of the skates as they glide along the ice!   

Products Used
Celebrate the Season Paper Collection
Celebrate the Season Cling Stamp Set
Celebrate the Season Die
Sparkling Poinsettia Cling Stamp Set
Sparkling Poinsettia Die
Deluxe Flower Shaping Kit
Designer Dries Clear Adhesive
Metal Tip for Adhesive Bottles
Crystal Gala Glitz
White embossing powder
Memento Summer Sky Dye Ink Pad
Foam Dots


Other products
80 lb white card stock
Silver card stock
Copics alcohol ink markers
Skate SVG file from Winter Gazebo at svgcuts
Sequins
Silver ribbon
White pearls
Brads for the underside of skate
Versmark embossing ink pad
Heat tool
Snowflake brad for the side of skate
Electronic die cut machine


Instructions

 Cut the skate SVG file using an electronic die cutting machine.   Use white card stock for the base and Celebrate the Season Paper Collection for the designer layers.  The sole, heal  and blade was  cut from silver card stock.  The skate was assembled according to  the directions that came with the file.  The blades were lightly coated with 3 D Crystal Lacquer and coated with Crystal Gala Glitz.    

The skate was colored with Copic Alcohol ink markers with BG10, BG10, BG53, BG57, BG09, C5 and c3.  They were die cut with the coordinating Celebrate the Season Die.  Two additional skates were cut from dark blue green card stock.  The layers were adhered with foam dots in-between each layer to add dimension.  The skate blades were coated with 3 D Crystal lacquer and coated with Crystal Gala Glitz.  

Stamp the poinsettia from Sparkling Poinsettia Cling Stamps with embossing ink and sprinkle with white embossing powder on vellum.   Lightly heat set from the under side in order to avoid scorching the vellum.   The poinsettia layers were lightly sponged with Memento Summer Sky Dy Ink.  
Die cut the poinsettias with the coordinating die.  Gently shape the flower using the Deluxe Flower Shaping Kit.   Adhere the layers of the flower and adhere with Designer Dries Clear Adhesive.  White pearls were applied to the center.    

The skate was embellished with sequins, the poinsettia and the colored skate from Celebrate the Season Cling Stamp set and die. 

This skate can be filled with treats and hung on an ornament holder or from the wall.  The possibilities are endless!


I hope you enjoyed this little project as much as I enjoyed creating it!  

I hoe you stop by and visit the fabulous "Celebrate the Season" Collection at Heartfelt Creations.   
It will be a real treat!   

Our fabulous design team's blog links are on my sidebar.  
I hope you give them a visit.   they have some fantastic creations! 


Sunday, November 21, 2010

Deck the Halls

"Color Me Creative Classroom" is having another fun challenge. The inspiration comes from this great picture...


I decided to use some of the festive holiday colors for my card and used the and the christmas ornaments for inspiration for my card.


The edges of my layers look very "frazzeled" but then... Sophie the cat looks pretty "frazzeled" too. Guess it is time to change my cutting blade.

Thank you for stopping by!
Hugs,
Marie

Monday, November 15, 2010

Magic Moments

The card I have for you today reminds me of the wonderful HOLIDAY season! I created this card for the Gina K Sketch Spotlight Challenge. Barbara won this challenge with an absolutely beautiful card. Stop by and see her beautiful creation at
http://stamptv.ning.com/forum/categories/current-challenges/listForCategory


Supplies:
Card Base: Gina K Pure Luxury "Black Onyx" 8 x 5.5 inches. Score at 4.25 inches.
Base Layer: 5.25 x 4 inches
Focal Image: GKD, "Very Merry Christmas" by Theresa Momber
Background Image: GKD "Tree Silhouettes"
Ink: Memento Ink "Summer Sk", "Paris Dusk", and "London Fog"
Copic Markers C3 for shadows and any color families of your choice for bow and swag.
I used a green blending family and blue.
Optional: Embossing pen and Micro Glitter - silver for stars.
White gelly roll pen for snow on trees


I cut my oval using Spellbinder's Petite Oval Large and sponged with Memento "Summer Sky" and "Paris Dusk". I used a masking technique to create my snowline. This is a technique I learned from watching Theresa Momber's wonderful tutorials! I have seen many books with this technique but Theresa's is "over the moon"!


I used Memento "London Fog" sponged the snowbanks using the masking technique.


I moved the sticky notes and continued to sponge the snowbanks.


I stamped the background image with GKD "Tree Silhouettes" with Memento "London Fog"


Used an embossing pen and Micro Glitter Ritz for stars.


I created tree shadows with a C3 Copic marker.


The small sentiment oval was cut with Spellbinders Petite OvalLarge (I used the smallesst. I then sponged around the Nestabilities die with "Summer Sky".


I shaded my bow with Copic markers in the blue and green families. I used reds for the berries.Copics: B32, B32 BV31, R35, $32, G7, G24, G28, G20, E74,C3


I embossed the base layer of Little Boy Blue with the Cuttlebug "D'Vine Swirls" folder and assembled the layers. I popped the focal image with "Pop Dots".
I hope your enjoyed this card. I really enjoyed creating it. YOu know how I love to participate in challenges!

Thank you for taking the time to visit my site!
Hugs,
Marie

Wednesday, October 27, 2010

Winter Wings

Winter Wings is a card inspired by some of the creative work by Theresa Momber. I created this card for a challenge at Gina K's Stamp TV website. I recently started posting on Gina K's site and I discovered a wonderful opportunity to participate in some fun challenges. This is the site if you are interested in joining in on the fun! http://stamptv.ning.com/


Measurements and Supplies
Focal Image: Gina K Designs "Winter Wings" Illustrator Asela Hopkins, Inspiration: Theresa Momber
Background Image: Gina K Designs "Tree Silhouettes"
Pure Luxury Cardstock:
Black Onyx: 5 1/2 x 8 1/2 in
Moonlit Fog: 5 1/4 in x 4 in
Pure White and Black Onyx cut with Nestabilities die Label 11
Forest Branches embossing folder
Memento London Fog Inkpad
Adhesive of choice
Glue of choice
Scor-pal


Background was sponged with Memento Ink "London Fog"


Snow line masked and sponged with Memento Ink "London Fog" Trees were inked with London Fog. I added some shadows to the trees with Copic marker C3.


The Layer of Moonlit Fog was embossed with "Forest Branches" and muted with Memento ink "London Fog". .


Focal imaged stamped with Memento "London Fog".

Imaged was colored with Copic Markers C6, C4, C2 and C0 After uploading the picture, I discovered the eye was too light. I have since, darkened the eye with C6and it looks much better. I cut the focal image out with a pair of sharp scissors.


I applied craft glue to the back of the focal image and allowed it to dry in order to add strength to the image.


I muted 2 brads with Copic Marker C6 and assembled the card.

I hope you enjoyed this as much as I enjoyed creating the card. Thank you for taking the time to look at my site.

Hugs,
Marie