Friday, May 27, 2011

Twilight


Good morning everyone! It is time for another fabulous Color Me Creative Challenge . It's a fun challenge group with 2 challenges & prizes every month to get you using those Copic skills. Come chat with us and have some fun! Click on the GROUPS tab at the top of the CMCC page and then click on the CMC Copic Challenge Group (you do not have to be a student to join us)!!

Did you say prize? Yes! We will have 1 Challenge Winner randomly selected to to win a special prize AND 1 winner from all that month's challenges will have an opportunity to win an additional prize! Two ways to win, but you gotta play!!

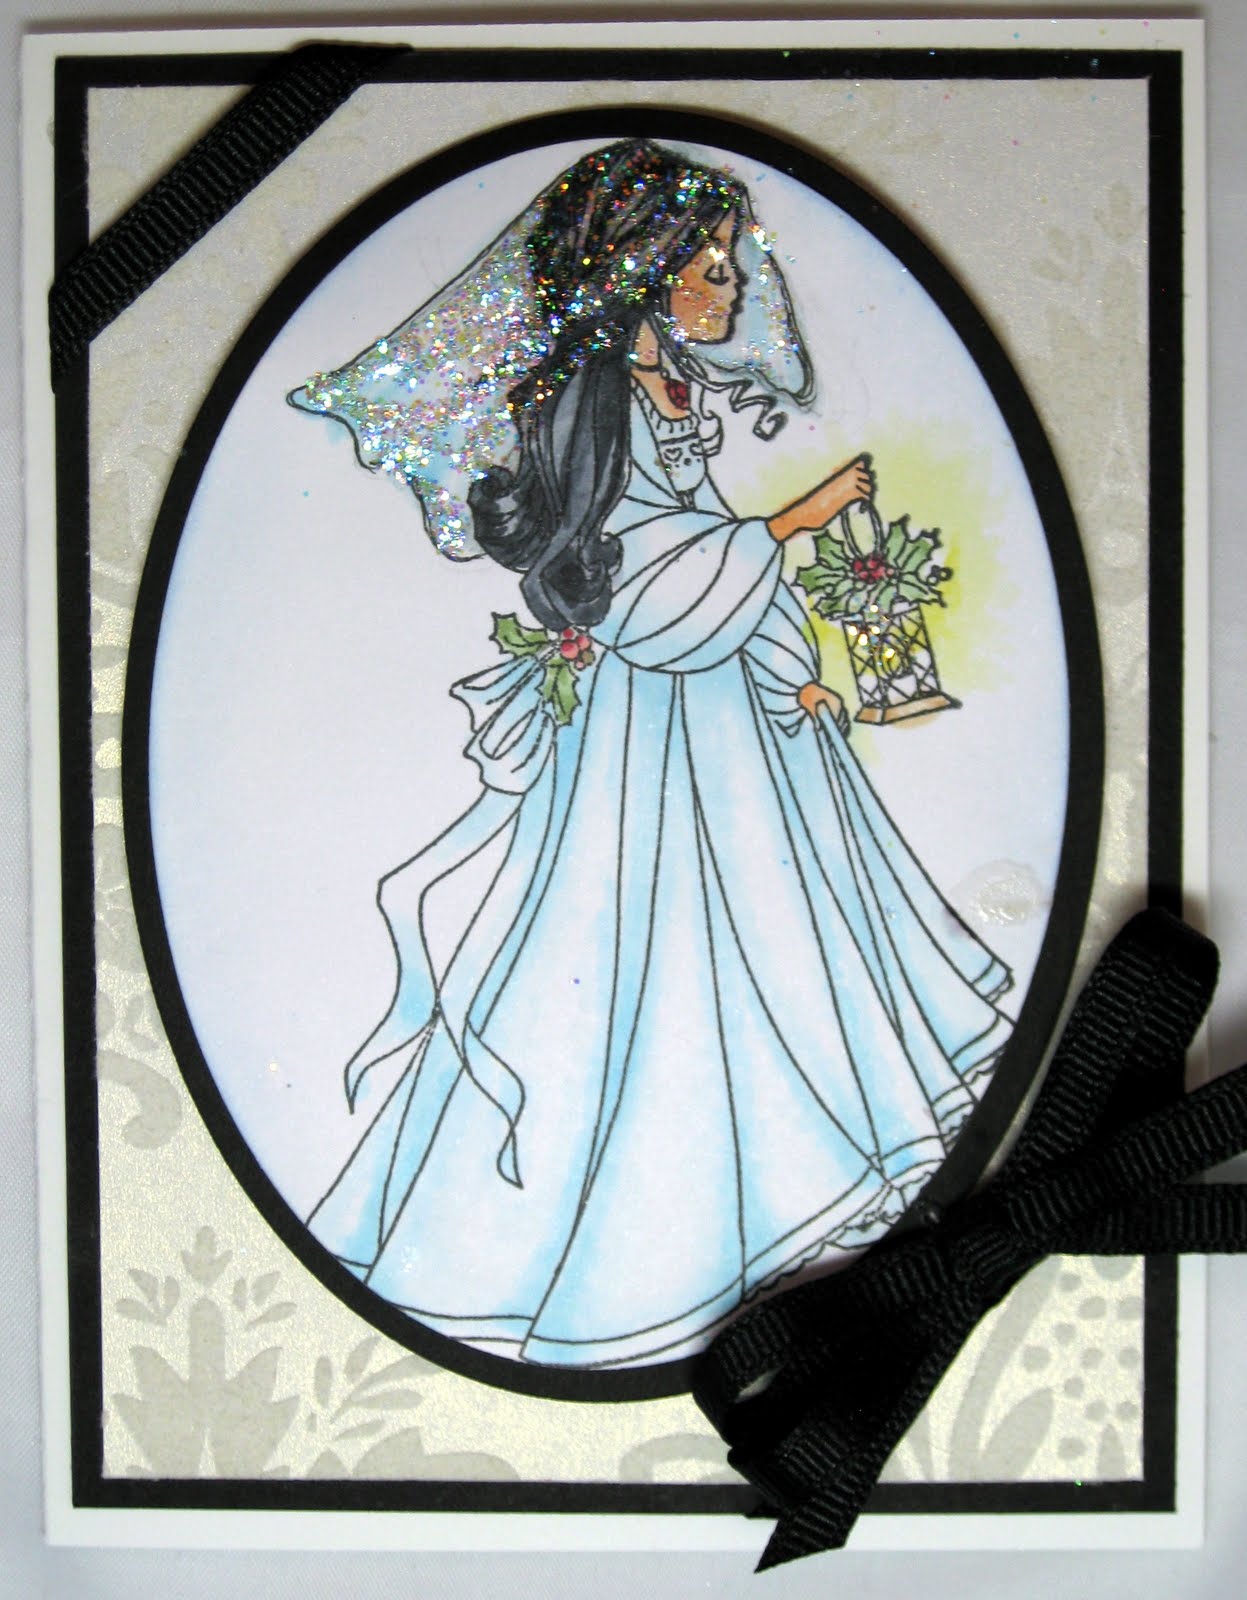
The challenge is to create a card with some kind of "feather" image. You can use your use imagination and create a card with any kind of feathers. - This can be a dress with feathers, birds, a single feather or feather wings... just think of all the possibilities!

I decided to select a wonderful whimsical digital stamp from Crafts & Me . I am also entering this card in the Crafts & Me Challenge #36 with the theme "Gems and Pearls". You may want to join in this too! This challenge can be be found HERE The Sponsor this week is STIX 2 and the fab prize is:

3 X Rolls of Ribbon
1 x Shiny Transfer Foil Set
1 x Pack of 132 All Occasion Gift Discs
1 x Pack of 440 Double Sided Foam Pads
1 x Roll of Double Sided High Tack Ultra Clear Tape
1 x Roll of Stationary Tape- Clear
1 x Quick Stix Glue Stick
1 x Sticky Sheet
All kept in a re-useable zip bag.


Click image to enlarge

Technique:
Copics
Feathers (Not “Feathering”)
Water Color background effect using Copic Markers

Personal Challenge:

I am pushing myself to try more designer paper I recently discovered that I used bright/bold gorgeous colors (designer paper) when I took a pain pill due to a recent extraction of a wisdom tooth….. wow – maybe I should try that when I am not on pain pills!! LO L. I usually try to do my own background paper. I know…. But I live in an area that does not have a craft store close and I don’t have that much designer paper. You have to get just the right one!! No craft stores…… just a lot of turkeys all over my newly landscaped back yard!!!

Measurements:

Card Base 5.5 in. X 8.5 in.
Score and fold at 4.25 in. (This makes card for a 2A envelope)
Card Base Layer 4 in. X 5.25 in.
Card Top Layer 3.75 in. X 5 in.
Focal Image cut with Smal/Large Petite Oval Nestabilities
Focal Base layer cut with Small/Large Petite Oval Nestabilities
I call them Small/Large Petite Ovals because I store them together and do not know which is which! LOL

Supplies:
Focal Image: Crafts And Me - digital image “Twilight”

Copic Markers:
Feathers and Dress: B0000, BG000, BG32, BG 34, BG45, BG49,
Face/skin: E00, E01, E02 help! I lost my E000 and E0000. Used my C. blender. R20
Lantern: E30, E35, E37, Y000
Background B0000, BG000, C0, C3, R20

Card stock : Cryogen White for focal image, GKD Pure Luxury “Pure White” and “and mint colored paper by Bazzill. Designer paper

Ink : Memento “TuxedoBlack” and “Paris Dusk”

Tools: Scor-Pal or Scor-Buddy, Paper Cutter (I use Fiskars), Scissors (Tim HoltzTonic scissors are great for people with arthritis and painful joints), Pop Dots, cuttlebug or die cutter of your choice, Nestabilities Small/Large Petite Oval Nestabilities and Magnoia Doohickeys (my newest and new fav tool)

Embelishments: Ice Stickles


Tip of the Day: I you are like me and lose you most loved Copic color at the most inopportune time….. you can pick up some color from your darker Copic marker with your colorless blender and use that….. at least until you find your “loved marker” under all the piles of necessary craft supplies… LOL


Thank you so much for stopping by. I Hope you have a wonderful day! Come back soon!

Blog Award


I won this wonderful blog award from my cool cyber friend Cindy at Cindy's Antics. Thank you Cindy! please take the time to check out her blog!

I have the opportunity to share 5 things about myself... one that has to do with Copic markers.

1. I was introduced to Copic markers one year ago. I was doing one of my favorite things.... surfing the web and found a gorgeous card on Copic Creations made by Suzanne Dean. I clicked on her name and the link took me to fabulous blog called Scrapbitz. I discovered she taught online Copic classes and I was instantly in love with Copics.....

2. I absolutely love to travel and I plan a trip to Hawaii in November. Can hardly wait!

3. I love mystery books and psychological thrillers. I plan to go to a mystery conference in St. Louis in September this year.

4. I love birds and animals. I have three birds, a cat and I adopted a blind dog (Lab) that was a professional model prior to going blind. He is really full of himself! LOL

5. I was arrested once in Mexico... yes... that will be a story for another day! LOL

And now... I get to recognize 5 cyber friends I think have beautiful, inspiring blogs -

The Pink Dawg House
You Made Me Ink
Creating in Carolina
Scrap and Stamp With Friends
Ruby 2 Shoes

Thank you for stopping by and please come back soon. I have not one but two great challenges to share with your tomrrow!!!

Hugs,
Marie

Tuesday, May 24, 2011

Celebrate!

Shabby Chick is what is it all about! Gina K Designs is having a fun challenge called "Shabby Chick". Even the name makes me smile!

You may wonder what that means.... I know I did. Well STV explains the challenge below

From Wikipedia, the free encyclopedia
Shabby chic is a form of interior design where furniture and furnishings are either chosen for their age and signs of wear and tear or new items are distressed to achieve the appearance of an antique. At the same time, a soft, minimalistic, and feminine feel is emphasized to differentiate it from regular vintage decor; hence the "chic" in the name.


This is the card I made for Stamp TV's Mix It Up Monday Challenge .


Click image to enlarge


Technique:

Shabby Chick (Antique and glitz)
Coloring “Light Cream” and “Dark Cream” as taught by Suzanne Dean in Class , Class 3 Video 6 at Color Me Creative Classroom
Coloring a Watercolor Effect Using Copics as taught by Suzanne Dean in Class 3 video 6 at Color Me Creative Classroom
Click image to enlarge

Personal Challenge:
Paper piecing a part of the image that I stamped with a design and then shading and highlighting with Copic markers.

Measurements:
Card Base 5.5 in. X 8.5 in.
Score and fold at 4.25 in. (This makes card for a 2A envelope)
Card Base Layer 4 in. X 5.25 in.
Card Top Layer 3.75 in. X 5 in.
Focal Image cut with Small Petite Oval Nestabilities
Focal Base layer cut with /Small Petite Oval Nestabilities
I call these Large/Small Petite Oval because I store them together and do not know which is which! LOL

Supplies:


Focal Image: Rubber Stamp by GKD “Celebrate In Style”
Dress Design: Rubber Stamp by GKD Illustrated y Melanie Muenchinger “Bring the Bling”

Copic Markers: E40, E42, E44, W00, W1, R46 and Colorless Blender

Card stock : Cryogen White for focal image, GKD Pure Luxury “Ivory” and “Chocolate Kiss”

Ink : Memento Black and Distress Ink “Vintage Photo”

Tools: Scor-Pal or Scor-Buddy, Paper Cutter (I use Fiskars), Scissors (Tim Holtz helps reduce pain for those with arthritis!), Quickie Glue Pen, Adhesive,large sponge daubers, and Pop Dots

Embellishments: Pearl and Recollections Adhesive Rhinestone Strip and Stickles


Tip of the Day:
If the rubber on your rubber stamps are turning white, you can apply a light coat of glycerin over the rubber to avoid ghosting.


This is a close up image of this versatile little stamp. I stamped my focal image with memento Black ink. I stamped a second image and stamped one of the spiral images from "Bring the Bling" with Desert Sand. I colored the dress in light and dark cream using my Copic markers. I then paper pieced the skirt and placed it over my focal image. I Decorated the spiral design with Stickles. I used very little. I once read that "less is more" when using stickles and I am inclined to agree.


Click image to elarge

Thank you or stopping by. Please come back soon!

Hugs,
Marie

Saturday, May 21, 2011

The Faeries are Busy!

Yes, I know this is a second post for the day but I just had to spread the word about some fabulous blog candy!

The Emerald Faerie Garden is offering some yummy blog candy. Click HERE for the details

Here is what is up for grabs -


Now who couldn't use a few more copic markers!!!!

This is a wonderful site. I recently purchased a few stamps from this site and couldn't wait to make a card with this cute little image. I posted a picture a few days ago of "Boo" that I used for a challenge with Copic Creations. I am proud to say that I am convinced that Boo helped me to have my card selected for the spotlight for Copic Creations.


Thanks Boo!

Stop by Deb's site and get in the running for some blog candy!
Hugs,
Marie

Friday, May 20, 2011

HELLLLLLO GORGEOUS!


Hi everyone!
Copic Creations is offering all of us that live for Copic Markers the opportunity to use the often neglected color - yellow. I don't know why it is neglected... I love yellow. Anyway, hop on over to Copic Creations and join in the fun!

This is another version of the card I selected to use for the challenge. It is a rubber stamp produced by Crafts And Me called "Flapper Melody". I just love their selection of flapper girls. I was first introduced to these wonderful stamps from one of the blogs I frequent called, In Rosie's Book. Hop over to her site and take a look at Rose's fabulous flapper girl!

The one I selected is called "Flapper Melody. Don't you just love her "sassy" look? I am also entering this card in the Basic Grey Challenge # 44. I used A colorful designer paper from a Basic Grey selection for my top base layer. Isn't it bright, colorful and complement the flapper?


Click to enlarge

Technique: Using those underused Yellow Copic Markers!

Measurements:
Card Base 5.5 in. X 8.5 in.
Score and fold at 4.25 in. (This makes card for a 2A envelope)
Base Layers 4 in. X 5.25 in. and 3.75 in. X 5 in
Top Base Layer 4 in. X 5 in.
Focal Image 2.25 in X 4.25 in
Base Focal Image 2.5 in X 4.5 in.

Supplies:
Focal Image: Crafts And Me “Flapper Melody”

Copic Markers:
Face: E000, E00, E01, E11 touch of R20
Hat, bow and Dress: Y0000, Y00, Y02, Y04, Y06, Y06, Y18
Colorless Blender

Card Stock Cryogen White, GKD Pure White, Black Onyx
Designer Paper by Basic Gray

Ink : Memento Tuxedo Black and London Fog

Tools: Scor-Pal or Scor-Buddy, Paper Cutter (I use Fiskars), Scissors (Tim Holtz helps reduce pain for those with arthritis!), Quickie Glue, Adhesive,large sponge daubers

Embellishments: Glossy Accents for floer, Rhinestone, Ribbon to coordinate with designer paper and “Cream” Peal Pen by Viva

Tip of the Day: If your image has an area that did not stamp clearly, you can use your Copic pen and avoid wasting that precious Cryogen paper! I like to use the 0.25 Copic Multiliner.


Click to enlarge
This is a closeup of this cute little image.


Thank you for stopping by! Please come back soon!
Hugs,
Marie

Thursday, May 19, 2011

A Fairytale Day

Good Morning everyone!
Color Me Creative Classroom is having a fun challenge using those wonderful Copic Markers coloring "white" images. Anyone can play along and of course, there is always the opportunity to win some fabulous blog candy! Interested? Stop by to play along! Hope to see you there!

I created two cards using Suzanne Dean's technique for coloring white images with Copic Markers. Color Me Creative Classroom Class 2/Video 6 "Coloring White"


Click image to enlarge

My first card is from Digital Delights called "Madison the Bride". Isn't she just the cutest thing?

Measurements:
Card Base 5.5 in.5 in
Card Base 5.5 in. X 8.5 in.
Score and fold at 4.25 in. (This makes card for a 2A envelope)
Base Layers 4 in. X 5.25 in. and 3.75 in. X 5 in
Focal Image Layer Large Petite Spellbinder Nestabilities

Supplies:

Focal Image: Digital Delights "Madison the Bride
Designer Paper
Copic Markers:
Face: E000, E00, E01, E11 and touch of R20
Hair: E25, E29, E31
Dress: B000, B00
Card Stock Cryogen White, GKD Pure Ivory,
Ink : Memento Black, Summer Sky
Tools: Scor-Pal or Scor-Buddy, Paper Cutter (I use Fiskars), Scissors (Tim Holtz helps reduce pain for those with arthritis!), Quickie Glue Pen, Adhesive,large sponge daubers, Spellbinders Nestabilities Petite Large Oval
Embellishment: Mini Roses, stickles, pearls, ribbon

Tip of the Day: Try coloring white with your Copic markers and then just add one coor to allow the picture to "pop".


Click image to enlarge

My second card was created from a stamp called "Willow with Lantern". I sketched the veil freehand and colored with B000 and B00 and then used stickles.

Tip: You can add interest to your images by drawing details freehand with Copic Multiliners. You can sketch with a pencil and then use your Copic Multiliner. Erase your pencil marks and you are ready to color.

Thank you for stopping by. Please come back soon!

Hugs,
Marie

Friday, May 13, 2011

The Magical Sea


This is a second card I created for "Spring Break" challenge at Color Me Creative Classroom.


Technique:
Highlighting/Shading
Blending with Colorless Blender Technique
Water/Sky

Measurements:
Card Base 5.5 in. X 8.5 in.
Score and fold at 4.25 in. (This makes card for a 2A envelope)
Base Layers 4 in. X 5.25 in
Focal Image Base Layer 3.75 in X 5 in.
Focal Image 3.5 in. X 4.75 in.

Supplies: Focal Image: Digital image - “, ” by Copic Marker Scrapbooking
Copic Markers:
Face: E000, E00, E11, E02 and a touch of R20,
Dark Blond Hair: YR23, E35, E37, E33, E30 Y23
Mermaid body: BG 18, BG15, BG13, BG10 and Colorless Blender
Water B00, B02, B32 and picked up sky with R20. Grey tones with C3, C5

Card Stock Cryogen White, GKD Pure Luxury White, Black Onyx and Pumpkin Spice
Ink : Memento Ink: Summer Sky, Angel Pink, Cantaloupe, Deseert Sand and Ptter’s s

Embelishment: Stickles

Tools: Scor-Pal or Scor-Buddy, Paper Cutter (I use Fiskars), Scissors (Tim Holtz helps reduce pain for those with arthritis!), Quickie Glue Pen, Adhesive,large sponge daubers,

Tip for the day:
Stickles applied very sparingly to the sand makes the beautiful glistening appearance of sand look more realistic. Hum, sure wish I was at the beach!


Doesn't it just make you want to explore the magic of the sea?

Thank you for stopping by. Come back soon!

Hugs,
Marie

Tuesday, May 10, 2011

Thinking of You Today


Copic Creations is having challenge 49 -This is what Copic Creations has to say...

We’ve got a new challenge for you this week . . . COLORING SKY and/or CLOUDS using your Copic markers. This can be either coloring directly on your paper with Copics, or if you’re lucky enough to have one ~ using your airbrush system, or even a slightly different technique using Copic reinkers.

And this is what some lucky winner will get:
This weeks prize for one lucky participant from LOTV will be a . . .


In addition... Paper Temptress will offer some lucky person the opportunity to win some beautiful Cryogen paper!

Making clouds was a bit of a challenge for me.... but here is my take on the challenge. I wanted to make the little guy sit on a cloud but decided to move him over so the clouds would show (since that is the challenge :)


Technique:
Creating sky and clouds using Copic Markers
and Paper Piecing


Measurements:

Card Base 5.5 in. X 8.5 in.
Score and fold at 4.25 in. (This makes card for a 2A envelope)
Card Base Layer 4 in. X 5.25 in.
Upper Base Layer 3.25 in. X 4.25 in
Focal Image Layers : spellbinder Large Rectangle Nestabilities and Deckled Nestabilities

Supplies: Focal Image: Rubber Stamp : The Emerald Faeries Collection “Boo & Snookie”

Background Image: Sky and Clouds created using Copic Markers

Copic Markers: B0000, B000, B01, B02, G0000, G18, G16, G12, G28, E000, E01, E11, R20, C00 and Colorless Blender

Card stock : Cryogen White for focal image, GKD Pure Luxury in White, Pumpkin Spice and Chocolate Kiss

Ink : Memento Black,Summer Sky

Tools:
Scor-Pal or Scor-Buddy, Paper Cutter (I use Fiskars), Scissors (Tim Holtz helps reduce pain for those with arthritis!), Quickie Glue Pen, Adhesive,large sponge daubers, brayer, Cuttlebug or die cutter, Swiss Dots embossing folder, Nestabilities Large Rectangles and Deckled, Nestabilities Fancy Labels and Pop Dots.

Embelishment: Green Rhinestones

Tip of the Day: When paper piecing, turn your paper rather than you scissors while cutting. It will be easier and provider a smoother finish


I created the sky and clouds using Copic Markers. I paper pieced the little faerie and attached with Pop Dots.

If you want to try your hand at creating sky and cloud images or even if you want to just look at all the fabulous cards that were created for this challenge, you can check it out HERE

Thank you so much for taking the time to visit. Please come back soon!
Hugs and Smiles,
Marie

Monday, May 9, 2011

I love You, Mother

Elizabeth Bell's World has a challenge that recognizes that person that will be forever special in our lives.... MOTHER. The site can be found HERE if you would like to play along!

Here is the little Elizabeth Bell card I created called "Pati's Kisses"


Technique: Pastels with Colorless Blender Technique from CMCC Class 3, Suzanne Dean

Measurements:
Card Base 5.5 in. X 8.5 in.
Score and fold at 4.25 in. (This makes card for a 2A envelope)
Base Layers 4 in. X 5.25 in. and 3.75 in. X 5 in
Designer Layer 3.75 in. X 5 in.
Base Focal Image Layer Large Petite Oval Spellbinder Nestabilities
Focal Image: Small Petite Oval Spellbinder Nestabilities

Supplies:
Focal Image Elizabeth Bell Digital Image “Pati’s Kisses”

Copic Markers:
Face: E000, E00, E01, E11 touch of R20
Blouse: R000, R20, R22 and Colorless Blender
Jeans, brief and scarf: B0000, Boo, B02 and Colorless Blender, V0000, V01
Belt: C00, C01, C03
Bear: E74, E71 and Colorless Blender

Card Stock Cryogen White, GKD Pure Ivory and Bazzell “Current Sensations”
Ink : Memento Black and Sky Blue

Tools: Scor-Pal or Scor-Buddy, Paper Cutter (I use Fiskars), Scissors - Tim Holtz (I find they help reduce pain for those with arthritis!), Quickie Glue Pen, Adhesive,large sponge daubers, Spellbinders Nestabilities Petite Large and Small Oval Die and Spellbinders shapeabilities “Symbology”

Embelishments: Pearls, flowers and ribbon

Tip of the Day Think twice before you throw out those scraps of paper.! I try to save paper if it is 2 inches or more. Look at the scroll I used on the card. Yep… scrap paper from the base and focal layers!


Here is a close up of that cute little Elizabeth Bell image


Thank you for stopping by! Come back soon!

Hugs,
Marie

Spring Break

Color Me Creative Classroom is having another fabulous challenge with the theme "Summer Break". Anyone can join in on the challenges.... Check it out! The site and details can be found HERE

Use the Inspiration Photo below to inspire your project and how you color your images with copics. Make your projects using images that reflect vacations, spring, summer, beach & warm weather! Have fun with it and make us all drooooooool with vacation envy!


I used the cute little image by Bugaboo Digital Stamps for one of my cards. I also used the beautiful stamp set by Gina K Designs and illustrated by Melanie Muenchinger "Gifts From the Sea".


I had difficulty getting the camera to capture my image .... don't I look fabulous in my itsy bitsy suit since I went on a crash Weight Watchers program? Just haven't got around to updating my Google picture! LOL!


Technique:

Highlighting
Blending with Colorless Blender Technique
Paper Piecing
Stenciled Background

Measurements:
Card Base 5.5 in. X 8.5 in.
Score and fold at 4.25 in. (This makes card for a 2A envelope)
Base Layers 4 in. X 5.25 in
Focal Base Layer 3.75 in. X 5 in.
Focal Image “Labels Fourteen” Spellbinder Netabilities

Supplies: Focal Image: Bugaboo Digital Stamps “Dottie Beach”
and stamp set by GKD/Melanie Muenchinger “Gifts From the Sea”
Base Layer: Spellbinders Impressailities “Sea Scape”
Copic Markers:
Face: E000, E00, E01, and a touch of R20,
Beach Towel: B0000, B00, B02 and Colorless Blender
Beach Ball: R000, R20, R22, R24, R26, Y0000, Y02, touch of Y23, B0000, B00, B02 andColorless Blender
Sea Shells: R0000, R00, R20, R22, R24, R26, R29

Card Stock Cryogen White, GKD Pure Ivory and Pure Luxury Bubblegum Pink and a darker shade of pink from the Bazzell Smoothie "Current Sensation" collection.
Ink : Memento Rose Bud and Angel Pink

Tools: Scor-Pal or Scor-Buddy, Paper Cutter (I use Fiskars), Scissors (Tim Holtz helps reduce pain for those with arthritis!), Quickie Glue Pen, Adhesive,large sponge daubers, Cuttlebug or die cutter of your choice, Spellbinders Nestabilities “ Label Fourteen” and Spellbinders Impressabilities “Sea Scape


Tip for the day: You can make beautiful backgrounds for your focal image by using ink and a stencil with Spellbinder Impressibilities or Deamweaver stencils. I have also used some beautiful stencils from the Martha Stewart collection.


This is a close up of a few of the beautiful stamp images from GKD's "Gifts From the Sea". Aren't they versatile? Think of all the possibilities!

I used Spellbinders Impressibilities "Sea Scape" and stenciled the image on my base layer using Rose Bud Memento ink. I thought the stencil coordinated nicely with the stamp set "Gifts From the Sea


Thank you for looking at my card. I appreciate that you took the time!
Have a great day!

Hugs and Smiles,
Marie

Thursday, May 5, 2011

Hopping Into Spring


Yes, I know... Easter has passed but I have been known to be a little late so what do I do? I change the title. It is now a May Basket!!! This is a little project I had completed for the second part of the DT call for THCRD. The design team has been selected so I can now post my project. It really was completed before Easter! LOL!

Little Bunny:
Stamp: Peachy Keen “Easter Basket Bunny"
Copic Markers: E30, E31, E33, E00
R20, R000, R0000
Y00, Y02, Y08, Y18
BG 10, BG32, BG34, BG45, BV00, BV13, BV17
Colorless Blender

May Basket (Get it? May Basket!)Hee Hee!
GKD Pure Luxury Vibrant Violet Cardstock
3 D basket cut at 7 inches using Cricut Expression
“Easter 2010” Cartridge
Grass cut at 2.5 inches with Cricut Expression using “Easter 2010” Cartridge.
I curled the tips of the grass in order to make it have more dimension and look more realistic.
Using a score tool on the creases of the basket will allow the corners to be sharp andThe provide a finished appearance.

I used Pop Dots on the back of the bunny to adhere it to the basket.

The handle was applied and a Prisma Flower applied.

And now - We are just waiting for the Easter Bunny to fill the basket with all kinds of sweet goodies!

Tip: The Cricut cartridge leaves little score marks for folding the basket but you will get a more professional look if you also use your bone folder. And, did you know that when using a bone folder, you will get a better finished product that does not have unwanted lines if you use a sheet of paper between the cardstock and your bone folder.


I used a cute bunny image from Peachy Keen Stamps. Isn't he just the cutest?


I cut the little basket out of the wonderful Cricut Cartridge called "Tags Bags and Boxes". I can say without a doubt that this is my most used cartridge. I use it all year long for just about every special occasion.


I used pop dots to position the little bunny so he would be positioned properly. The basket is at an angle so I put most of the pop dots on the bottom to pop it out a little. Note the degree of saturation of the Copic marker on the bak of the paper. This is the degree of saturation you want to achieve when using your Copic markers.


Of course I had to cut a little grass with the Cricut.


This is the side view of the basket.


I really enjoyed this project. I hope you enjoyed it and thank you so much for stopping by. Come back soon.....

Hugs and Smiles
Marie