Tuesday, September 13, 2016

Heartfelt Creations Classic Rose Release - Vineyard Mosaic Card


I have had such a hard time keeping this release a secret!  
I have been so excited about this amazing set of stamps and die from Heartfelt Creations- 
Classic Rose Collection
I thought I wold have a little fun with creating a mosaic card! 


Classic Rose Paper Collection
Classic Rose Cling Stamp
Classic Rose Die
Classic Rose Vine Die
Deluxe Flower Shaping Kit
Designer Dries Clear Glue
Metal adhesive tip
Memento Tuxedo Black Dye Ink
Scor-Pal Scoring and Measuring Board

120 lb. ivory card stock, burgundy card stock, double sided tape, paper trimmer, die cut/embossing machine, opaque white ink, Copic Alcohol Ink Marker, Misty and misting spritzer bottle.


 Stamp, color and die cut Classic Roses.  Die cut one  Classic Rose Vine. I stamped my images on X-Press It Blending Card Stock but you can use any Copic compatible paper.
 I used the following Copic Alcohol Ink Markers - RV 21, RV35, RV29, R59 and a touch of Y15 (sparingly) to the highlight.   

You can watch Emma Lou create  gorgeous flowers from the Classic Rose Collection HERE

Create a 5 1/2 x 5 1/2 inch card with a top fold.  A mat from he designer paper was cut at 5 1/2 x 5 1/5 inches.  A burgundy mat was cut at 5 1/4 x 5 1/4 inches.  Lightly draw a line at 1 inch intervals in horizontally and vertically.   

Distress and adhere the layers to the card base. Select a  designer paper from the Rose Collection Designer Paper Collection that has a pictures of a beautiful winery and  vineyard. Cut this layer at 5 x 5 inches. Cut in 1 inch strips.   I found it easiest to cut a lateral 1 inch strip and cut again vertically in 1 inch strips.  

Adhere to the burgundy layer of card stock, using your lines as a guide.  Leave a slight space in-between each square.    
Repeat with each strip.   

Adhere the shaped Rose Vine and Classic Rose clusters for embellishment.    

I added a burgundy layer to the inside of the card and a light colored designer paper that would allow  a sentiment or personal not on the inside.  


 for stopping by.  I hope you enjoy Heartfelt Creations as much as I do!    
Check out my team mates wonderful creations.   They are such a creative designers!    You can find their blog links on my sidebar!   


Tuesday, September 6, 2016

Heartfelt Creations Vintage Winter Box Card


Today I had some fun with a Vintage Winter Box Card.  
I used the gorgeous paper, stamp and die sets from Heartfelt Creations' August release - 
Snow Kissed Collection

When I think of the Winter Holidays and Christmas, I think of "Vintage".  
I love the vintage theme that takes us to memories past.    
Thank made me want to create a vintage themed card 
that has the crisp and chilly feel of Winter. 


HCDP1-269  Snow Kissed Paper Collection
HCD1-7107   Frolicking Frosty and Spruce Die Set
HCPC-3740  Snow Kissed Spruce Cling Stamp Set
HCD1-745  Luggage and Tags Die
TSMP801 - Memento Tuxedo Black Dye Ink Pad
173842 - Scor Pal Measuring and Scoring Board 
DDots - Dimensional Foam Dots
159723 - Designer Dries Clear Adhesive
352854 - Metal Glue Tip 

 White card stock, navy blue card stock, opaque white ink, Vintage Photo Distresss Ink, Weathered Wood Distress Ink,  diecut/embossing machine, paper trimmer, double sided tape,  Star Dust  Clear Stickles,  self adhesive silver pearls, Box Card SVG Kit - from svgcuts.com


The box card was cut from the Box Card SVG Kit from svgcuts.com.   The layers were cut from navy blue card stock and the light blue designer paper from  the Snow Kissed Paper Collection.  The spruce tree was stamped on the background of the designer paper using Weathered Wood Distress Ink.   I continued to stamp 3 times with the stamp without re-inking in order to give a dimensional look.  I repeated the process.  

 The box was easy to assemble with the directions that came with the kit.  I omitted the design elements that came with the SVG Box  Kit (see other product list).   I substituted various sizes of spruce trees, a tag from Luggage and Tag's Die set and  snowflakes.  For the tag, I selected designer paper that had a snowman image.  Silver pearls were adhered to the center of the snowflakes.

The edges of the box card was sponged with Vintage Photo Distress Ink for that vintage look.  The box was embellished with Star Dust Stickles.    I love how the card folds flat for mailing. 


Smile for the Day


Thank you 
so much for stopping by and I hope you enjoyed my vintage box card.  
I hope you check out all the August stamps and die from heartfelt Creations 
and come back and see the new September release next week.  
You will not be disappointed!  


Tuesday, August 30, 2016

Heartfelt Creations - Winter Sleigh Ride


Today's card is a sleigh ride stamp set from Heartfelt Creations August Release - 
Snow Kissed Collection.   
I remember living in Colorado and going into the mountains for a delightful sleigh ride to a log cabin.    
It looks like the one in this image.    
Once we arrived, there was a wonderful prime rib dinner and hot spiced cider waiting for us!   
I will never forget the magical time we had.   


HCDP1-269 Snow Kissed Paper Collection
HCPC-2749  Snow Kissed Spruce Cling Stamp Set
HCD2-750  Cut Mat Create 1B
DDots   3-D Foam Dots 
173842  Scor-Pal Scoring and Measuring Board
TSMP900Memento Tuxedo Black Dye Ink Pad


120 lb. white card stock, green card stock, Xpress It Blending Card Stock, Copic Alcohol ink Markers,  Stickles, double sided tape, paper trimmer, die and embossing machine, painters tape, Weathered Wood Distress Ink Pad and dauber. 


Create a 5 12 x 4 1/4  inch top fold card base.  Cut a base layer from green card stock measuring 5 1/4 x 4 inches.   Select the scenic mat paper from the Snow Kissed Paper Collection with the boughs and ornaments.  Trim the designer paper to 5 x 3 3/4 inches.  Adhere the layers with double sided tape.  

Stamp the sleigh design on X-Press it or any Copic compatible paper.  The 2.5 x 3.5 inch die from Cut Mat Create 1B was placed over the image and the edges taped to the die.  The image was colored with the following Copic Alcohol Ink Markers - R20, R22, R24, R56,  C5, E40, E42, E44, E46, RV91, RV95, Y11, B000, B00, and B41.   Weathered Wood Distress Ink was lightly sponged over the top  of the die to give a border.  Die cut the image with the Cut Mat Create 1B Die.   Cut a mat out of green card stock to fit the die cut image and pop it up with dimensional foam dots.  

Add some Stickles to give an look of the sunset reflecting on the trees, roof and snowy bank. 


Smile For the Day


Thank you for stopping by a checking out my Heartfelt Creations card!  
I hope you have a wonderful week!  
The blog links of my fabulous team members can be found on my sidebar! 


Sunday, August 28, 2016

The Outlawz - Twisted Thursday : Butterfly Gift Tag


Welcome!

I would love to share my guest designer  project I created for The Outlawz - Twisted Thursday.
I love tags and my eyes lit up when I saw this gorgeous take digital image from Bugaboo Stamps!    

Our fabulous sponsor is
Sponsor Bugaboo
For my tag, I colored the image with Copic Alcohol Ink Markers. 
I tried to use different colors but wanted to keep the B00 and  B10 consistent in each butterfly.
I added some white opaque white to the wings.    

The other thing I love to do is to create fun backgrounds!    I used  some BV000 and BV00 around the butterflies.   I saturated some burlap with 70% rubbing alcohol and applied it to the background for 3-4 seconds.   Isn't that fun?!   I love doing this!   


Thank you for stopping by and come back soon!  


Tuesday, August 23, 2016

Heartfelt Creations - Frolicking Frosty!


Frolicking Frosty the Snowman is a cute stamp and die set from 
Now how cute is that!   This card makes up in no time and is super easy to create!  
The gorgeous scenes that come in the Snow Kissed Paper Collection 
sets the tone for your card!    


Snow Kissed Paper Collection
Frolicking Frosty Cling Stamp Set
Frolicking Frosty and Spruce Die Set
Snow Kissed Spruce Cling Stamp Set
Memento Tuxedo Black Dye Ink Pad
Scor Pal Measuring and Scoring Board
Dots - Dimensional Foam Dots
Designer Dries Clear Adhesive
Metal Glue Tip
Blue Gala Glitz
White Gala Glitz


120 lb white card stock
Blue card stock
X-Press It Blending Card Stock (or any Copic compatible paper)
Copics Alcohol Ink Markers
Opaque white ink
Weathered Wood Distress Ink
Die - Embossing machine
Paper Trimmer
Double sided tape
post-it Note


Cut  5 1/2 inch x 11 inch white card stock for your card base.   Score and create a crisp fold at 5 1/2 inches.  The base layer was cut from blue card stock and measures 5 1/4 in. x 5 1/4 in. For the scenic background, I selected a paper with spruce trees and a  small snowman that would match Frosty.  The designer paper was cut at 5 inches x 5 inches.  Frolicking Frosty was stamped on  X-Press It card stock with Memento Tuxedo Black Dye Ink.  Memento Ink is compatible with Copic Markers and will not discolor the nibs.

The image was colored with Copic Alcohol Ink Markers.  I used the following color combinations -  G40, YG61, YG63, YG39, C3, C5, C7, C9, YR20, YR24, B0000, B000, B21 and a touch of R20 to the cheeks.  I speckled the image with opaque white ink to look like snowflakes. The image was die cut using the Frolicking Frosty and Spruce Die.

I masked the image on the designer paper with a Post-It Note  and stamped some spruce trees with Weathered Wood Distress Ink.  I created dimension by using a "stamp off" technique.  The tree was stamped and then stamped a second and third time in different areas without re-inking the stamp.  This will allow some trees to look like they are in the distance.   This is a fun technique that can be used on many scenes.    I used an opaque white ink pen and dotted the trees in areas to look like snow.

The layers were adhered with double sided tape.   Frosty was popped up on the paper with dimensional foam dots.  For a little added bling - I used Designer Adhesive - Dries Clear Glue and dotted it in the sky.  I then added white and blue Gala Glitz.


Today's Dose of Cuteness


I hope you enjoyed this card and will check out the wonderful collection of stamps and die from Heartfelt Creations' August Collection!   
My fabulous team mates blog like are listed on my left sidebar!   

Have a wonderful week and come back soon! 


Tuesday, August 16, 2016

Heartfelt Creations - Winter Wonderland!


Just hear those sleigh bells! 

Welcome! 
I am so excited to share a trifold card I created with
Heartfelt Creations August Release -
Snow Kissed Collection! 

I love getting a jump start on all my Christmas cards! 
The new collection of paper, stamps and die 
make it so easy! 

Heartfelt Creations' Products
 Snow Kissed Paper Collection
 Snow Kissed Spruce Cling Stamp Set
Cut Mat Create 1B
 Memento Tuxedo Black Dye Ink
Double Dots 3D Foam Circles
Scor Pal Measuring and Scoring Board

Other Products
120 lb white card stock, green card stock, X=Press It Blending Card Stock, Stickles, Double sided tape, Opaque white ink, Copic alcohol ink markers, paper trimmer and die cut machine.


Instructions
  1. Cut white card stock at 5 1/2 inches x 11 inches and score at 5 1/2 inches. Cut two green base layers at 5 1/4 in. x 5 1/4 inches.
  2. I selected the paper with the green boughs and river scene from Snow Kissed Paper Collection and cut at 5 in. x 5 in.
  3. The focal image was stamped with the sleigh on X-Press It Blending Card Stock. My image was colored with the following Copic alcohol ink markers - E30, E33, E35, E39, B000, B21, Y11, RV000, RV00, RV11,   G40, G43 and YG63. I accented the boughs, river and trees with opaque white ink. You can use any in medium you prefer and paper that is comparable with your color medium.
  4. The focal image was die cut with the Cut Mat Create 1B die. I used some reserved green card stock to mat the focal image. I drew a line around the outside of the die I used for the focal image and scissor cut it to create the mat for the focal image.
  5. A tag was selected from the paper collection that had an image of a small sleigh and I matted it with the green card stock.
  6. The layers were adhered to the inside of the card with double sided tape . The front of the card was scored and folded with a crisp fold at 2 1/4 inches and folded with a mountain fold.  The two pieces of designer paper should be facing each other.    This allowed the bough and tree from the inside of the card to show even when the  try-fold card is closed. The focal image and sentiment were popped up with foam dimensional dots and adhered as shown in the picture.
  7. And now for some added sparkle - I applied Stickles to the river, snow and trees. Clear Designer glue and white Gala Glitz would have been gorgeous! I wish I would have thought of that sooner!


Thought for the Day


Thank you for stopping by and visiting today!  
I hope you check the wonderful new stamps, die and paper at Heartfelt Creations.   
Don't forget to hop over and visit the fabulous blogs of my co- design team members!   


Wednesday, August 10, 2016

Heartfelt Creations - Christmas Greetings!


Hello and welcome! 

Today I invite you to join me on a magical journey to that wonderful time of year when snow flakes are falling and Frosty is in the front yard... waving  to everyone while Christmas carols ring out from every corner!   

Our new release at Heartfelt Creations is...

Snow Kissed Collection!


Hello and Welcome! 
I created another Snow Kissed Collection card for you today.  
I decided to showcase some of the gorgeous paper from this collection by using a try-fold card. 


Heartfelt Creations Products

Snow Kissed Paper Colletion
Frolicking Frosty Cling Stamp Set
Frolicking Frosty and Spruce Die Set
Snow Kissed Flakes and Tag Cling Stamp Set
Snow Kissed Flakes and Tag Die Set
Designer Dries Clear Adhesive
Metal Tip for Adhesive Bottles
Gala Glitz - white
Memento Tuxedo Black Dye Ink Pad
Border Essentials Die
Scor Pal Measuring and Scoring Board

Other Products
120 lb white card stock
Navy blue card stock
X-Press It Blending Card Stock (or any Copic compatible paper)
Copics Alcohol Ink Markers
Opaque white ink
Blue and white baker's twine
Die machine
Paper Trimmer

Instructions
  • Create a 5 1/2 x 5 1/2 inch white card base and 5 1/4 x 5 1/4 inch  base layer from navy blue card stock.  Cut a 5 x 5 inch white Copic compatible paper and  die  cut snow flakes  in an arch around the top of the paper.  I used the negative part of the snowflake die so the blue would show through.  You can save all the snowflakes that are loose for another project.   
  • Stamp the focal image with Tuxedo Black Memento Ink.   Color the image with Copic alcohol ink markers or the media of your choice.  I used Copic B0000, B000, B41,  G40, GY61, GY 63, GY67, Y13, YR15, R20, R22, R24,  R56, C1, C3, C5, C7, C9
  • The inside of the card has a base layer of navy blue cut at 5 1/4 x 5 1/4 inches.  I die cut a border of squares  at the bottom and threaded some navy and white baker's twine and tied a bow.  I selected the top layer from the Snow Kissed Paper Collection and trimmed it to fit with an even 1/8 inch  border.   The layers were adhered with double sided tape.  
  • White opaque dots  were applied for  a snowy look.     Specks of designer glue that dries clear were applied  to the snowflakes and snow.   I sprinkled  some gorgeous white Gala Glitz for some extra shine. 


Cuteness Overload for the Day


 Thank you so much for stopping by and checking out our latest
 Snow Kissed Collection at Heartfelt Creations!     
For a special treat, don't forget to  hop over to the blogs of my fabulous team mates....   
You can find their links on my sidebar!    


Wednesday, August 3, 2016

Heartfelt Creations Monochromatic Window Card with a Color POP


Hello everyone!   It's another Heartfelt Creations  time!
Today, I have colored a monochromatic window card using a masking technique and a color pop!  
I am getting to excited thinking of all the fun cards and projects I can make for the the holidays!   
I love getting a jump start!   

Products

HCDP1-268 Celebrate the Season Paper Collection
HCPC-3747 Celebrate the Season Cling Stamp Set
HCD1-7106 Celebrate the Season Die Set
HCPC-3748 Gift Wrapped Presents Cling Stamp Set
7104 Ornate Sleigh and Presents Die
HCD2-751Cut Mat Create 2A
HCD1-761  Everyday Heroes Die
ANC822  I cannot tell a Lilic Prills
HCST1-401 Deluxe Flower Shaping Kit
159723 Designer Dries Clear Adhesive
352854 Metal Tip for Adhesive Bottles
Memento Tuxedo Black Dye Ink
White embossing powder

Other Products Used
Violet card stock, 120 lb. card stock, X-Press It Blending Card Stock or any Copic compatible paper, Ranger Star Dust Stickles, Copic alcohol ink markers, die machine, paper trimmer and Versamark embossing stamp pad.


Instructions
Techniques - Monochromatic Window Card with a Color POP and masking.
Create a top fold 5 1/2 x 5 1/2 in.  card using 120 lb. white card stock.  Cut two  base layers from violet card stock.    Cut one  designer layer measuring 5 x 5 inches from Celebrate the Season Paper Collection.  I selected the paper that says Merry Christmas and has beautiful wrapped gifts of violet and teal.   I cut a 5 x 5 inch layer of X-Press It (or Copic compatible paper) for the inside of the card.  This layer will be used for our focal image.

A window was die cut In the  card base using the 3 1/2 x 3 1/2 inch square die. The layer was adhered and die cut (from the underside or negative space from the card base).    Repeat the process for the 5 x 5 inch designer paper and adhere all layers to the card base.   Use the same die to cut a window in some  violet card stock and  trim  in a square allowing 1/2 inch margin on all sides.   This provides a window frame.  Adhere the frame to the outer edge of the window.

Inside of the card.   
Adhere the second violet  5 1/3 x 5 1/4 inch layer to the inside of the card.  Position the Copic compatible paper layer  and lightly mark the window with a pencil.   

Stamp the two small blue-green gifts within the circle.  Create two masks by stamping the images on  thin sticky note paper and trim.   The masks are placed over the top of the images and the larger square gift can be stamped over the top.   When the masks are removed,  the square box sits behind the other two gifts.  This adds dimension. The last stamped image becomes the background.   The round gift box can be  stamped again on Copic compatible paper.

The blue-green gifts were colored  with BG 0000, BG000,  BG00 and C3 for shadows.     The violet Gift was colored with V01, V04, V06 and B09.   The ribbon was colored with BG000, BG10,  BG01 and C4 for the shadow.   This layer can now be adhered on top of the violet layer on the inside of the card.   The gifts should now be viewed perfectly from the window when the card is closed.

And now for the "Color POP".  The  colored violet gift can be die-cut along with two additional from  violet card stock. These  three layers  are popped up with foam dots in-between each layer for dimension.   Not only will it give a pop of color but it will also physically popped up from the rest of the gifts.   Close the card and adhere the colored gift with the  foam dots in front of the blue-green gifts as shown in the picture.

The poinsettias were stamped and colored with the same violet color combo.   The flowers were shaped using the Deluxe Flower Shaping Kit and adhered with clear designer adhesive.   I Cannot Tell a Lilac Prills were adhered to the center of the flowers.  Stickles were applied to the tips of the petals.   The leaves were die-cut from some of the gorgeous Celebrate the Season paper Collection.  The poinsettias can be adhered to the lower left hand corner of the frame.  

The sentiment  "Merry Christmas"  was stamped with Versemark and embossed  with white embossing powder.   After heat setting, the sentiment was die cut with the arrow shaped die from  the Everyday Heroes.     The sentiment was trimmed and  adhered to the left side of the card.

Fun thought for the day


Thank you for stopping by and you will see all the fabulous blog links from my fabulous team mates on the left side of my blog.   I hope you stop by and enjoy the fabulous Heartfelt Creations stamps and die and see the inspiring cards and projects from the fabulous design team!


Friday, July 29, 2016

The Outlawz - Twisted Thursday : Special Memories


Welcome! 

Today is the day I get to share my guest designer project for The Outlawz- Twisted Thursday!   
Our challenge for this week is "anything goes".   Yes, my fav!!!  
Our sponsor will be   


I hope you hop over and put your creation in the challenge.   
it is a fabulous group of designers and a great community
and 
after all -
Isn't that what it is all about?!   


I am still practicing "shine" on leather shoes.   
I loved Jennifer Dove's Bootcamp and I learned so much.    
This stamp is one of Jennifer's illustrations... called Heels.    
I purchased mine at bootcamp but C.C. Designs carries them. 

I colored them with Copic Markers -   BG20, BG72,  BG75 and BG 79
I added some cross hatching with a grey Faber Castelle Colored Pencil.  
I added some gold sequins for embellishment. 

Take care, my friends and come back soon! 
Don't forget to like your card or project into the challenge at


Tuesday, July 26, 2016

Celebrate the Season - Winter Fun!


Hello and Welcome! 

It's time to share another project for Heartfelt Creations!   

This is week two of our "Celebrate the Season Collection" for July.    
I just love to  create projects that showcase the magical time of winter holidays! 
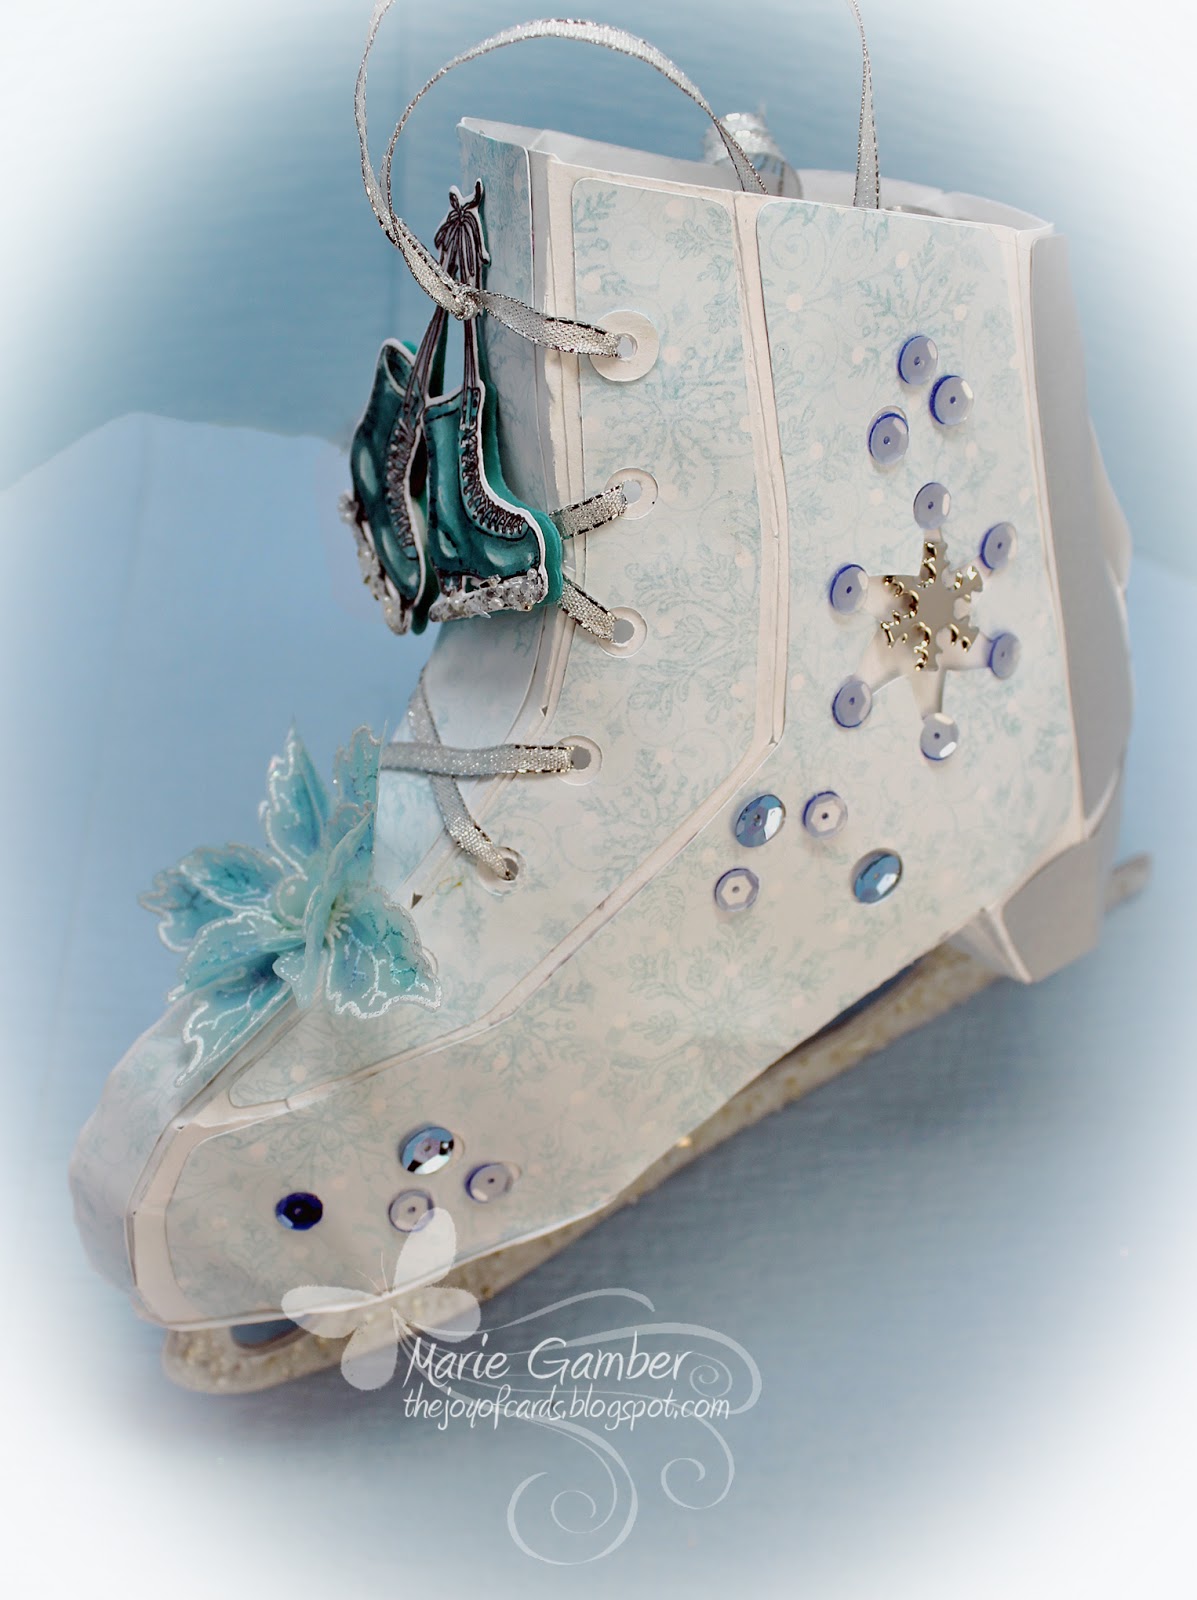
I created a skate to coordinate with the ice skate in the Celebrate the Season Collection.   I also added a poinsettia from the Sparkling Poinsettia stamp and die collection.    
I can almost hear the sound of the skates as they glide along the ice!   

Products Used
Celebrate the Season Paper Collection
Celebrate the Season Cling Stamp Set
Celebrate the Season Die
Sparkling Poinsettia Cling Stamp Set
Sparkling Poinsettia Die
Deluxe Flower Shaping Kit
Designer Dries Clear Adhesive
Metal Tip for Adhesive Bottles
Crystal Gala Glitz
White embossing powder
Memento Summer Sky Dye Ink Pad
Foam Dots


Other products
80 lb white card stock
Silver card stock
Copics alcohol ink markers
Skate SVG file from Winter Gazebo at svgcuts
Sequins
Silver ribbon
White pearls
Brads for the underside of skate
Versmark embossing ink pad
Heat tool
Snowflake brad for the side of skate
Electronic die cut machine


Instructions

 Cut the skate SVG file using an electronic die cutting machine.   Use white card stock for the base and Celebrate the Season Paper Collection for the designer layers.  The sole, heal  and blade was  cut from silver card stock.  The skate was assembled according to  the directions that came with the file.  The blades were lightly coated with 3 D Crystal Lacquer and coated with Crystal Gala Glitz.    

The skate was colored with Copic Alcohol ink markers with BG10, BG10, BG53, BG57, BG09, C5 and c3.  They were die cut with the coordinating Celebrate the Season Die.  Two additional skates were cut from dark blue green card stock.  The layers were adhered with foam dots in-between each layer to add dimension.  The skate blades were coated with 3 D Crystal lacquer and coated with Crystal Gala Glitz.  

Stamp the poinsettia from Sparkling Poinsettia Cling Stamps with embossing ink and sprinkle with white embossing powder on vellum.   Lightly heat set from the under side in order to avoid scorching the vellum.   The poinsettia layers were lightly sponged with Memento Summer Sky Dy Ink.  
Die cut the poinsettias with the coordinating die.  Gently shape the flower using the Deluxe Flower Shaping Kit.   Adhere the layers of the flower and adhere with Designer Dries Clear Adhesive.  White pearls were applied to the center.    

The skate was embellished with sequins, the poinsettia and the colored skate from Celebrate the Season Cling Stamp set and die. 

This skate can be filled with treats and hung on an ornament holder or from the wall.  The possibilities are endless!


I hope you enjoyed this little project as much as I enjoyed creating it!  

I hoe you stop by and visit the fabulous "Celebrate the Season" Collection at Heartfelt Creations.   
It will be a real treat!   

Our fabulous design team's blog links are on my sidebar.  
I hope you give them a visit.   they have some fantastic creations!