Showing posts with label Celebrate the Season. Show all posts

Tuesday, July 26, 2016

Celebrate the Season - Winter Fun!


Hello and Welcome! 

It's time to share another project for Heartfelt Creations!   

This is week two of our "Celebrate the Season Collection" for July.    
I just love to  create projects that showcase the magical time of winter holidays! 
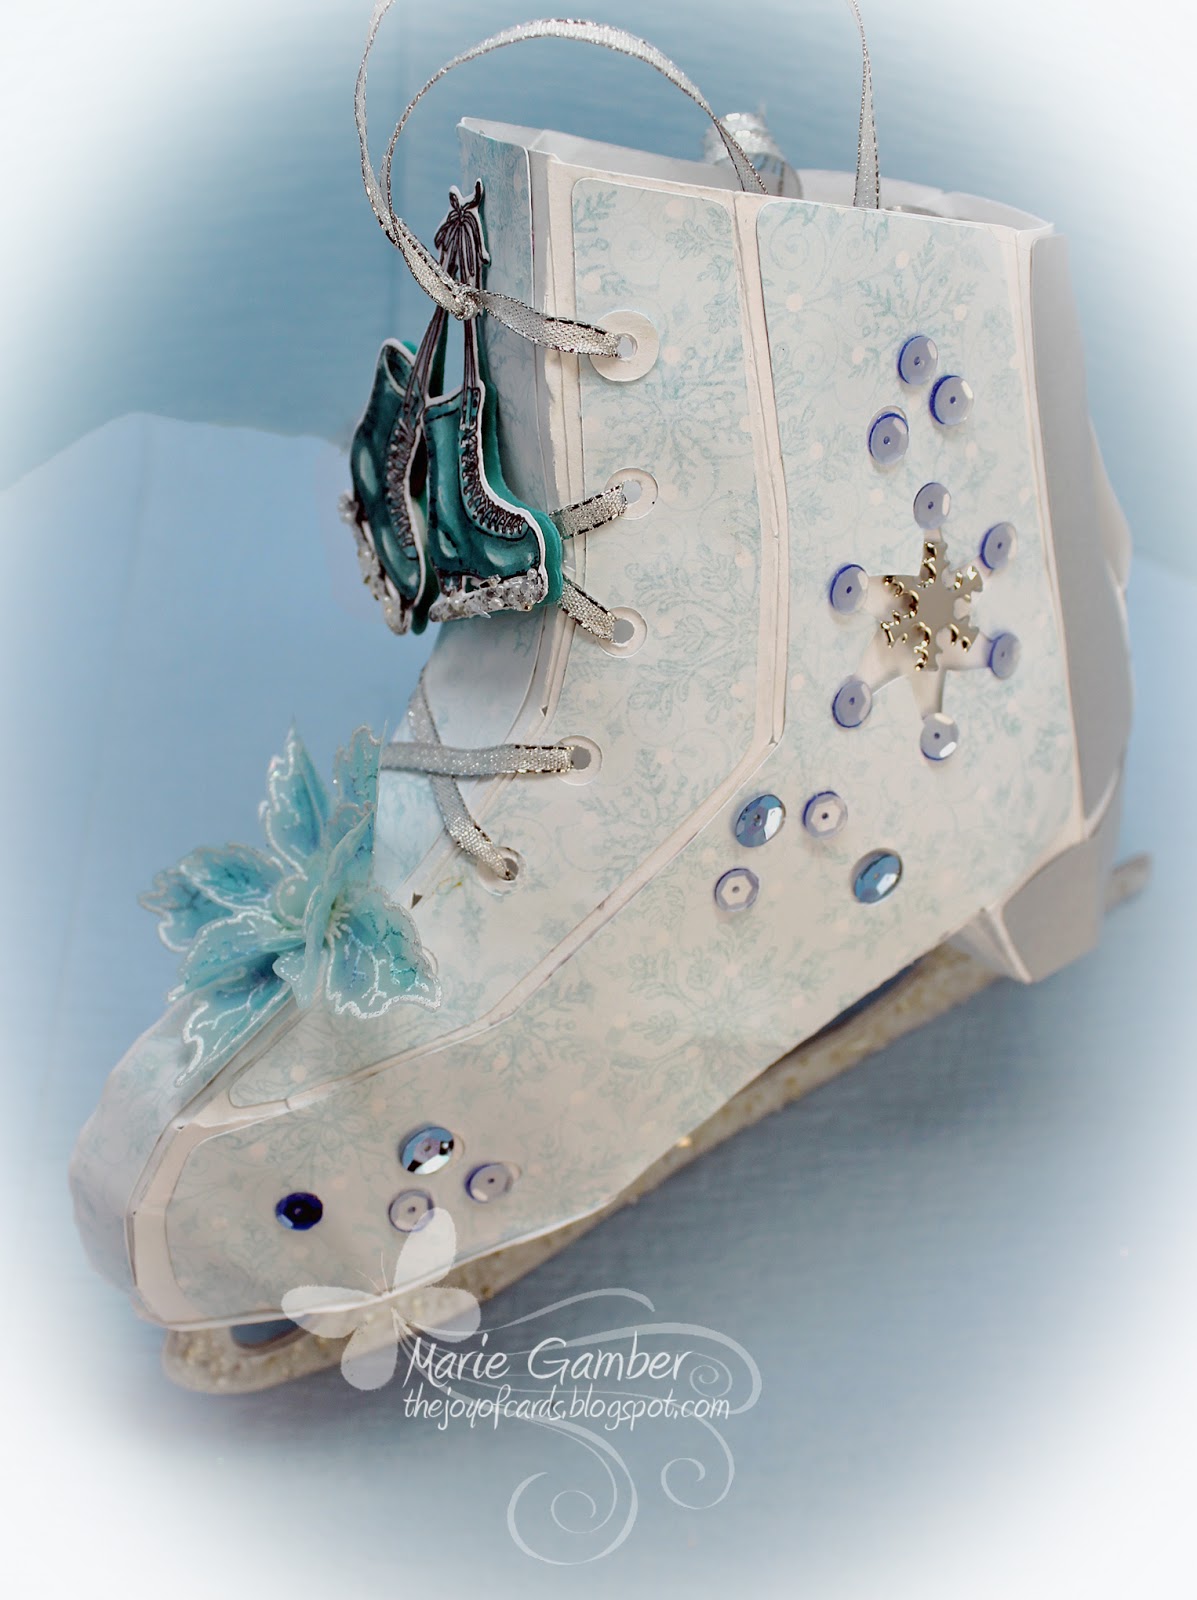
I created a skate to coordinate with the ice skate in the Celebrate the Season Collection.   I also added a poinsettia from the Sparkling Poinsettia stamp and die collection.    
I can almost hear the sound of the skates as they glide along the ice!   

Products Used
Celebrate the Season Paper Collection
Celebrate the Season Cling Stamp Set
Celebrate the Season Die
Sparkling Poinsettia Cling Stamp Set
Sparkling Poinsettia Die
Deluxe Flower Shaping Kit
Designer Dries Clear Adhesive
Metal Tip for Adhesive Bottles
Crystal Gala Glitz
White embossing powder
Memento Summer Sky Dye Ink Pad
Foam Dots


Other products
80 lb white card stock
Silver card stock
Copics alcohol ink markers
Skate SVG file from Winter Gazebo at svgcuts
Sequins
Silver ribbon
White pearls
Brads for the underside of skate
Versmark embossing ink pad
Heat tool
Snowflake brad for the side of skate
Electronic die cut machine


Instructions

 Cut the skate SVG file using an electronic die cutting machine.   Use white card stock for the base and Celebrate the Season Paper Collection for the designer layers.  The sole, heal  and blade was  cut from silver card stock.  The skate was assembled according to  the directions that came with the file.  The blades were lightly coated with 3 D Crystal Lacquer and coated with Crystal Gala Glitz.    

The skate was colored with Copic Alcohol ink markers with BG10, BG10, BG53, BG57, BG09, C5 and c3.  They were die cut with the coordinating Celebrate the Season Die.  Two additional skates were cut from dark blue green card stock.  The layers were adhered with foam dots in-between each layer to add dimension.  The skate blades were coated with 3 D Crystal lacquer and coated with Crystal Gala Glitz.  

Stamp the poinsettia from Sparkling Poinsettia Cling Stamps with embossing ink and sprinkle with white embossing powder on vellum.   Lightly heat set from the under side in order to avoid scorching the vellum.   The poinsettia layers were lightly sponged with Memento Summer Sky Dy Ink.  
Die cut the poinsettias with the coordinating die.  Gently shape the flower using the Deluxe Flower Shaping Kit.   Adhere the layers of the flower and adhere with Designer Dries Clear Adhesive.  White pearls were applied to the center.    

The skate was embellished with sequins, the poinsettia and the colored skate from Celebrate the Season Cling Stamp set and die. 

This skate can be filled with treats and hung on an ornament holder or from the wall.  The possibilities are endless!


I hope you enjoyed this little project as much as I enjoyed creating it!  

I hoe you stop by and visit the fabulous "Celebrate the Season" Collection at Heartfelt Creations.   
It will be a real treat!   

Our fabulous design team's blog links are on my sidebar.  
I hope you give them a visit.   they have some fantastic creations! 


Tuesday, July 19, 2016

Heartfelt Creations - Celebrate the Season Gift Bag


Hello and WELCOME! 

I have another holiday project for you today.    
Heartfelt Creations is showcasing Celebrate the Season Collection 
and I can hardly wait to share my gift bag with you.     
The color theme win the designer paper collection is just stunning. 
It's filled with gorgeous violet  and teal colors.   
I think you will really like them! 

Heartfelt Creations Products
HCDP1 - 268  Celebrate the Season Paper Collection
HCPC - 3747  Celebrate the Season Cling Stamp Set
HCD1 - 7104  Celebrate the Season Die
HCPC - 3745  Ornate Sleigh  Cling Stamp Set
HCD1- 7104  Ornate Sleigh  and Presents Die
HCPC - 3748  Gift Wrapped Presents Cling Stamp Set
HCD1 - 783   Essential Border Die
HCD1- 779  Regal Borders and Pocket Die
159723 Designer Dries Clear Adhesive
352854 Metal Tip for Adhesive Bottles
S173842  Scor-Pal Measuring & Scoring Board
DDOTS Double Dots 3D Foam Circles
12WHT White Gala Glitz
425125 3-D Crystal Lacquer

Other Products
White gift bag,  X-Press It Blending Card Stock, pearl, violet card stock, teal card stock,  double sided tape, Copic alcohol ink markers, 70% Alcohol, Textured Cloth, rhinestone bling, Star Dust Stickles


Instructions

Gift Bag - Trim the gift bag at the top to measure 9 inches in length.  My gift bag is 8 inches wide.  

Layers - Cut violet card stock to measure 8 3/4 in. x 7 3/4 in.   Select the designer paper with the poinsettias at the right hand corner from Celebrate the Season paper collection.   Trim the designer paper to measure 8 1/2 in. x 71/2 in.  Adhere the layers to the gift bag.  

A border from Essential Border die was cut from violet card stock and applied to the top of the gift bag.  Another  decorative border was applied to the top of the bag using Regal Borders and Pocket die.  Rhinestones were applied in-between the two border die cuts.   

Stamp Assorted presents from the Gift Wrapped Presents Cling Stamp Set. Stamp two sets of skates and one set of mittens from Celebrate the Season Cling Stamp Set.   You can use the Ornate Sleigh cling stamp set - However, I used the sleigh that was in the paper collection.   

Color the images with markers or sponge the images with the ink of your choice.  I colored my images with Copic Alcohol Ink Markers - BG10, BG53, BG57, BG09, C5, C3,  V01, V04, V06, V09, RV11, RV32, RV34, Y11, YR20, YR24.  I wanted to add texture to the mittens so I lightly wet a textured cloth with 70% alcohol and placed it flat over the colored  mittens for 3-4 seconds.  It is  best to place your palm over it rather than you fingers.  When the image dries, the textured pattern pops from the coloring and it looks texturized. 

The images were die cut.   The Ornate Sleigh die fit the image from the paper collection perfectly.   Using violet and teal card stock,  die cut two layers each for the two sets of skates and mittens.  Repeat the process for the gifts.   Apply foam dots in-between the two layers  of card stock and the colored layer for each image.   This will give them a lot of fun dimension.    Adhere the sleigh, skates, mittens and gifts to the gift bag.    

Sentiment - The sentiment,  "A gift of love" was cut from the paper collection and layered on violet card stock.  

The blades of the skates and sled were adhered with Crystal Lacquer and topped with White Gala Glitz.  Star Dust Stickles were applied to the center of the poinsettias.  '

And now, the Holiday Gift Bag is now ready for someone special.  


I hope you enjoyed this and will check out the 
wonderful projectsfrom all my team mates.   
You can find their blog links on my sidebar!     

Have a wonderful day 
and come back soon!   


SaveSave

Tuesday, July 12, 2016

Heartfelt Creations - Celebrate the Season Release


Hello and welcome 
to

I am so glad you could join me today for our new release for July.   - Although many of you are experiencing super hot temperatures -  I want to transport you to that wonderful winter season when children (young and old) pull out their skates and enjoy the bite of snowflakes on their nose!     You got it!   It's Christmas in July with our new Heartfelt Creations Collection - Celebrate the Season!


Heartfelt Creations Products

Celebrate the Season Paper Collection
Gift Wrapped Presents Cling Stamp Set
Celebrate the Season Cling Stamp Set
Ornate Sleigh and Presents Die
Celebrate the Season Die
Sparkling Poinsettia Cling Stamp Set
Sparkling Poinsettia Die
Express-O Yourself Prills
White Gala Glitz
Deluxe Flower Shaping Kit
Memento Tuxedo Black Dye Ink
Designer Dries Clear Adhesive
Metal Tip for Adhesive Bottles
3 D Crystal Lacquer

Other Products
120 lb. white card stock
80 lb. violet card stock
double sided tape


Instructions

Create a 4 1/4 inch x 5 1/5 inch card base and cut a violet card stock  base layer at 4 inches x 5 1/4 inches. Reserve the remainder of the card stock.   Select the beautiful  designer mat from Celebrate the Season Paper Collection.   I used the one with the little poinsettia in the bottom right hand corner.   The layers were applied with double sided tape. 

And now for the focal images!  I wanted to create some dimensional images that would be able to go through the mail.   Here is how I did it.  Stamp the mittens,  skates and poinsettia on Copic compatible paper.  I used X-Press It Blending Card.   The colors I used for the images are - V09, V06, V04, V01, C1, C3 and C5.  

 I wanted to add texture to the mittens.  70% alcohol was applied to some textured cloth.   The cloth was placed  on top of the colored  mittens with my palm over it for 3 -4 seconds.  When  the image dried,  the texture from the cloth popped  up on your colored image.  Have fun trying this technique with a variety of clothes with various textures on your other projects.  

Die cut the colored images.   Now, use  the reserved dark violet card stock that was used on the base layer to die cut two skates and two mittens.   Layer the skate die cuts with foam dots in-between each layer.    This will allow the skates to pop up from the rest of the card.  I love dimension and this will definitely give dimension!  

The poinsettia was shaped using the Deluxe Flower Shaping Kit.  Express-O Yourself Prills were added to the center of the poinsettia.   

For a little added pop -   3-D Crystal Lacquer was applied  to the skate blades and topped off with  White Gala Glitz.   The Gala Glitz  is chunky and really gives the appearance of snow and ice crystals  on the blades.  I love this and have been going crazy using it on all my cards. 

Adhere the skates, mittens and poinsettia with foam dots and  Designer dries Clear Adhesive and enjoy!

Thank you for stopping by.  I appreciate your visit!  Don't forget to check out the creations from my fabulous team mates!