
Hello and welcome!
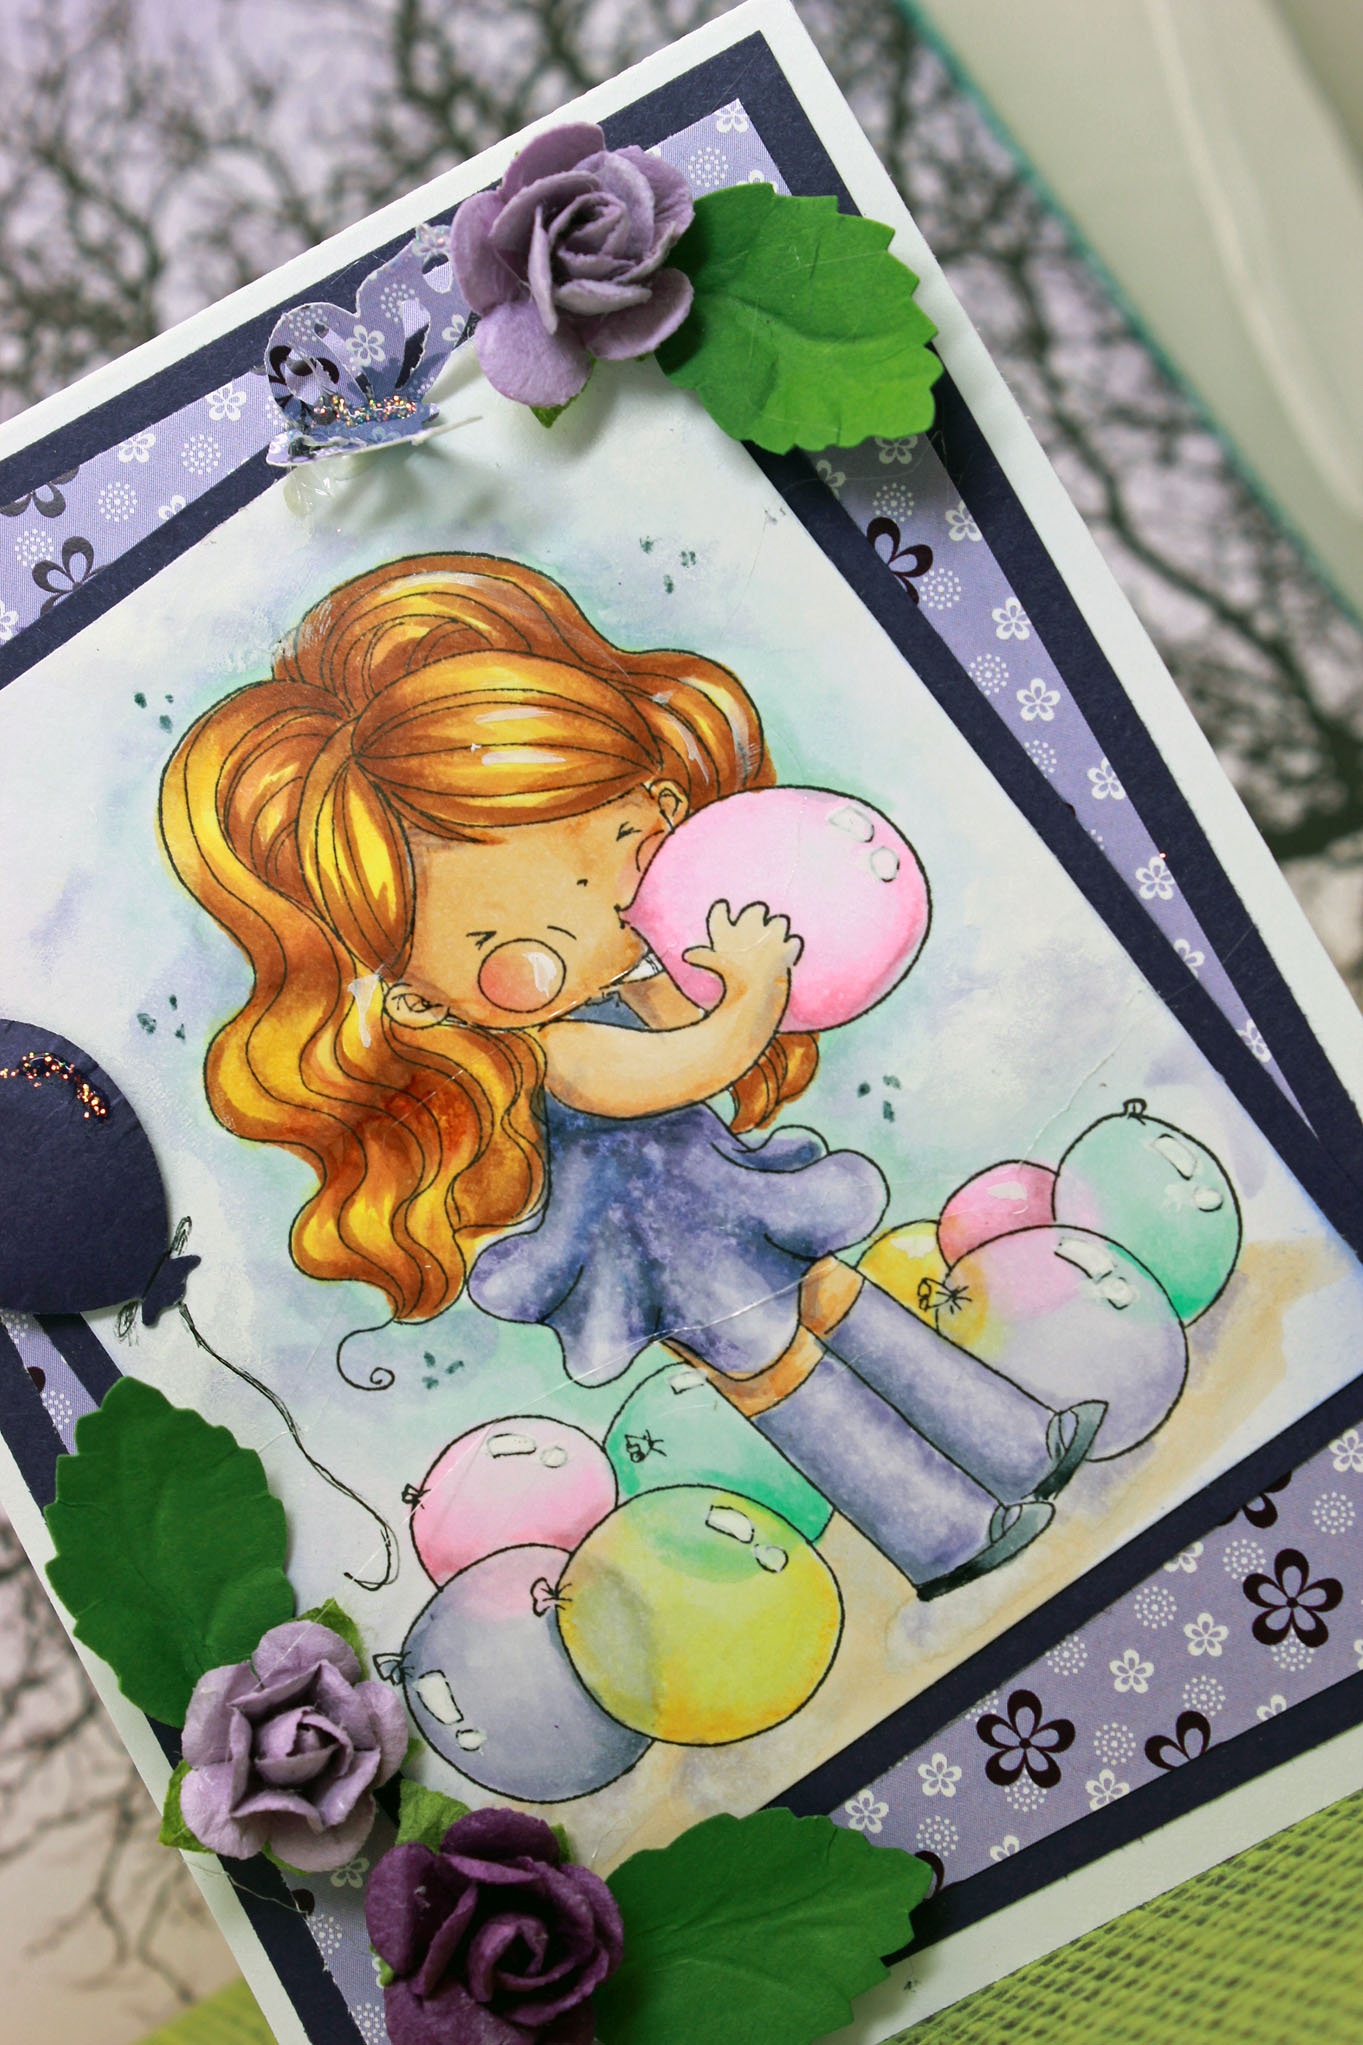
I have a mini tutorial for you today on coloring transparent balloons. Balloons always remind me of birthdays and happy times. I remember one birthday when my parents gave me a surprise birthday party and balloons were hanging from all the trees in the yard. The memory still brings a smile to my face.
I have a mini tutorial for you today on coloring transparent balloons. Balloons always remind me of birthdays and happy times. I remember one birthday when my parents gave me a surprise birthday party and balloons were hanging from all the trees in the yard. The memory still brings a smile to my face.
Supplies
Paper: X-Press It Blending Paper (X-Press)Stamp: Lisbeth & Balloons (Little Darlings)
Copic Alcohol Ink Sketch Markers (.too Corp)
Copic Colorless Blender (.too Corp)
Copic Opaque White Ink (.too Corp)
Copic Multiliner - Grey 0.05 mm (.too,Corp)
Memento Black Tuxedo Ink (Tsukineko)
Tim Holtz Shaded Lilac Distress Ink (Ranger)
Double Sided Adhesive (Crafter's Companion)
Balloon Punch
Butterfly Punch
Rose Embellishments
Rose Leaf Punch
Copic Markers Used
RV000), RV000, RV23, RV93
BV0000, BV000, BV20, BV23
Y0000, Y000, Y11, Y21
BG0000, BG000, BG10 (my favorite :D)
Balloon cast shadows: BV00
Skin Tones: E50, E21, E53, BVoo, R20Hair: E99, E97, Y21, Y11Shoes: C3, C5, C7Dress: BV0000, BV000, BV20, BV23, Colorless Blender to texturizeBackground: BG10, BV000, BV0000, Colorless Blender,
Copic opaque white. and Copic gray multiliner

1. Cut 11 in x 8.5 inch paper in portrait orientation and score at 4.25 inches. This will make two card bases.
2. Scor and fold the card base at 5.5 inches. The fold will be on the top. This will fit a standard 2A envelope. Tip: Place a piece of paper over the top of your card stock before running the bone folder over the top. This will prevent unwanted marks on your card base.
3. Cut the base layer at 5.25 in x 4 in.
4. Cut designer paper at 5 in x 3.75 in.
5. Stamp your focal image on paper that is compatible with your alcohol ink markers. I used X-Press It for this project but I often use Cryogen, as well.
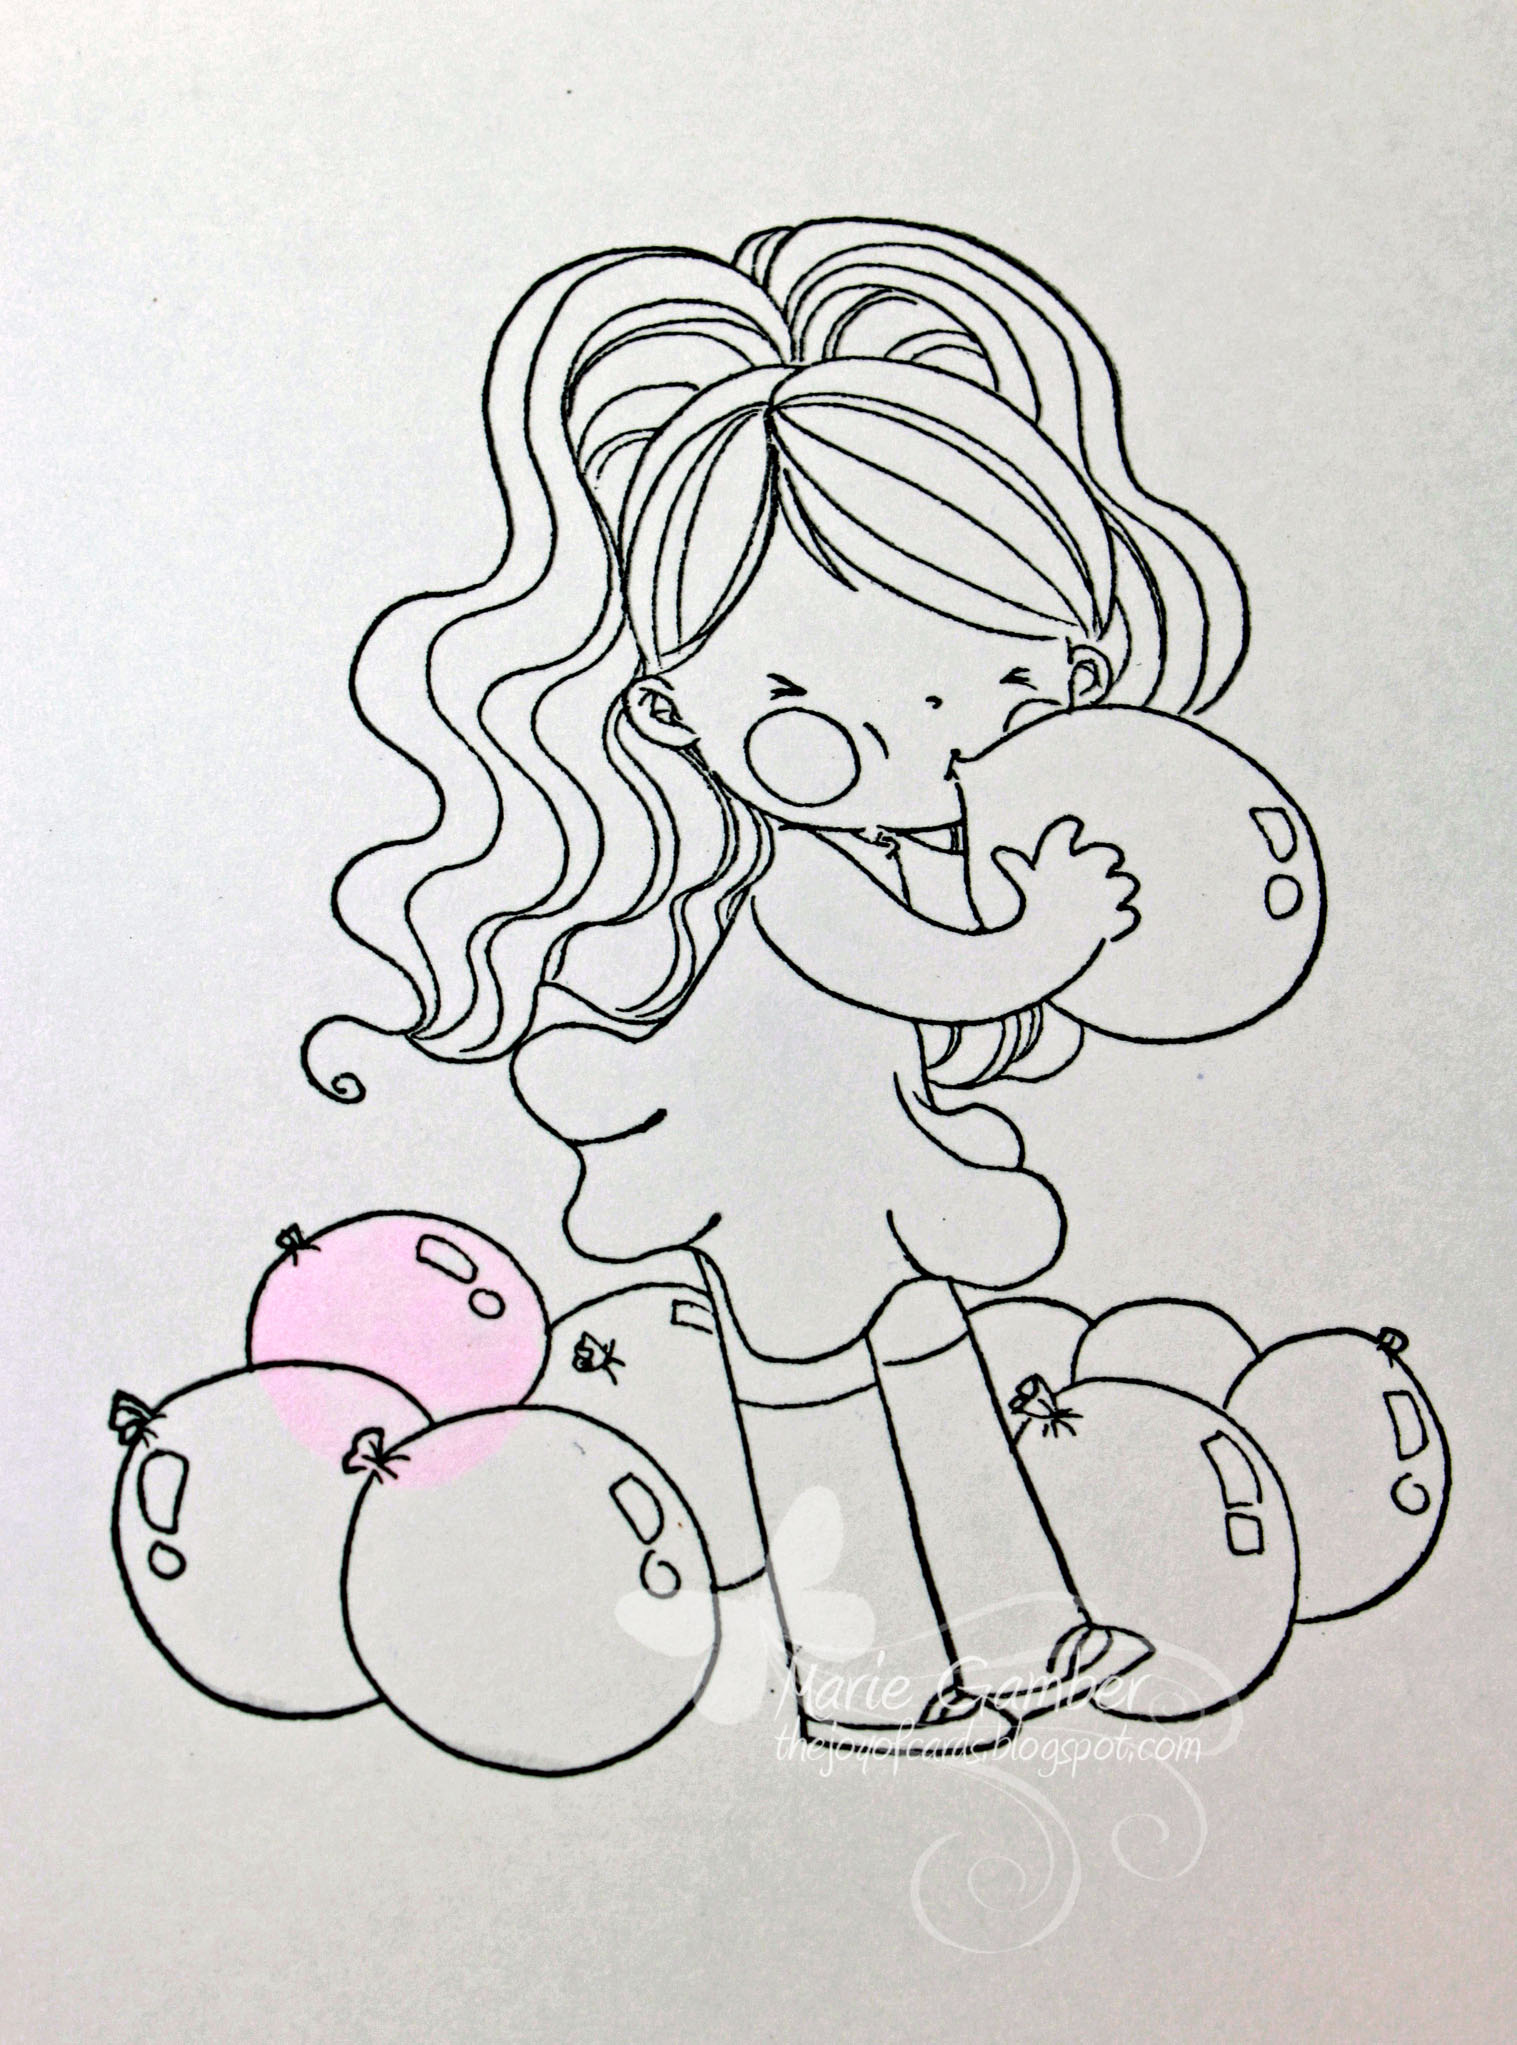
6. The first balloon was colored with RV0000. Extend the balloon so it overlaps into it's neighboring balloon. Make the balloon a complete circle.
7. BV0000 was applied in the same manner to the second balloon. Color the complete circle of the balloon. See the transparency? You can see the balloons in the back showing through the transparent balloons.

8. BG0000 was applied the a third balloon.

9. Y0000 is applied to the balloon in the foreground. See how you can see through it and identify the balloons behind?

10. Each color is lightly re-applied over the top where they overlap. Apply RV0000, BV0000, BG0000 and Y0000.
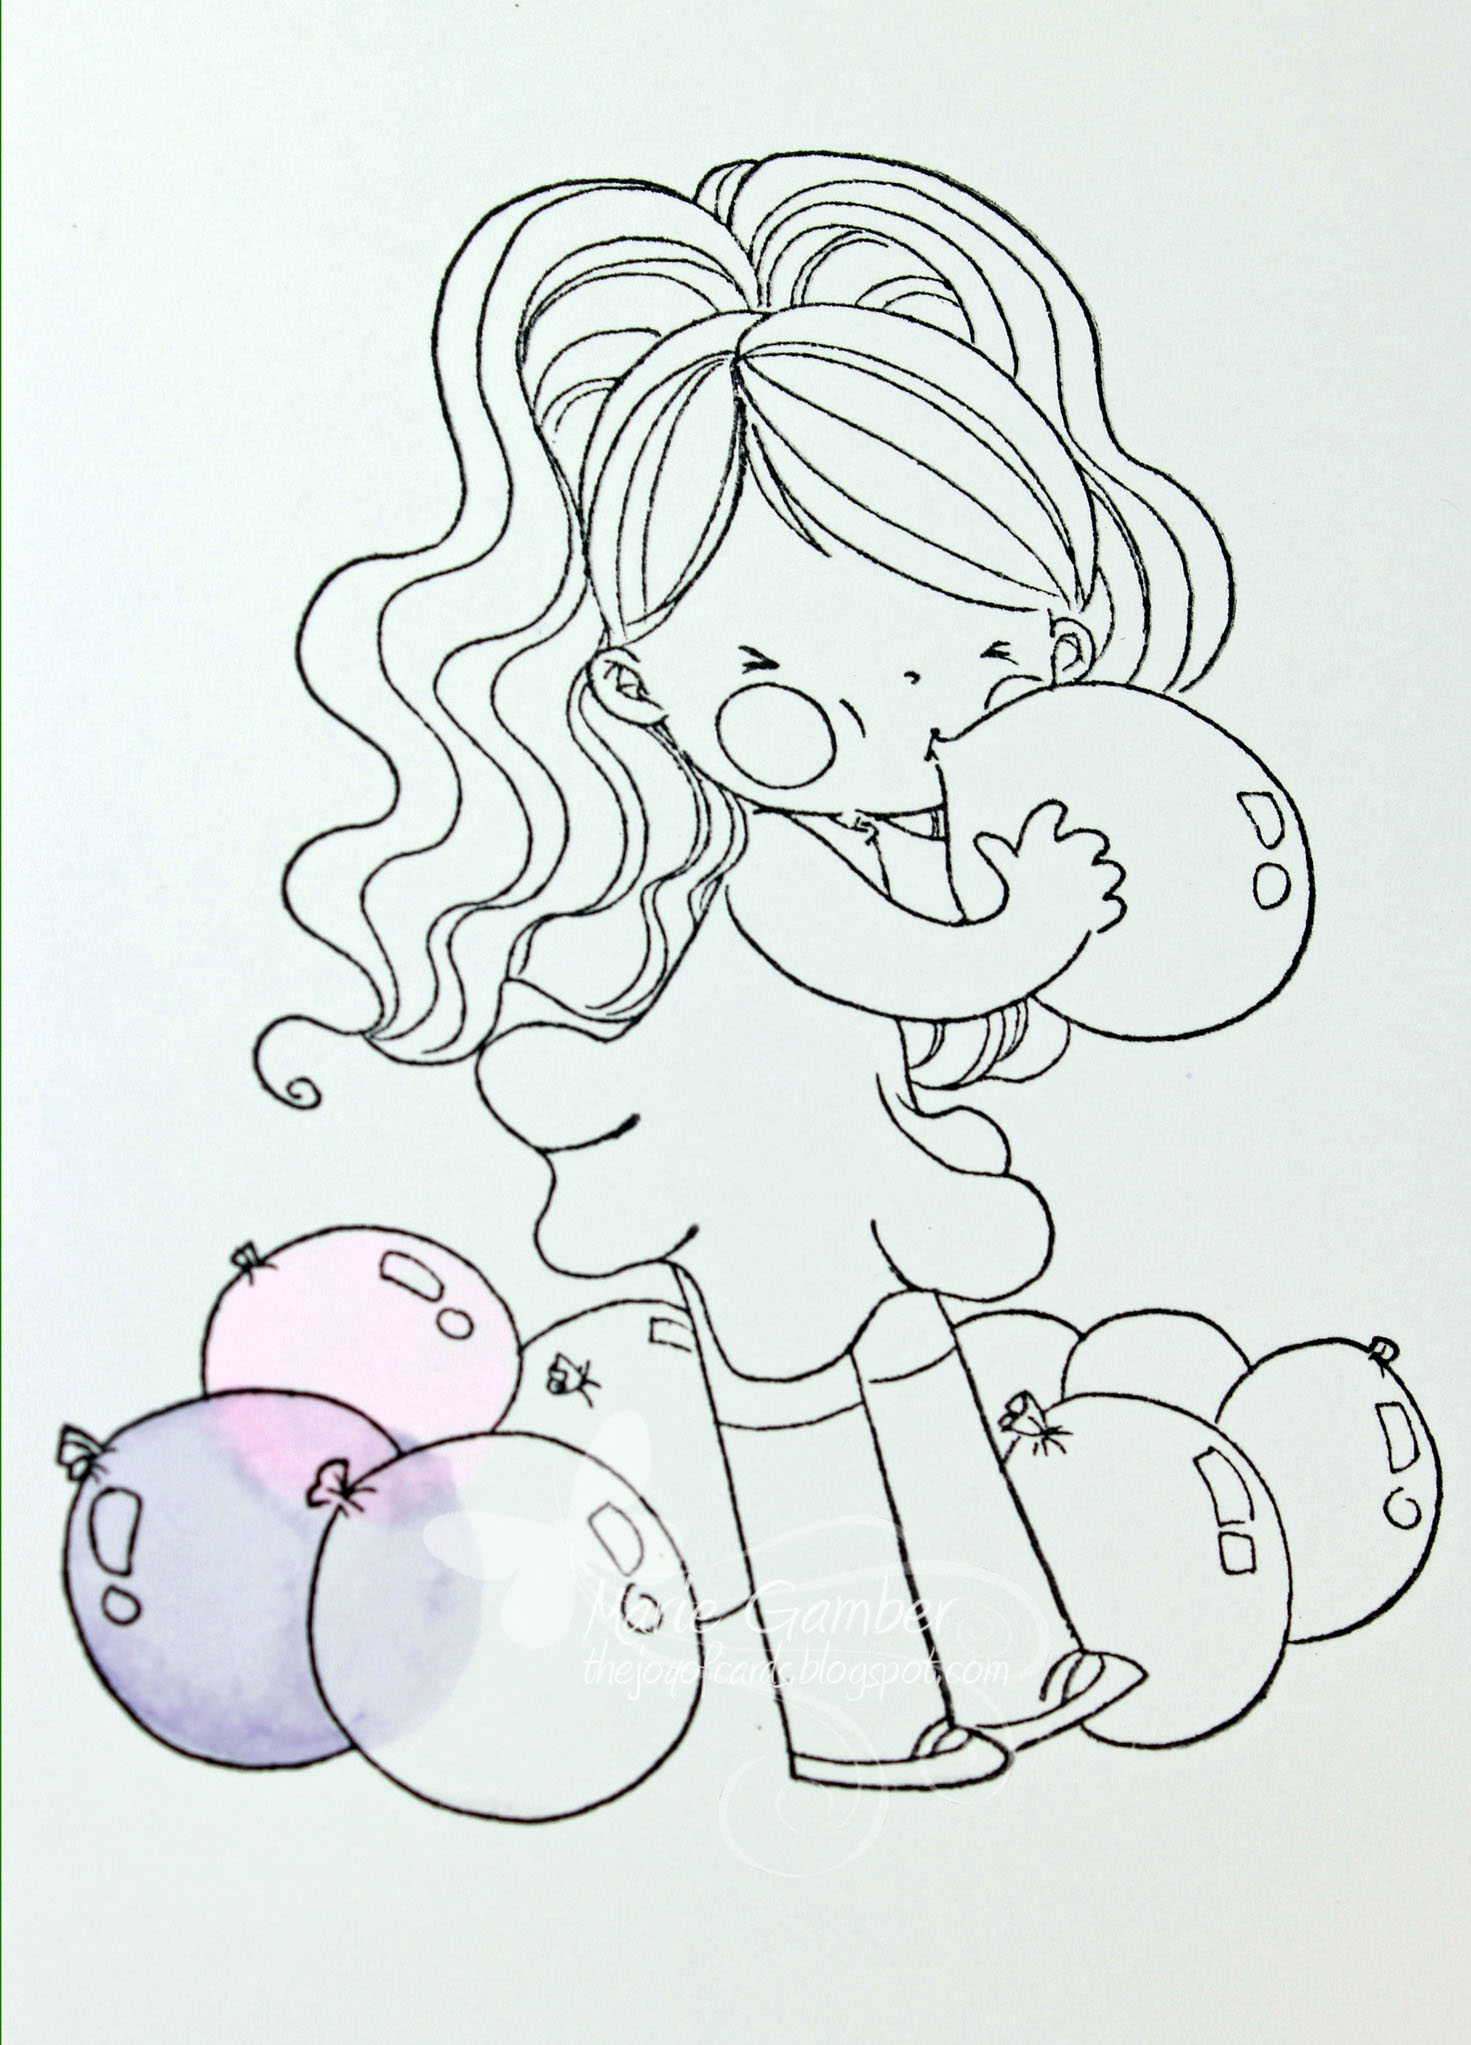
 11. I added shadow colors to the balloons the give them dimension.Use the flicking method and blend your shadow toward the highlight.
 RV000), RV000, RV23, RV93
BV0000, BV000, BV20, BV23
Y0000, Y000, Y11, Y21
BG0000, BG000, BG10 (my favorite :D)

12. The process was repeated for the other balloons. Just have fun with it. Take one balloon at a time and don't let it overwhelm you! You can do it! :D

13. The image was grounded with E30 and cast shadows were applied with BV00.
Skin Tones: E50, E21, E53, BVoo, R20
Hair: E99, E97, Y21, Y11
Shoes: C3, C5, C7
Dress: BV0000, BV000, BV20, BV23, Colorless Blender to texturize
Background: BG10, BV000, BV0000, Colorless Blender, Copic opaque white. and Copic gray multiliner
Skin Tones: E50, E21, E53, BVoo, R20
Hair: E99, E97, Y21, Y11
Shoes: C3, C5, C7
Dress: BV0000, BV000, BV20, BV23, Colorless Blender to texturize
Background: BG10, BV000, BV0000, Colorless Blender, Copic opaque white. and Copic gray multiliner
13. The layers were adhered to the card base and the focal image attached. The card was embellished with mini roses and a punched butterfly.

***
Disclosure: My coloring techniques were learned from Suzanne Dean, CMC
and any bad habits I learned on my own!
and any bad habits I learned on my own!
I am linking my card with the following wonderful challenges:
- Papertake Weekly Challenge: Anything Goes
- Top Tip Tuesday - Cute
- Divas By Design - Anything goes
Thank you so much for stopping by and viewing my tutorial. I hope you come back soon for more mini tutorials!
this is gorgeous Marie.
ReplyDeletethanks for the tutorial.
gr karin
Thank you so much Karin for stopping by and for your comment. I am glad you liked my tutorial :D
DeleteHugs,
Marie
Hi Marie oh this is such a lovely image and colouring, I love how you made the balloons look translusant :)
ReplyDeleteHugs
Vic x
Thank you so much Vicki! I love coloring transparent objects :D
DeleteHugs,
Marie
Great Little Tutorial! A really sweet Card and just a few Embellies to finish her of Perfectly! Enjoy your Week!
ReplyDeleteThank you Jennifer. It was fun! Thank you for the visit! :D
ReplyDeleteSuper card with tutorial. I learned a lot. Your technique and explanation is great. Thank you for so generously teaching me via blogland.
ReplyDeleteHI Marie,
ReplyDeleteThis looks fab. Such a lovely card & great tutorial. Thanks for joining us at Passion For Promarkers this week.
Hugs,
Andie xx
What a cute card, and fantastic effect on the balloons . Thank you for joining us over at Top Tip Tuesday Challenges. Good luck, Hugs Samantha K x
ReplyDeleteGorgeous card such a brilliant tutorial too! thanks so much for sharing it! Sorry my comment is a little late!
ReplyDeleteCheck out the TTT blog!!
Thanks for Playing along with us this time at Top Tip Tuesday Challenge, hugs Samantha :0)