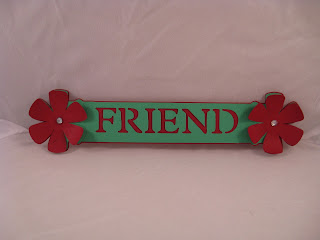
Good afternoon! Today is my last day off before I go back to 4 days of 12 hour shifts in the Emergency Department. I wanted to spend some time crafting.... Is there such a word? Definitely for those us who love, love, love to spend time in our craft rooms. I thought I would post my first tutorial today - making end caps using the Cricut Plantin SchoolBook cartridge. It would make a very cute title for a scrapbook page or a sign for the kids door. I even think it would look cute on a card, gift or even on the front of an envelope. Can you imagine presents under the Christmas tree with these as name tags? How fantastic! The possibilities are endless!

- Plantin SchoolBook cartridge
- You will need two different colors of card stock
- Brads or embellishments of your choice.
Load the paper you want to be the top layer into your Cricut machine.
Select End Caps
Select the flower image. Row 5-5
Shift and type phrase or word
Select Shift End Cap
Select flower image Row 5-5
Cut
Load the shadow colored card stock into your Cricut
Change End Cap to End Cap Shadow
Select repeat last
Cut
This is what it looks like when layered
I cut a couple flowers a little larger to add additional layerand interest to the flowers.
This is my finished product. It can then be added to just about any project. There is no limit to what you can find to do with this little treasure! I hope you enjoyed this tutorial. Feel free to leave a comment. I am very new at blogging and I am always in a learning mode. Thank you for viewing my site.
Marie


NICE TAG!
ReplyDelete