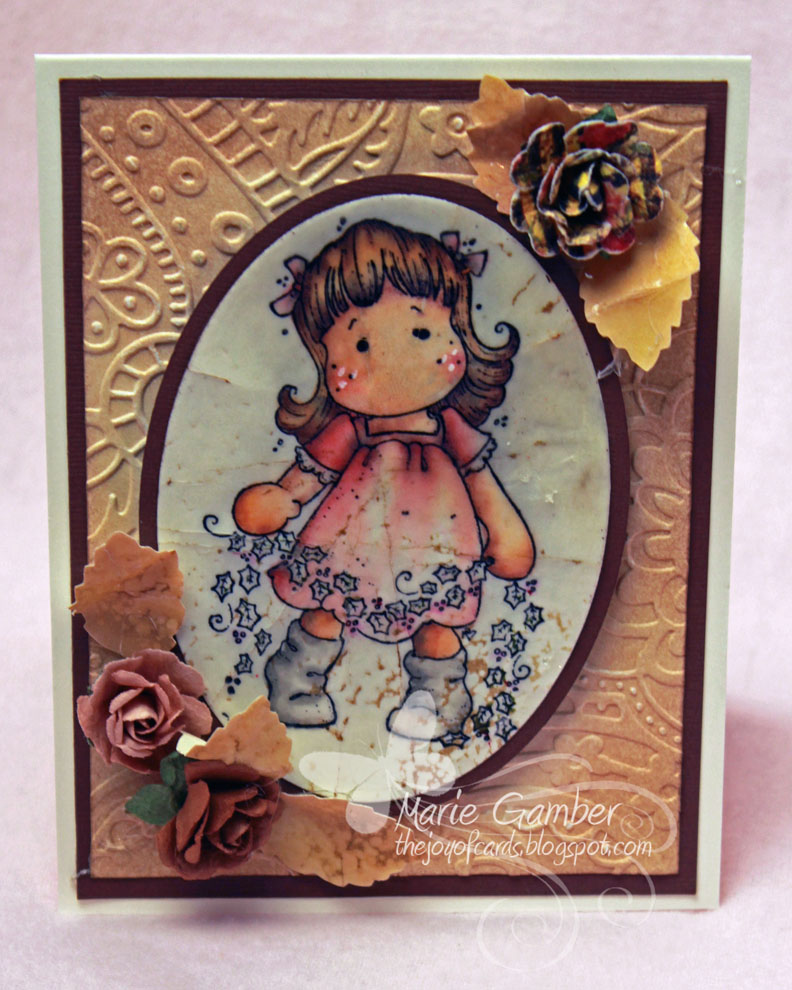
Hello everyone and happy Tuesday! The Holiays are moving along quicly and I want to
share a card I created for you using
a rubber stamp from Magnolia called "Holly Tilda". MarkerPop has
so many cute Magnolia images that work well with this technique.
a rubber stamp from Magnolia called "Holly Tilda". MarkerPop has
so many cute Magnolia images that work well with this technique.
I loved this stamp the minute I set my eye on it and I have been waiting for an opportunity to
use this adorable Holiday image.
use this adorable Holiday image.
Techniques:
- Distress inking using Copic Alcohol ink Markers.
- Distress Ink sponging
- Cracked glass with Ultra Thick Embossing Enamel
Ink Used:
- Skin Tones: Copic Sketch Markers - E13, E11, E00, R20, Colorless Blender
- Hair: Copic Sketch Markers - E25, E31, YR20, W3, Colorless Blender
- Dress: Copic Sketch Markers - R21, R22, W3, Colorless Blender
- Shoes: Copic Sketch Markers - W3, W1, W0, Colorless Blender
- Background (focal image): Copic Sketch Markers - W00
- Background mat layer: Tim Holtz Distress ink (Ranger) Antique Linen and Tattered Rose
- Leaves of flowers: Tim Holtz Distress Ink (Ranger) Antique Linen and Tattered Rose
- Holy leaves and berries: Tim Holtz Distress Markers (Ranger) - Peeled Paint and Fired Brick
- Base Layer : Tim Holtz Embossing Ink (Ranger)
I wanted to give the impressiion of an old vintage holiday card so I decided to use a
Swedish technique of Distress Inking with my Copic Markers.
The technique uses very light colors and allows "pooling" of color in the corners.
The pooling has a vintage look by adding W3 on top of my R21.
Swedish distress inking has "ALOT" of white or "lightness" so I
used my colorless blender to blend out my R20.
I love to create my own background layers.
I sponged Tim Holtz Distress Ink over my paper starting with Tattered rose
and then Antique Linen. I then embossed the paper for texture.
I sponged Tim Holtz Distress Ink over my paper starting with Tattered rose
and then Antique Linen. I then embossed the paper for texture.
The Cracked Glass technique was used to add more of a vintage look to the image.
I applied clear embossing ink to the entire image and then coated it with Ultra Thick Embossing Enamel.
I melted the embossing enamel using my heating tool.
The image was placed in the freezer for about 15 minutes.
I applied clear embossing ink to the entire image and then coated it with Ultra Thick Embossing Enamel.
I melted the embossing enamel using my heating tool.
The image was placed in the freezer for about 15 minutes.
I removed the image and bent it in various directions while it was still frozen, allowing the image to
actually "crack". I then sponged Antique Linen over the image to accent the cracked glass look.
I think this gives the impression of an old picture.
I repeated the Cracked Glass technique with some of my leftover
base layer paper that I sponged. I then cut leaves out for my flowers.
base layer paper that I sponged. I then cut leaves out for my flowers.
I am linking this card with the following challenges:
Make It Monday - Anything goes
Inspire Me Friday - Anything Goes
Through The Craftroom Door - Anything Goes
Divas By Design - Red
I hope you enjoyed this card and the different techniques. Distress inking is always one of my favorite techiques.
Check out our arkerPop Blog Challenge #13 that will be running for the next two weeks.
The theme is to use deep, rich darker shades.
The theme is to use deep, rich darker shades.


This is gorgeous...Thanks for playing along at Divas by Design this week.
ReplyDeleteWendy xx
Adorable card and image Marie. Saw this on MIM..Loz
ReplyDeleteLove your card Marie...your coloring is amazing, as usual!
ReplyDeleteLove your card and your coloring skills are impeccable Marie. Thanks for joining us at Make It Monday.
ReplyDeleteWhat an artistic piece, Marie--it does look like an old photo! Love the coloring and the techniques you used--that embossing of the background is perfect! :^)
ReplyDeleteHugs, Penny
Wow, aren't I the lucky one who gets to comment on your beautiful card!!!
ReplyDeleteYou never cease to amaze me Marie, on so many different levels!
This card is very unique and I love your the technique, you certainly achieved the look you were going for.
Thanks for sharing your technique and this gorgeous card with us at TTCRD. Merry Christmas and Happy New Year my friend, miss you. :)S
Sweet little image and of course, amazing coloring.
ReplyDeleteHi Marie
ReplyDeleteI saw you on MIM and came to take a closer look. Your card is super gorgeous. Love all the techniques you used to create this beauty especially the cracked glass one.
Michaela xx
I saw you on MIM and came to take a closer look.
ReplyDeleteOh WOW, your card is just heavenly and I absolutely adore everything about it!
hugs lorianna
So very vintage & lovely & old fashioned looking. The cracked glass was perfection on this image. Loved your background too, and thanks for explaining the how-to's. Great card and TFS
ReplyDeleteGorgeous with your beautifully coloured Tilda. So glad I came in for a closer look on MIM. xx
ReplyDeleteFabulous card and colors marie. Visiting from MIM..Loz
ReplyDelete