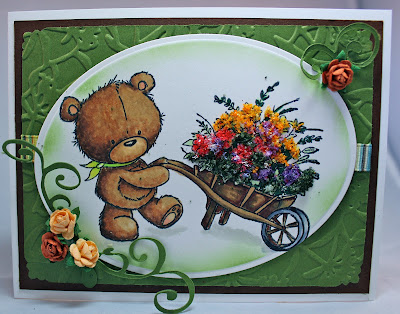
Just For You!
Year 2012! WOW!
Happy New Year to all my friends in cyber-land! I have some wonderful news. I feel so honored to be selected to serve on the
iCopic Design Team. It has been hard to keep this a secret.... but I can finally shout it out and I am "bursting with pride"! The community is filled with tenthusiastic, talented artists and I feel I learn so much from them. I am ready to jump in and get started.
ICopic Design Team!
My first card for
iCopic is a cute little image from
Wild Rose Studio called Milton with Barrow. Isn't he just the cutest little guy? There are some exciting changes that will be happening at our
iCopic Lover Blog. The design team members will each rotating days to post fun and creative cards and projects for you to enjoy. There will be a different focus each day. My first post will was today, Tuesday and I was to was to share a tip or trick that has to do with Copics or stamping. So, what did I do?........I used
Copic Alcohol Ink Markers for my focal image and I used
Copic Various Ink Refills to show you a quick and easy tip for making a product that looks similar to Flower Soft. You know how it is when you want to use some Flower Soft and you run short on supplies or need a specific color to coordinate with your card. Presto! Read on!
The image was stamped with
Tuxedo Black dye ink by Tsukeniko on
Cryogen paper from Curious Metallic, Inc. My highlights came from the right side. I selected this side because I wanted attention drawn to the flowers. I also made the flowers at the top the lightest in order to be consistent with my light source.
These are the Copic markers I used to color Milton. E59 will be the darkest of the shadow area. E31 will be the highlight. E31 and E50 will be used around the nose.
The bear was completely colored with E31 in order to avoid having any white spots in your finished image. The darkest shadow area was colored sparingly with E59. A dotting method was used to apply the color in order to achieve texture in the fur. E25, E35, E33 and E31 was applied. The majority of the image was colored with E35 and E33. R20 was added to the inner ear and the little pads on the bottom of Milton's little foot. E31 was lightly applied over the top of the R20. The muzzle area around the nose was colored with E31 and E50.
The scarf was colored with YG13 and YG01. For the wheel I used C0, C3, C5 and C7. The barrow was colored with E29, E27, E44 and E31. I just selected some colors to use on the flowers in order to get a feel for where I wanted to use my texture. There was no need to shade the flowers because they were covered with colored styrofoam. Adhere the layers of the card at this time. It is important that you complete this step before applying the colored styrofoam.
Tip of the Day: Adding texture to parts of the focal image can add interesting and make the card memorable. One way to add texture is to add Flower Soft. If I do not have the correct color of Flower Soft on hand, I take two pieces of styrofoam and rub them together to create fine granules. Color the styrofoam granules with a drop or two of
Copic Various Ink Refills. You only need to make the amount to need. No storage and no waste!
This is a sample of the styrofoam I colored with Copic R17. It is important to allow the styrofoam to throughly dry. Flower Soft Adhesive or Elmers Glue was applied to the image, one color at a time. Gently press the styrofoam down and allow to dry. This process can be repeated with as many colors as you choose to use. Just think... this can be coordinated with all your Copic markers! You just have to add a drop or two of any
Copic Various Ink Refill to the styrofoam granules and thoroughly mix together. You can also try to mix the granules and producing a medley of color. For my card, I wanted to be consistent with my light source. The styrofoam texture will not reflect light well so I chose to trick the eye by positioning my brightest color at the top where the light source would shine.
This is the finished card. I hope you enjoyed the tutorial. Play with the
Copic Various Ink Refills and see what creative projects you can come up with!
I am interring this card in the following challenges:
Thank you for stopping by! Please come back soon and from my home to yours - Have a safe and happy NEW YEAR!


